
用 CADisplayLink 實作果凍般的彈性動畫
想要讓手繪風格的動畫真正貼合螢幕更新節奏,CADisplayLink 會比一般計時器可靠得多。本文用它做一個帶果凍變形效果的元素移動動畫。
CADisplayLink 是什麼
Apple 文件的定義是:CADisplayLink 是一個計時器物件,可讓應用程式把繪圖與螢幕的刷新率同步。
和 NSTimer 相比,它的關鍵差異在於:系統每一次準備渲染畫面時,註冊的方法都會被呼叫,因此動畫不會因為計時器與刷新週期錯位而出現掉格,流暢度自然有保障。
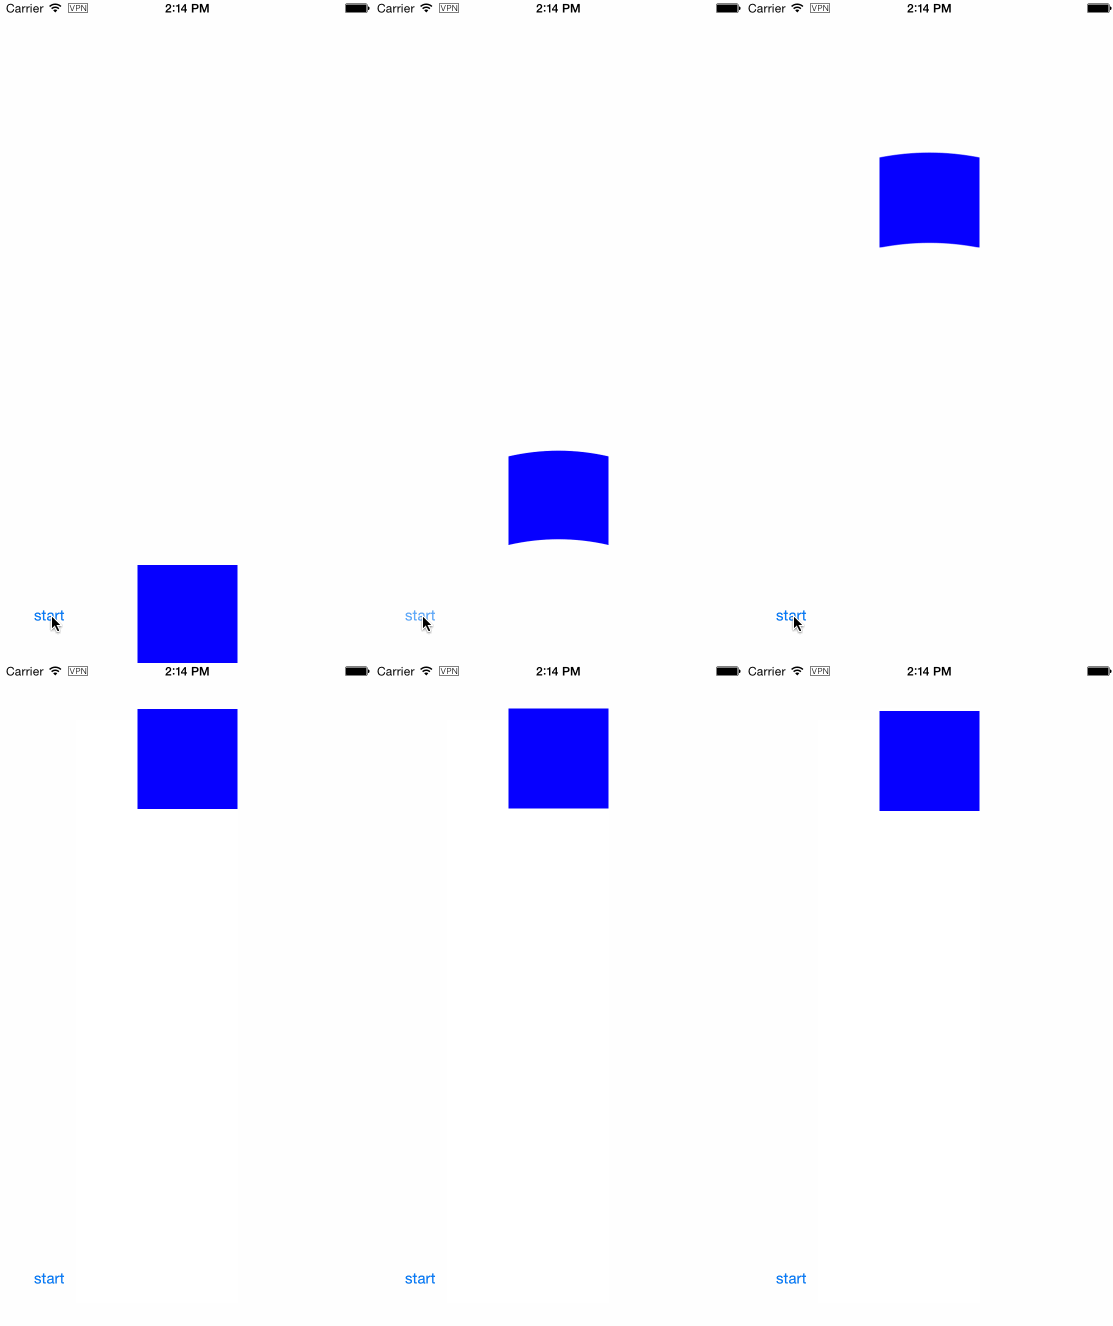
動手做:會變形的方塊
目標是在移動一個 view 的過程中,讓它的上下邊緣像果凍一樣被拉長又回彈。我們把全部邏輯封裝進一個名為 BlockView 的自訂 view 裡。
先在類別中宣告 displayLink 屬性:
@property (strong, nonatomic) CADisplayLink *displayLink;
動畫開始時建立 displayLink 並指定每一幀要呼叫的方法,記得把它加入目前的 run loop:
- (void)startAnimation {
    if (self.displayLink == nil) {
        self.displayLink = [CADisplayLink displayLinkWithTarget:self selector:@selector(tick:)];
        [self.displayLink addToRunLoop:[NSRunLoop currentRunLoop]
                                forMode:NSDefaultRunLoopMode];
    }
}
動畫結束則要讓它失效並清空,否則 displayLink 會持續持有 target:
- (void)completeAnimation {
    [self.displayLink invalidate];
    self.displayLink = nil;
}
每一個 tick 只需要標記重繪,因為形狀會隨位置改變:
- (void)tick:(CADisplayLink *)displayLink {
    [self setNeedsDisplay];
}
真正的繪製放在 drawRect: 裡。這裡有個重點:動畫進行中的位置資訊必須從 self.layer.presentationLayer 取得,直接讀 layer 只會拿到最終值。
- (void)drawRect:(CGRect)rect {
    CALayer *layer = self.layer.presentationLayer;
    CGFloat progress = 1 - (layer.position.y - self.to) / (self.from - self.to);
    CGFloat height = CGRectGetHeight(rect);
    CGFloat deltaHeight = height / 2 * (0.5 - fabs(progress - 0.5));

    CGPoint topLeft     = CGPointMake(0, deltaHeight);
    CGPoint topRight    = CGPointMake(CGRectGetWidth(rect), deltaHeight);
    CGPoint bottomLeft  = CGPointMake(0, height);
    CGPoint bottomRight = CGPointMake(CGRectGetWidth(rect), height);

    UIBezierPath *path = [UIBezierPath bezierPath];
    [[UIColor blueColor] setFill];
    [path moveToPoint:topLeft];
    [path addQuadCurveToPoint:topRight controlPoint:CGPointMake(CGRectGetMidX(rect), 0)];
    [path addLineToPoint:bottomRight];
    [path addQuadCurveToPoint:bottomLeft controlPoint:CGPointMake(CGRectGetMidX(rect), height - deltaHeight)];
    [path closePath];
    [path fill];
}
progress 代表目前動畫的相對進度,deltaHeight 則決定上下邊緣被拉開的幅度:在 0.5 附近最大,往兩端收斂為 0,再用兩條二次曲線把形狀畫出來,果凍感就出現了。
啟動動畫
最後只要呼叫 startAnimationFrom:to:,並搭配一個帶彈性的 spring 動畫讓位移本身有回彈手感,在 completion 中收尾:
[self.blockView startAnimationFrom:from to:to];
[UIView animateWithDuration:1 delay:0 usingSpringWithDamping:0.85 initialSpringVelocity:0 options:0 animations:^{
    self.blockView.center = CGPointMake(self.blockView.center.x, to);
} completion:^(BOOL finished) {
    [self.blockView completeAnimation];
}];
位移交給 UIView 的 spring 動畫,變形交給 CADisplayLink 逐幀重繪,兩者分工之後,畫面看起來就像一塊真的果凍被丟下去又彈回來。想調整手感,可以從 damping 值與 deltaHeight 的計算方式下手,參數換一換,個性就差很多。