
CALayer 動畫實戰:拆解一個登入頁的所有動效
Layer Animation 與前面談過的 View Animation 思路相近,但可表達的效果豐富得多,控制粒度也更細。本文用一個登入頁的實作,把常用的 Core Animation 玩法串一遍。範例動畫出自《iOS Animations by Tutorials》,本文只是復述與拆解。
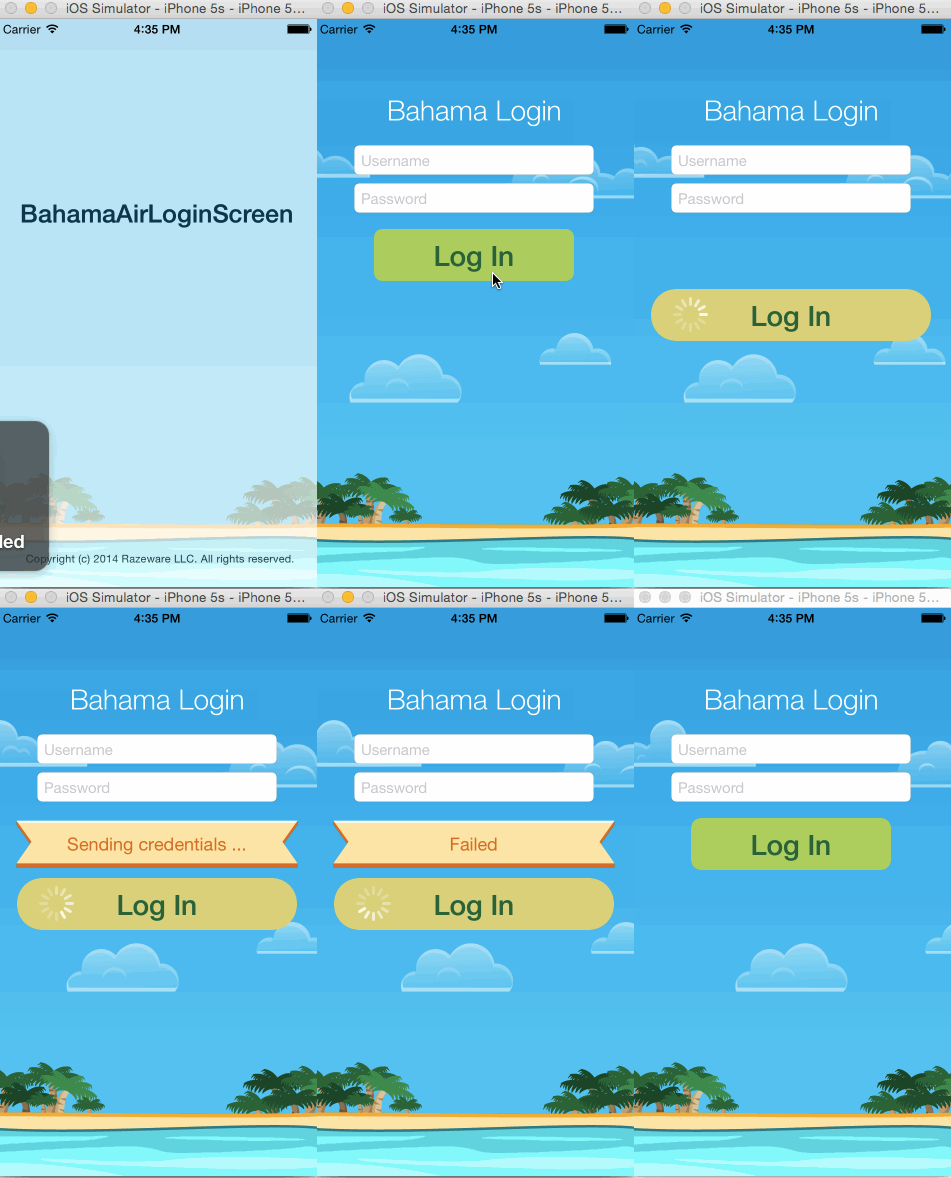
先說一句 CALayer 是什麼:通俗理解,它就是 UIView 背後的內容層,你在螢幕上看到的 UIView,本質上是它的 layer。若拿樹葉打比方,CALayer 更像葉綠素——只負責「你看到的一切」,比 UIView 單純得多。
以下默認讀者具備 Swift 基礎。
雲朵漸入
仔看看會發現背景雲朵是漸入的,也就是透明度從 0 過渡到 1。用 UIViewAnimation 當然也能做,但換成 CALayer 該怎麼寫?
//1
let fadeIn = CABasicAnimation(keyPath: "opacity")
//2
fadeIn.fromValue = 0.0
//3
fadeIn.toValue = 1.0
//4
fadeIn.duration = 0.5
//5
fadeIn.fillMode = kCAFillModeBackwards
//6
fadeIn.beginTime = CACurrentMediaTime() + 0.5
cloud1.layer.addAnimation(fadeIn, forKey: nil)
fadeIn.beginTime = CACurrentMediaTime() + 0.7
cloud2.layer.addAnimation(fadeIn, forKey: nil)
fadeIn.beginTime = CACurrentMediaTime() + 0.9
cloud3.layer.addAnimation(fadeIn, forKey: nil)
fadeIn.beginTime = CACurrentMediaTime() + 1.1
cloud4.layer.addAnimation(fadeIn, forKey: nil)
逐行來看:
1、宣告一個 CABasicAnimation,keyPath 填 opacity(透明度)。這個位置還能填 position 等其他可動畫屬性,後文會陸續出現。
2、設定起始值為 0。
3、設定終值為 1。
4、時長 0.5 秒。前三行合起來就是:在 0.5 秒內把透明度從 0 變到 1。
5、fillMode 設為 kCAFillModeBackwards。把這行註解掉再跑一次,你會發現動畫開始前雲朵仍然可見——這是個 bug。解法有很多,比如先把 alpha 都設為 0,再用 delegate 回調在動畫結束後設回 1,可行但確實不優雅。kCAFillModeBackwards 的含義是「套用動畫的初始狀態」,正好解決這個問題;另外兩個值分別是 kCAFillModeForwards(套用動畫結束後的效果)與 kCAFillModeBoth(兩者兼顧)。
6、設定每朵雲的啟動時間,讓它們錯開而非同時出現,作用近似 UIViewAnimation 的 delay 參數。
以上是雲朵漸入的完整實作。
標題與輸入框飛入
接著讓標題、Username、Password 從畫面外由左側飛進中央:
//1
let flyRight = CABasicAnimation(keyPath: "position.x")
flyRight.toValue = view.bounds.size.width / 2
flyRight.fromValue = -view.bounds.size.width / 2
flyRight.duration = 0.5
heading.layer.addAnimation(flyRight, forKey: nil)
//2
flyRight.beginTime = CACurrentMediaTime() + 0.3
flyRight.fillMode = kCAFillModeBackwards
username.layer.addAnimation(flyRight, forKey: nil)

flyRight.beginTime = CACurrentMediaTime() + 0.4
password.layer.addAnimation(flyRight, forKey: nil)
//1這裡的 keyPath 是position.x,fromValue 與 toValue 分別是螢幕寬度的一半的正負值。值得留意的是,這裡的值指的是 center.x,而非左上角座標。//2username 延後 0.3 秒啟動,同樣要設fillMode = kCAFillModeBackwards,否則會在動畫開始前提前露出。
登入按鈕的彈出
UIView.animateWithDuration(0.5, delay: 0.5, usingSpringWithDamping: 0.5, initialSpringVelocity: 0.0, options: nil, animations: {
    self.loginButton.center.y -= 30.0
    self.loginButton.alpha = 1.0
}, completion: nil)
這裡用彈簧動畫讓按鈕上浮並淡入, damping 與 velocity 的細節可參考相關專文。
雲朵持續飄移
func animateCloud(cloud: UIImageView) {
    let cloudSpeed = 60.0 / view.frame.size.width
    let duration = (view.frame.size.width - cloud.frame.origin.x) * cloudSpeed
    UIView.animateWithDuration(NSTimeInterval(duration), delay: 0.0, options: .CurveLinear, animations: {
        cloud.frame.origin.x = self.view.frame.size.width
    }, completion: { _ in
        cloud.frame.origin.x = -cloud.frame.size.width
        self.animateCloud(cloud)
    })
}
先用距離除以速度算出時長,做線性位移;動畫結束後把雲重置到左側外,再遞迴啟動下一輪,於是形成無縫飄移。
點擊登入後的一連串反應
按下 Log in 之後:按鈕先「duang」一下變長,接著下移,顏色轉變,圓角變大,左側出現活動指示器。
@IBAction func login() {
    //1
    UIView.animateWithDuration(1.5, delay: 0.0, usingSpringWithDamping: 0.2, initialSpringVelocity: 0.0, options: nil, animations: {
        self.loginButton.bounds.size.width += 80.0
    }, completion: nil)

    //2
    UIView.animateWithDuration(0.33, delay: 0.0, usingSpringWithDamping: 0.7, initialSpringVelocity: 0.0, options: nil, animations: {
        self.loginButton.center.y += 60.0
        //3
        self.spinner.center = CGPoint(x: 40.0, y: self.loginButton.frame.size.height / 2)
        self.spinner.alpha = 1.0
    }, completion: { _ in
        //4
        self.showMessage(index: 0)
    })

    //5
    let tintColor = UIColor(red: 0.85, green: 0.83, blue: 0.45, alpha: 1.0)
    tintBackgroundColor(layer: loginButton.layer, toColor: tintColor)

    //6
    roundCorners(layer: loginButton.layer, toRadius: 25.0)
}- 1、用彈簧動畫把按鈕拉寬;
- 2、同時把按鈕下移;
- 3、讓 spinner 移到按鈕內側並淡入;
- 4、動畫結束後呼叫訊息提示;
- 5、呼叫
tintBackgroundColor換色; - 6、呼叫
roundCorners放大圓角。
換色方法的實作:
func tintBackgroundColor(#layer: CALayer, #toColor: UIColor) {
    let tint = CABasicAnimation(keyPath: "backgroundColor")
    tint.fromValue = layer.backgroundColor
    layer.backgroundColor = toColor.CGColor
    tint.toValue = toColor.CGColor
    tint.duration = 1.0
    tint.fillMode = kCAFillModeBoth
    layer.addAnimation(tint, forKey: nil)
}
思路是先把屬性直接設為目標值,再用動畫把「從哪裡開始」補回來。
圓角同理:
func roundCorners(#layer: CALayer, #toRadius: CGFloat) {
    let round = CABasicAnimation(keyPath: "cornerRadius")
    round.fromValue = layer.cornerRadius
    layer.cornerRadius = toRadius
    round.toValue = toRadius
    round.duration = 0.33
    layer.addAnimation(round, forKey: nil)
}
剩下的就是訊息動畫,以及訊息結束後按鈕彈回——彈回與前面的下移完全對稱,只是方向相反。
func removeMessage(#index: Int) {
    UIView.animateWithDuration(0.33, delay: 0.0, options: nil, animations: {
        self.status.center.x += self.view.frame.size.width
    }, completion: { _ in
        self.status.hidden = true
        self.status.center = self.statusPosition
        self.showMessage(index: index + 1)
    })
}

func resetForm() {
    UIView.transitionWithView(status, duration: 0.2, options: .TransitionFlipFromTop, animations: {
        self.status.hidden = true
        self.status.center = self.statusPosition
    }, completion: nil)

    UIView.animateWithDuration(0.2, delay: 0.0, options: nil, animations: {
        self.spinner.center = CGPoint(x: -20.0, y: 16.0)
        self.spinner.alpha = 0.0
        self.loginButton.bounds.size.width -= 80.0
        self.loginButton.center.y -= 60.0
    }, completion: { _ in
        let tintColor = UIColor(red: 0.63, green: 0.84, blue: 0.35, alpha: 1.0)
        tintBackgroundColor(layer: self.loginButton.layer, toColor: tintColor)
        roundCorners(layer: self.loginButton.layer, toRadius: 10.0)
    })
}
這一段全部用 UIViewAnimation 完成,語意直觀,就不逐行解釋了。
Core Animation 的額外能力:監控動畫過程
Core Animation 相對 UIView Animation 的優勢之一,是你能介入動畫的生命週期。要監控過程,理論上得實作協議,但實際上每個 NSObject 都已具備兩個回調:
override func animationDidStop(anim: CAAnimation!, finished flag: Bool) { }
override func animationDidStart(anim: CAAnimation!) { }
當多個 CABasicAnimation 都設了 .delegate = self,怎麼在回調裡分辨是哪一個?可以掛個標記:
caBasic.setValue("Value", forKey: "key")然後這樣識別:
if let name = anim.valueForKey("name") as? String {
    if name == "Vaule" {
        println("This is caBasic")
    }
}
CAAnimationGroup:把多個動畫打包
let groupAnimation = CAAnimationGroup()
groupAnimation.beginTime = CACurrentMediaTime() + 0.5
groupAnimation.duration = 0.5
groupAnimation.fillMode = kCAFillModeBackwards
groupAnimation.timingFunction = CAMediaTimingFunction(name: kCAMediaTimingFunctionEaseIn)

let scaleDown = CABasicAnimation(keyPath: "transform.scale")
scaleDown.fromValue = 3.5
scaleDown.toValue = 1.0

let rotate = CABasicAnimation(keyPath: "transform.rotation")
rotate.fromValue = CGFloat(M_PI_4)
rotate.toValue = 0.0

let fade = CABasicAnimation(keyPath: "opacity")
fade.fromValue = 0.0
fade.toValue = 1.0

groupAnimation.animations = [scaleDown, rotate, fade]
loginButton.layer.addAnimation(groupAnimation, forKey: nil)
這樣就一次掛上了一組動畫。注意:這些動畫是同時進行的,不是一個結束才跑下一個。
timingFunction 控制整組動畫的速度曲線,常見值有:
kCAMediaTimingFunctionEaseIn — 起步慢、隨後加速
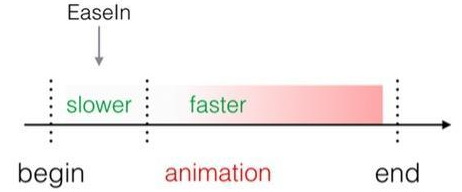
kCAMediaTimingFunctionEaseOut
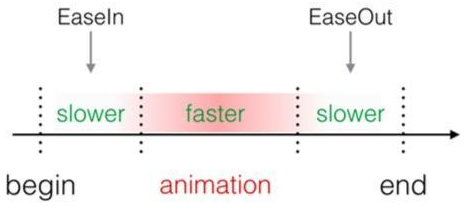
kCAMediaTimingFunctionEaseInEaseOut
kCAMediaTimingFunctionLinear — 預設值,速度恒定。
另外幾個常用屬性:
.repeatCount:重複次數.speed:播放速度。.speed = 2表示以兩倍速播放,時長減半而次數不變view.layer.speed = 2.0:這樣設定會讓該 view 上所有動畫一起加速一倍
CAKeyframeAnimation:精細到關鍵幀
CABasicAnimation 只能描述「從 fromValue 到 toValue」,而 CAKeyframeAnimation 可以把過程切成多段,逐段指定數值與對應時間點:
let wobble = CAKeyframeAnimation(keyPath: "transform.rotation")
wobble.duration = 0.25
wobble.repeatCount = 4
wobble.values = [0.0, -M_PI_4/4, 0.0, M_PI_4/4, 0.0]
wobble.keyTimes = [0.0, 0.25, 0.5, 0.75, 1.0]
heading.layer.addAnimation(wobble, forKey: nil)
可以理解為把 fromValue、toValue、duration 切成 n 段分別控制,代價是寫法複雜些,收穫是控制精準得多。
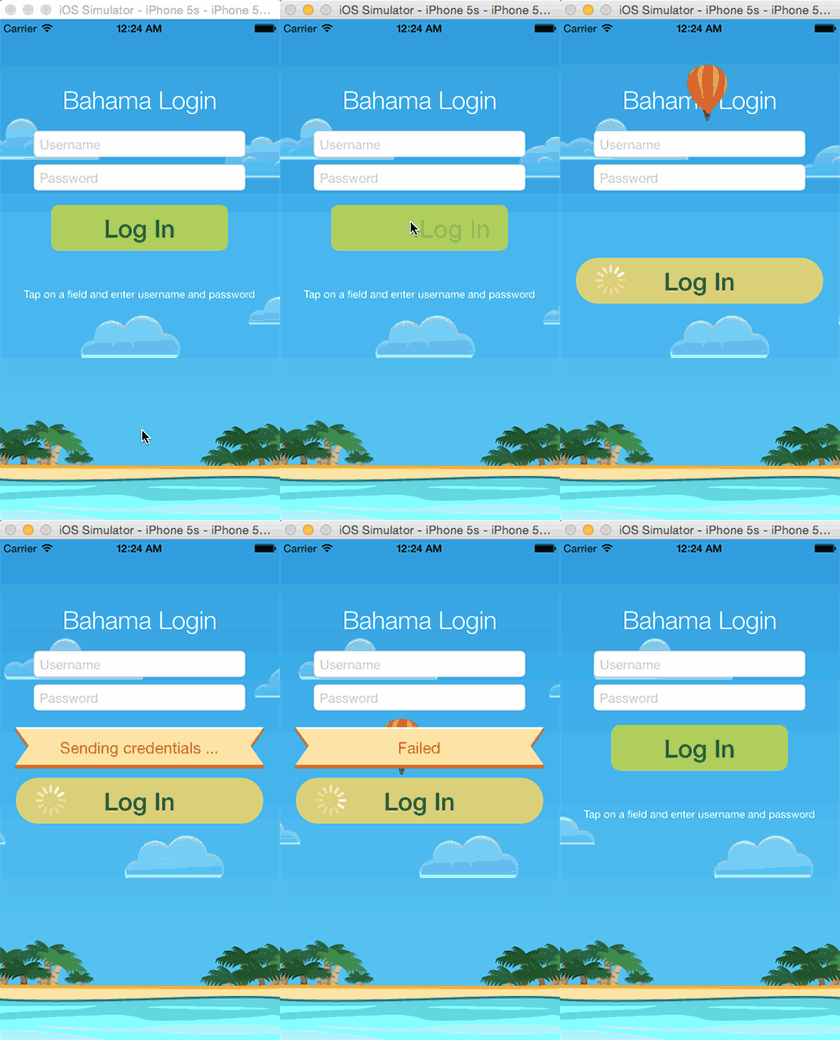
來看一個更直觀的例子:點擊登入後,一個熱氣球從左上角出現,先往右下方飄,到邊界後再轉向左下角。路徑明顯有三個關鍵點,依次抵達即可:
let balloon = CALayer()
balloon.contents = UIImage(named: "balloon")!.CGImage
balloon.frame = CGRect(x: -50.0, y: 0.0, width: 50.0, height: 65.0)
view.layer.insertSublayer(balloon, below: username.layer)

let flight = CAKeyframeAnimation(keyPath: "position")
flight.duration = 12.0
flight.values = [
    CGPoint(x: -50.0, y: 0.0),
    CGPoint(x: view.frame.width + 50.0, y: 160.0),
    CGPoint(x: -50.0, y: loginButton.center.y)
].map { NSValue(CGPoint: $0) }
flight.keyTimes = [0.0, 0.5, 1.0]
balloon.addAnimation(flight, forKey: nil)
把 values 分成三段,各自指定抵達時間,最後掛到 layer 上,氣球就沿著折線路徑飛行了。
這篇的知識點偏零散,但都出自同一個 Demo。
GitHub:https://github.com/superxlx/iOS_Animation_Test4