
三個有意思的 Auto Layout 實例(Masonry 實作)
前言
很久沒寫 Blog 了,這陣子有點忙。
本文整理了三個頗有「特色」的 Auto Layout 案例,靈感來自微博上好友的提問。它們既有趣又有代表性,於是寫出來分享。
至於為什麼用 Masonry——因為它好用啊。(既然被問到 Masonry 相關問題,就乾脆用它來實作吧 =。=)
成果預覽
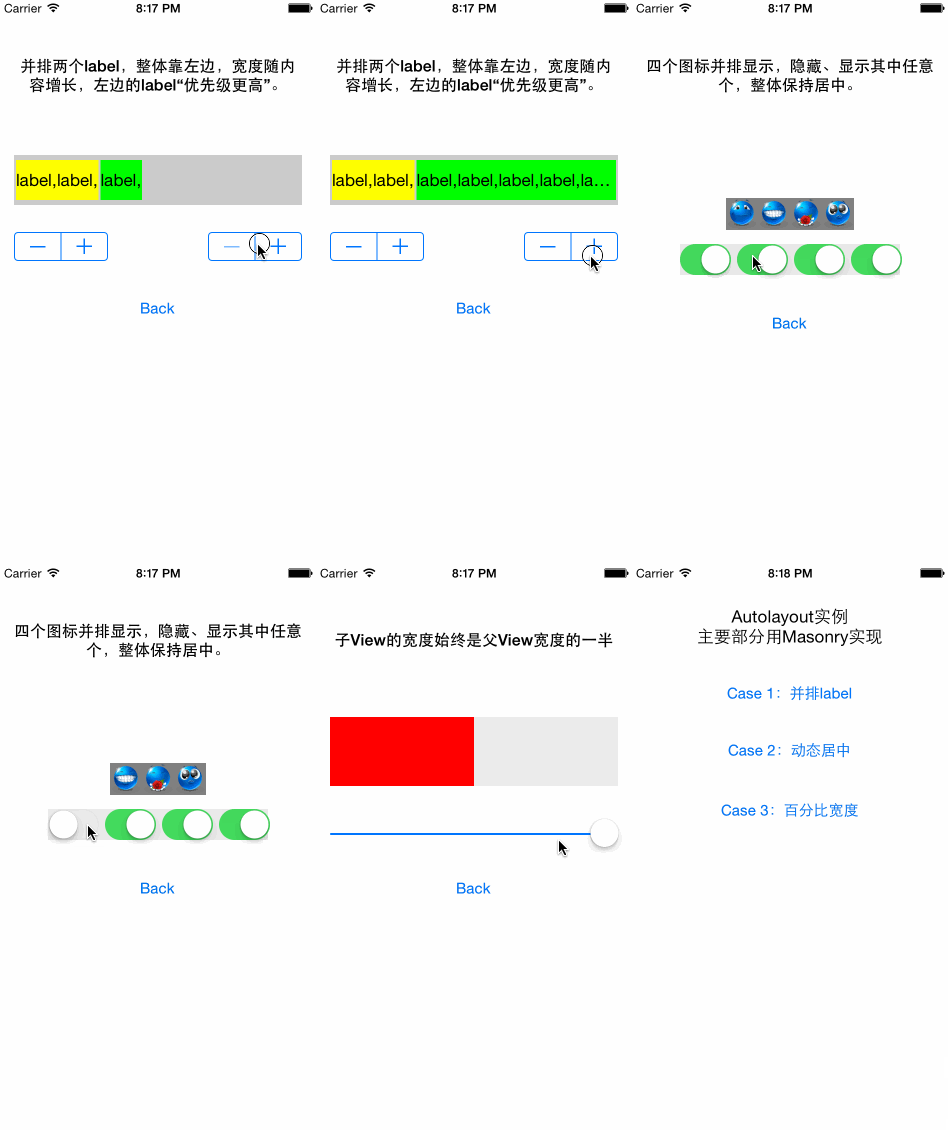
GitHub:https://github.com/zekunyan/AutolayoutExampleWithMasonry
關於範例專案的結構
實作時採用「StoryBoard 拖曳約束 + Masonry 手寫程式碼」的混搭方式。最關鍵的部分一律用 Masonry 寫,以便凸顯重點;其餘無關緊要的空間約束,直接拖一拖就好。
關於 Auto Layout
剛開始學 Auto Layout 時,"Leading Edges"、"Horizontal Centers" 一堆名詞砸過來,一時真的適應不來,面對一個介面佈局需求常常無從下手。
歸納起來,我認為 Auto Layout 的關鍵就是Constraint(約束),本質上只有兩件事:
從「顯式設定 frame」,轉為「用約束控制 View 的大小與位置」。
思考佈局時,關注點從單一 View,轉到所有 View 之間的相互關係。
既然不再直接設 frame,那就意味著系統會在執行階段依我們給的約束,算出每個 View 的 frame,再進行繪製。
所以我們寫下的 Constraint,必須能完整表達 View 的位置(x、y)與尺寸(寬、高)。不論用 IB 拖約束還是手寫程式碼,只要從這個角度切入,多數問題都能拆解。
網路上 Auto Layout 的資料很多,這裡不重複列舉,但有一條公式值得貼出來:
viewA-attribute = viewB-attribute * multiplier + constant
關於 Masonry
好用!
Case 1:並排兩個 label,寬度由內容決定;空間不足時優先顯示左邊
這類與「內容壓縮、優先級」有關的佈局,繞不開 Auto Layout 的兩個關鍵屬性:Content Compression Resistance 與 Content Hugging。
Content Compression Resistance = 不許擠我!
這個屬性的優先級越高,就越不容易被壓縮。也就是說,當整體空間裝不下所有 View 時,優先級越高者,顯示出來的內容越完整。
Content Hugging = 抱緊!
這個屬性的優先級越高,View 就越「抱緊」內部內容,也就是不會隨著父 View 變大而跟著變大。
分析
依需求可把約束拆成兩塊:
空間充足時,兩個 label 寬度由內容決定——即 label 的 Content Hugging 優先級很高,且不設固定 Width。
空間不足時,左邊 label 更不易被壓縮——即它的 Content Compression Resistance 優先級更高。
重點:
label 不設具體寬度,寬度由內容決定。
誰優先顯示,由 Content Compression Resistance 的高低決定。
約束示意圖
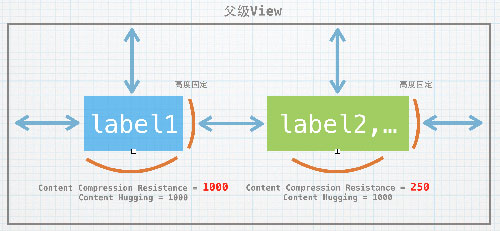
關鍵程式碼
先設定位置(label1 在左,label2 在右):
// label1:位於左上角
[_label1 mas_makeConstraints:^(MASConstraintMaker *make) {
    make.top.equalTo(_contentView1.mas_top).with.offset(5);
    make.left.equalTo(_contentView1.mas_left).with.offset(2);
    // 40 高度
    make.height.equalTo(@40);
}];

// label2:位於右上角
[_label2 mas_makeConstraints:^(MASConstraintMaker *make) {
    // 左邊貼著 label1,間隔 2
    make.left.equalTo(_label1.mas_right).with.offset(2);
    // 上邊貼著父 view,間隔 5
    make.top.equalTo(_contentView1.mas_top).with.offset(5);
    // 右邊間隔保持大於等於 2,注意是 lessThanOrEqual
    // 在「從左往右」的 X 軸上理解會更直觀:
    // label2 右邊界的 X 座標「小於等於」contentView 右邊界的 X 座標
    make.right.lessThanOrEqualTo(_contentView1.mas_right).with.offset(-2);
    // 只設高度 40
    make.height.equalTo(@40);
}];
再設定內容約束:
// 左邊 label1 的 content hugging 設為 1000
[_label1 setContentHuggingPriority:UILayoutPriorityRequired
                          forAxis:UILayoutConstraintAxisHorizontal];

// 左邊 label1 的 content compression 設為 1000
[_label1 setContentCompressionResistancePriority:UILayoutPriorityRequired
                                         forAxis:UILayoutConstraintAxisHorizontal];

// 右邊 label2 的 content hugging 設為 1000
[_label2 setContentHuggingPriority:UILayoutPriorityRequired
                          forAxis:UILayoutConstraintAxisHorizontal];

// 右邊 label2 的 content compression 設為 250
[_label2 setContentCompressionResistancePriority:UILayoutPriorityDefaultLow
                                         forAxis:UILayoutConstraintAxisHorizontal];
小結:靈活運用 Content Compression Resistance 與 Content Hugging。
Case 2:四個 ImageView 整體居中,可任意顯示/隱藏
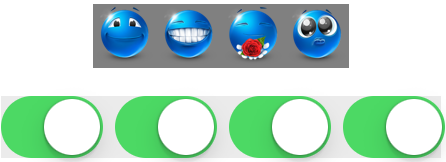
下方四個 Switch 分別控制對應位置的圖片是否顯示。
分析
先解決「整體居中」:最簡單的辦法是把四張圖片裝進一個容器 View,讓容器 View 在頁面中居中,就不必逐個去調居中。
再解決顯示與隱藏:這裡直接控制 ImageView 的寬度,寬度為 0 就等於隱藏。
約束示意圖
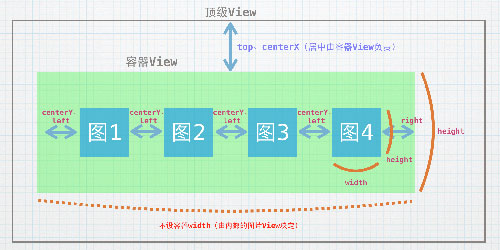
之所以這樣設,主要考慮三點:
盡量減少無效約束,讓約束不多也不少。
內部每個 ImageView 的約束其實只有四個:left、centerY、width、height。這樣就能寫一個函式一次替 View 加上這幾條約束,大幅省下程式碼。
最右邊的 ImageView 另外設一條與容器 View 的右邊約束,這樣就不必設定容器 View 的 width,容器剛好包住內部內容,整體才算真正居中。
關鍵程式碼
先看設定單一 ImageView 約束的函式:
/**
 *  設定 view 的寬高、左邊約束、垂直中心約束
 *
 *  @param view    要設定的 view
 *  @param size    CGSize
 *  @param left    左邊對齊的約束
 *  @param centerY 垂直中心對齊的約束
 *
 *  @return 回傳寬度約束,用於顯示/隱藏單一 view
 */
- (MASConstraint *)setView:(UIView *)view size:(CGSize)size left:(MASViewAttribute *)left centerY:(MASViewAttribute *)centerY {
    __block MASConstraint *widthConstraint;
    [view mas_makeConstraints:^(MASConstraintMaker *make) {
        // 寬高固定
        widthConstraint = make.width.equalTo(@(size.width));
        make.height.equalTo(@(size.height));
        // 左邊約束
        make.left.equalTo(left);
        // 垂直中心對齊
        make.centerY.equalTo(centerY);
    }];
    return widthConstraint;
}
接著設定容器 View:
// containerView 就是容器 View
[_containerView mas_makeConstraints:^(MASConstraintMaker *make) {
    // 只設高度,寬度由子 View 決定
    make.height.equalTo(@(IMAGE_SIZE));
    // 水平居中
    make.centerX.equalTo(self.view.mas_centerX);
    // 距父 View 頂部 200 點
    make.top.equalTo(self.view.mas_top).offset(200);
}];
最後是內部 ImageView 的約束,注意約束的對象關係:
// 分別設定每個 imageView 的寬高、左邊、垂直中心約束
// 每個 View 的左邊約束等於左邊那個 View 的右邊,有點繞口...
UIImageView *imageView1 = _imageViews[0];
MASConstraint *width = [self setView:imageView1 size:imageViewSize left:_containerView.mas_left centerY:_containerView.mas_centerY];
[_widthConstraints addObject:width];

UIImageView *imageView2 = _imageViews[1];
width = [self setView:imageView2 size:imageViewSize left:imageView1.mas_right centerY:_containerView.mas_centerY];
[_widthConstraints addObject:width];

UIImageView *imageView3 = _imageViews[2];
width = [self setView:imageView3 size:imageViewSize left:imageView2.mas_right centerY:_containerView.mas_centerY];
[_widthConstraints addObject:width];

UIImageView *imageView4 = _imageViews[3];
width = [self setView:imageView4 size:imageViewSize left:imageView3.mas_right centerY:_containerView.mas_centerY];
[_widthConstraints addObject:width];

// 最後讓最右邊的 imageView 右邊與容器 View 對齊
[imageView4 mas_makeConstraints:^(MASConstraintMaker *make) {
    make.right.equalTo(_containerView.mas_right);
}];
控制顯示與隱藏,只要讓寬度等於 0:
- (IBAction)showOrHideImage:(UISwitch *)sender {
    NSUInteger index = (NSUInteger)sender.tag;
    MASConstraint *width = _widthConstraints[index];
    if (sender.on) {
        width.equalTo(@(IMAGE_SIZE));
    } else {
        width.equalTo(@0);
    }
}
小結:用一個「容器 View」管理內部 View,往往有事半功倍的效果;而且把約束統一規格化,就能用一個函式搞定,程式碼量自然下降。
Case 3:子 View 寬度恆為父 View 的一半(或任意百分比)
這個其實很簡單 =。= 再看一次那條公式:
viewA-attribute = viewB-attribute * multiplier + constant
把它換成寬度語言就是:
子 View 的寬度 = 父級 View 寬度 * 係數 + 常數
Masonry 裡有個 multipliedBy 函式,正是用來設定 multiplier(對應原本的 NSLayoutConstraint)。
關鍵程式碼
[subView mas_makeConstraints:^(MASConstraintMaker *make) {
    // 上下左貼邊
    make.left.equalTo(_containerView.mas_left);
    make.top.equalTo(_containerView.mas_top);
    make.bottom.equalTo(_containerView.mas_bottom);
    // 寬度為父 view 的一半
    make.width.equalTo(_containerView.mas_width).multipliedBy(0.5);
}];
之後只要改父 View 的寬度,子 View 就會跟著變。
小結:multipliedBy 在 Masonry 的 GitHub 首頁並沒有寫到,所以要養成讀標頭檔的習慣。
總結
Auto Layout 能寫的還很多,動畫、動態修改約束等等都還沒提到,本文只能算個引子,任重而道遠。
能看到這裡的朋友,也算很有耐心了,哈哈~
參考
SnapKit / Masonry
Masonry 介紹與使用實踐(快速上手 Auto Layout)
AutoLayout:忘掉 Frame,擁抱 Constraint
Autolayout 基礎
對 Auto Layout 中 Content Compression Resistance 與 Content Hugging 的總結
Auto Layout Guide