
手把手復刻 Ping App 的圓形擴散轉場動畫(Swift 完整實作)
原文:How To Make A View Controller Transition Animation Like in the Ping App
作者:Rounak Jain 譯者:遠的風景、あ夂寒ツ
匿名社交應用 Secret 的團隊此前推出了一款名為 Ping 的新產品,用戶可以訂閱自己感興趣的內容並接收推送。Ping 最令人印象深刻的地方,莫過於主屏幕與菜單切換時那個從右上角按鈕向外擴散的圓形轉場動畫。
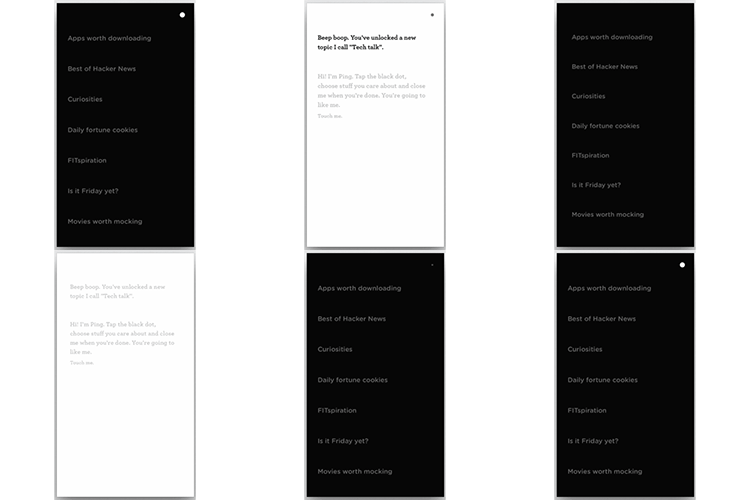
每次看到這種恰到好處的動畫,我都會忍不住琢磨:如果換成我,要怎麼在 iOS 上把它做出來。
在這篇教程裡,你將用 Swift 一步步還原這個效果,過程中會用到圖層、遮罩(Mask)、UIViewControllerAnimatedTransitioning 協議以及 UIPercentDrivenInteractiveTransition 類。
注意:本文假設你已具備基本的 iOS 開發與 Swift 語言基礎。如果是新手,建議先補一補入門內容。
整體思路
Ping 的動畫發生在兩個視圖控制器相互過渡的瞬間。在 iOS 中,你可以把兩個控制器放進同一個 UINavigationController,再借助 iOS 7 引入的 UIViewControllerAnimatedTransitioning 協議來自定義切換動畫。
這個協議本質上賦予你三件事:
- 決定動畫持續多長時間
- 拿到一個同時引用兩個控制器的容器視圖
- 實現任何你能想到的動畫形式
具體的繪製工作,交給 UIView 動畫或 Core Animation 即可。
圓形過渡的實現要點
把效果拆開來看,其實只有兩句話:
- 屏幕右上角有一個圓形按鈕,它是動畫的起點。
- 這個圓充當 Mask:圓內的內容顯示出來,圓外的內容被藏起來。
遮罩可以加在 CALayer 上,系統會依據遮罩的 alpha 通道來決定該圖層哪些區域可見。alpha 為 1 的地方完整呈現下方內容,為 0 的地方完全隱藏,介於兩者之間則是半透明過渡。
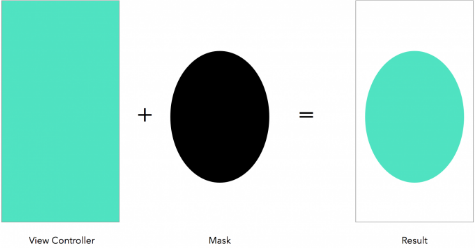
既然遮罩是圓形的,最自然的选择就是 CAShapeLayer。而讓圓「長大」的方法也很單純:不斷放大圓形遮罩的半徑。
搭建工程骨架
注意:這一節是給想從零開始動手的讀者準備的。如果你已經是熟手,可以直接跳到「自定義動畫」部分。
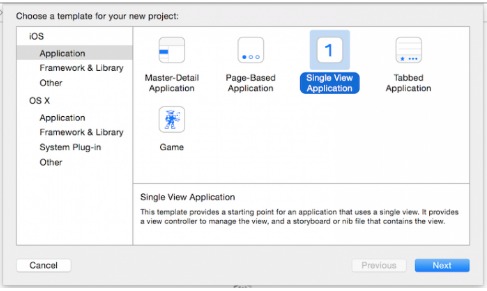
在 Xcode 中選擇 File → New → Project,接著選 iOS → Application → Single View Application。
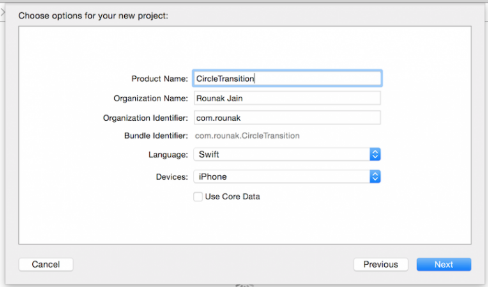
工程命名為 CircleTransition,語言選 Swift,設備選 iPhone。
打開 Main.storyboard,你會看到一個初始的視圖控制器。既然要做轉場,自然需要多個控制器。
先把它嵌入導航控制器:選中視圖控制器,執行 Editor → Embed In → Navigation Controller。
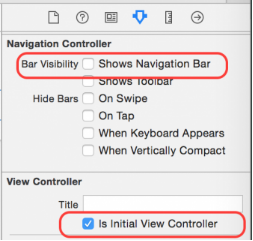
接著把導航欄隱藏掉。在右側工具面板切到第四個頁籤(Attributes Inspector),取消勾選 Shows Navigation Bar。
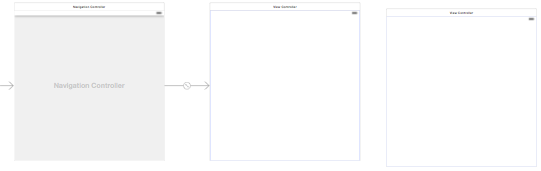
再從控件庫拖一個視圖控制器到 Storyboard 上,用導航控制器把它們水平串接起來。
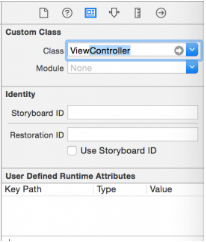
選中新建的控制器,在右側 Identity Inspector 中把 Custom Class 改為 ViewController,與 Xcode 自動生成的類文件對應上。
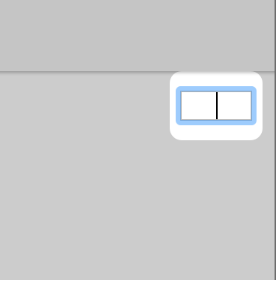
接下來,在每個控制器的右上角各放一個按鈕。雙擊按鈕並按退格,把標題清空。
把按鈕的背景色設為黑色。
用 Auto Layout 定位按鈕。以第一個控制器為例:
- 點擊右側與頂部的紅色括號,把間距設為 10
- 寬與高設為 44
- 把 Update Frames 設為 Items of New Constraints
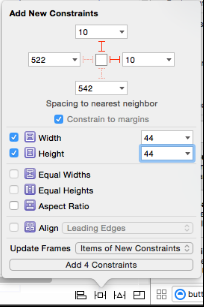
點擊 Add 4 Constraints,尺寸與位置就確定了。其餘控制器重複同樣操作。
最後把按鈕變成圓形:在 Identity Inspector 的 User Defined Runtime Attributes 中,為 layer 添加 cornerRadius 參數。
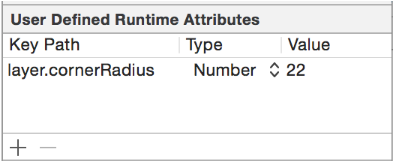
此時在 Interface Builder 裡按鈕仍是方形,但運行後就是圓的了。
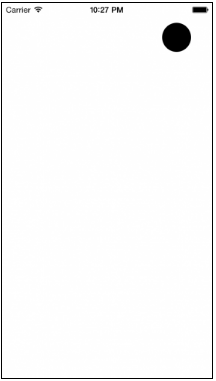
給兩個控制器分別設置不同的背景色,第一個綠色、第二個黃色,方便肉眼分辨轉場過程。
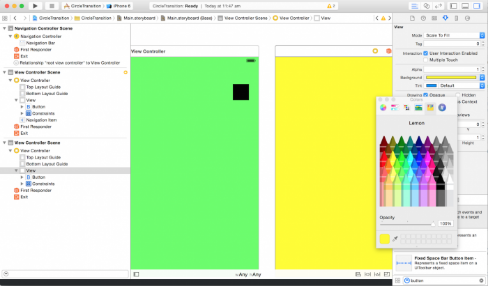
再各添加一個 image view,寬高設為 300 points,點擊右下角的 Align,勾選 Horizontal Center in Container 與 Vertical Center in Container 讓它居中。
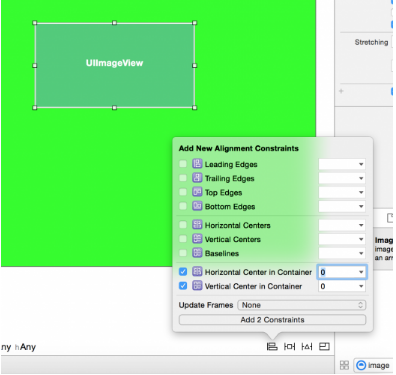
透過 Resolve Auto Layout Issues 修正 frame,然後 Update Frames,畫布應該長這樣:
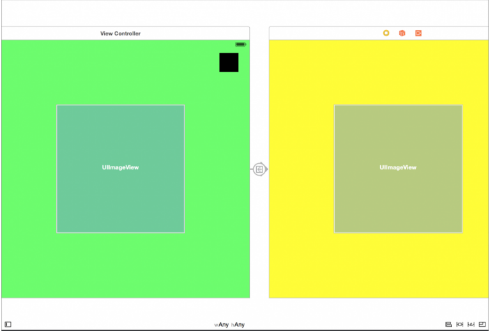
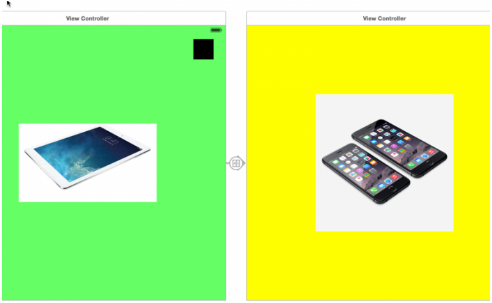
下載 iPhone 與 iPad 版本的示例圖片,賦值給 image view,並把 content mode 設為 Aspect Fit。
把交互串起來
恭喜,App 的骨架已經搭好了。現在來接按鈕事件。
右鍵拖動第一個控制器的按鈕到第二個控制器,建立 action 連接。
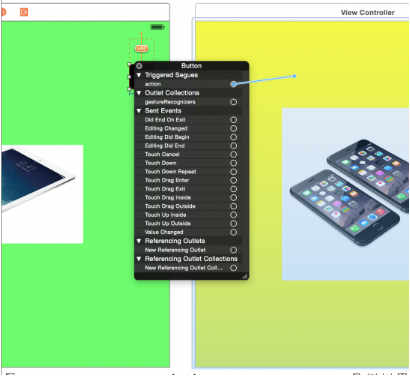
在彈出的面板中選擇 show。
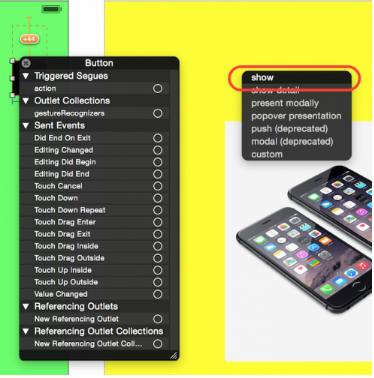
這樣按下按鈕時,第二個控制器就會被 push 進來。
打開 Attributes Inspector,把這條 segue 的 identifier 命名為 PushSegue。
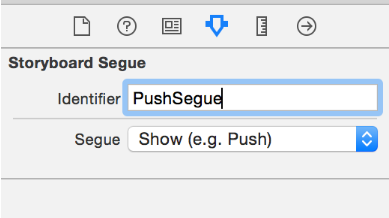
先編譯運行一次,確認 push 正常工作。
接著讓第二個頁面也能返回。在 ViewController 類中寫一個方法:
@IBAction func circleTapped(sender: UIButton) {
    self.navigationController?.popViewControllerAnimated(true)
}
同時加上一個弱引用的 outlet:
@IBOutlet weak var button: UIButton!
回到 Storyboard,對兩個控制器做同樣的操作:
- 右鍵點擊按鈕
- 把 Touch Up Inside 拖到控制器頂部
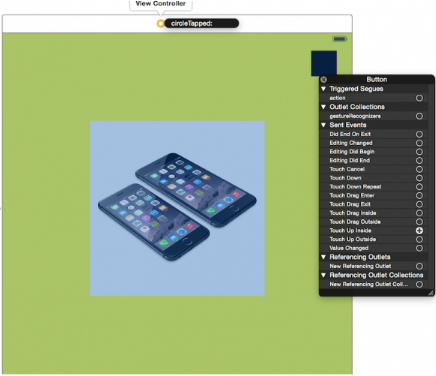
再把 button 的引用 outlet 分別連到各自的控制器上。
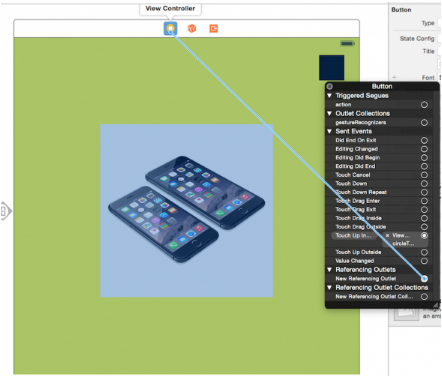
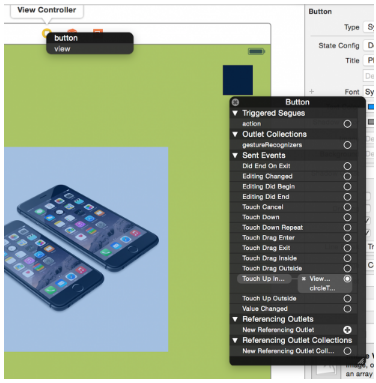
再次編譯運行,一組完整的 push/pop 交互就通了。
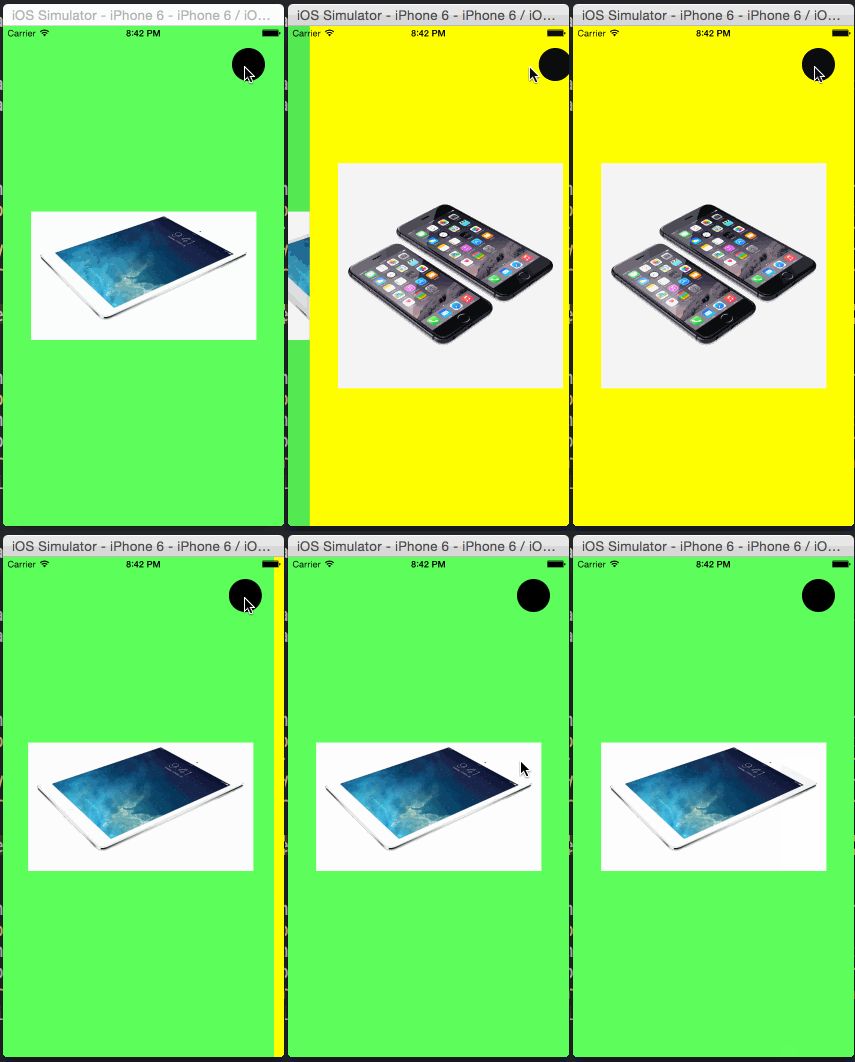
自定義轉場動畫
如果你跳過了上一節,可以直接下載 starter project,裡面已經配好了控制器和按鈕。
要接管 push/pop 動畫,需要實現 UINavigationControllerDelegate 的 animationControllerForOperation 方法。
新建一個文件 NavigationControllerDelegate,宣告遵循該協議:
class NavigationControllerDelegate: NSObject, UINavigationControllerDelegate {
}
打開 Main.storyboard,把這個 delegate 掛到導航控制器上。從右側控件庫搜索 object 並拖到左側 Navigation Controller Source 下方。
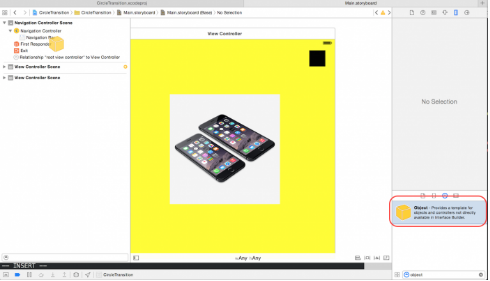
選中這個 object,在 Identity Inspector 中把它的 Custom Class 改為 NavigationControllerDelegate。
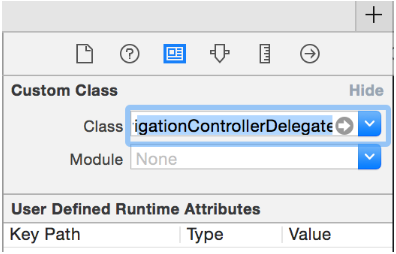
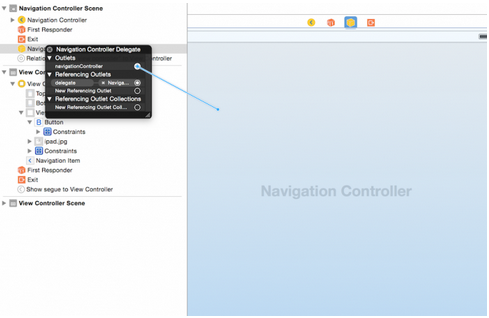
然後右鍵拖動,把 delegate 指示點連到這個對象上。
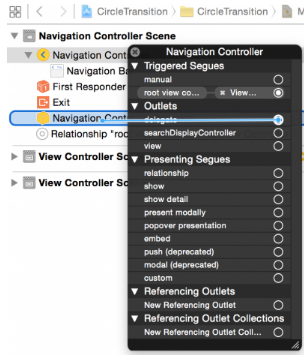
回到代碼,先寫一個佔位實現:
func navigationController(navigationController: UINavigationController,
    animationControllerForOperation operation: UINavigationControllerOperation,
    fromViewController fromVC: UIViewController,
    toViewController toVC: UIViewController) -> UIViewControllerAnimatedTransitioning? {
    return nil
}
這個方法拿到參與轉場的兩個控制器,要求你返回一個遵循 UIViewControllerAnimatedTransitioning 的對象。所以我們得先造一個出來。
通過 File → New → File 新建 Cocoa Touch Class,命名為 CircleTransitionAnimator。
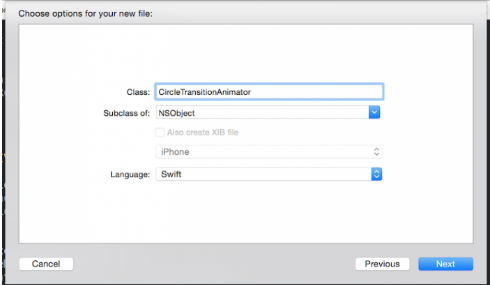
宣告遵循協議:
class CircleTransitionAnimator: NSObject, UIViewControllerAnimatedTransitioning {協議要求兩個方法。第一個是時長:
func transitionDuration(transitionContext: UIViewControllerContextTransitioning) -> NSTimeInterval {
    return 0.5
}
想要半秒的動畫,返回 0.5 即可。接著加一個屬性用來保存上下文:
weak var transitionContext: UIViewControllerContextTransitioning?
第二個方法是真正的動畫主體:
func animateTransition(transitionContext: UIViewControllerContextTransitioning) {
    // 1
    self.transitionContext = transitionContext
    // 2
    var containerView = transitionContext.containerView()
    var fromViewController = transitionContext.viewControllerForKey(UITransitionContextFromViewControllerKey) as! ViewController
    var toViewController = transitionContext.viewControllerForKey(UITransitionContextToViewControllerKey) as! ViewController
    var button = fromViewController.button
    // 3
    containerView.addSubview(toViewController.view)
    // 4
    var circleMaskPathInitial = UIBezierPath(ovalInRect: button.frame)
    var extremePoint = CGPoint(x: button.center.x - 0, y: button.center.y - CGRectGetHeight(toViewController.view.bounds))
    var radius = sqrt((extremePoint.x * extremePoint.x) + (extremePoint.y * extremePoint.y))
    var circleMaskPathFinal = UIBezierPath(ovalInRect: CGRectInset(button.frame, -radius, -radius))
    // 5
    var maskLayer = CAShapeLayer()
    maskLayer.path = circleMaskPathFinal.CGPath
    toViewController.view.layer.mask = maskLayer
    // 6
    var maskLayerAnimation = CABasicAnimation(keyPath: "path")
    maskLayerAnimation.fromValue = circleMaskPathInitial.CGPath
    maskLayerAnimation.toValue = circleMaskPathFinal.CGPath
    maskLayerAnimation.duration = self.transitionDuration(transitionContext)
    maskLayerAnimation.delegate = self
    maskLayer.addAnimation(maskLayerAnimation, forKey: "path")
}
逐段解讀:
- 把 transitionContext 存下來,方法結束後還要用到它。
- 取得容器視圖與參與切換的兩個控制器。容器視圖是動畫上演的舞台。
- 把 toViewController 的視圖加進容器。
- 構造兩條圓形貝塞爾路徑:一條與按鈕等大,另一條的半徑足以覆蓋整個屏幕。動畫就在這兩條路徑之間插值。
- 新建
CAShapeLayer作為遮罩,並直接把 path 設為最終形態,避免動畫結束後圖層回彈。 - 建立一個 keyPath 為 path 的
CABasicAnimation,並註冊 delegate 以便動畫結束後善後。
接著在同一個類裡做清理:
override func animationDidStop(anim: CAAnimation!, finished flag: Bool) {
    self.transitionContext?.completeTransition(!self.transitionContext!.transitionWasCancelled())
    self.transitionContext?.viewControllerForKey(UITransitionContextFromViewControllerKey)?.view.layer.mask = nil
}
第一行告訴系統動畫已結束;既然演完了,遮罩也就可以移除了。
最後回到 NavigationControllerDelegate.swift,把佔位方法補完:
func navigationController(navigationController: UINavigationController,
    animationControllerForOperation operation: UINavigationControllerOperation,
    fromViewController fromVC: UIViewController,
    toViewController toVC: UIViewController) -> UIViewControllerAnimatedTransitioning? {
    return CircleTransitionAnimator()
}
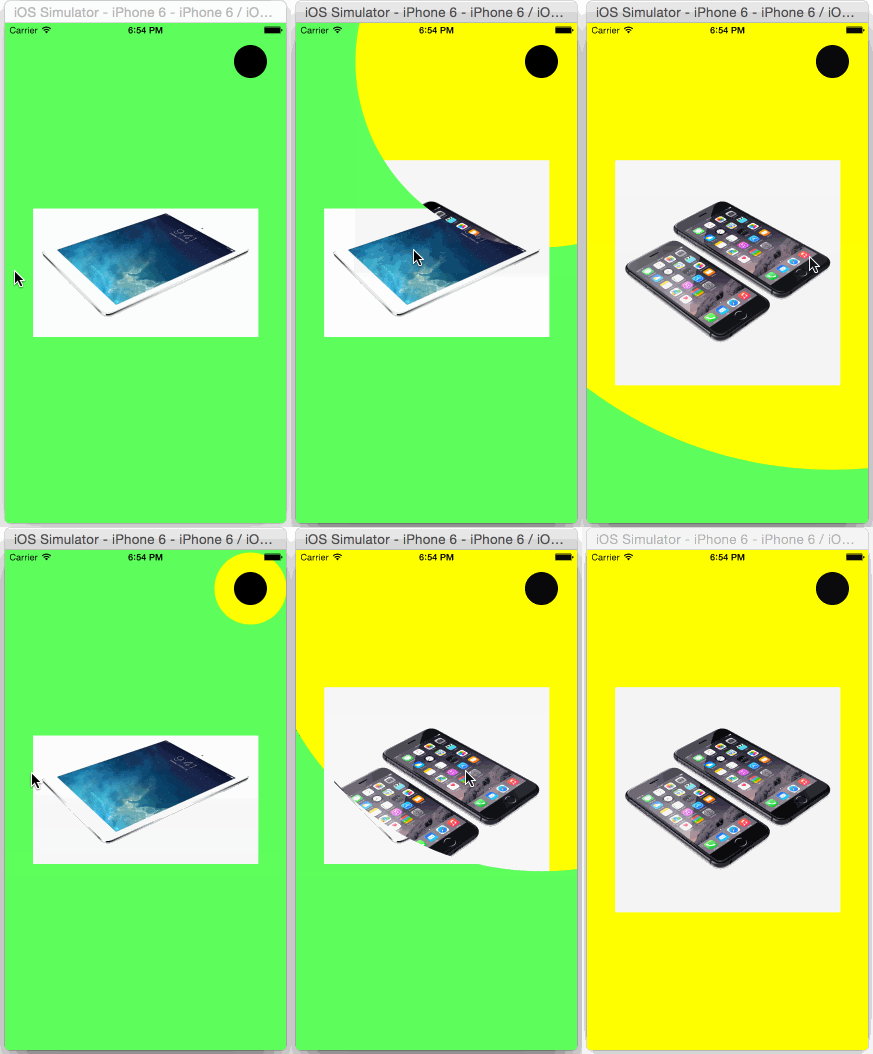
編譯運行,效果如下:
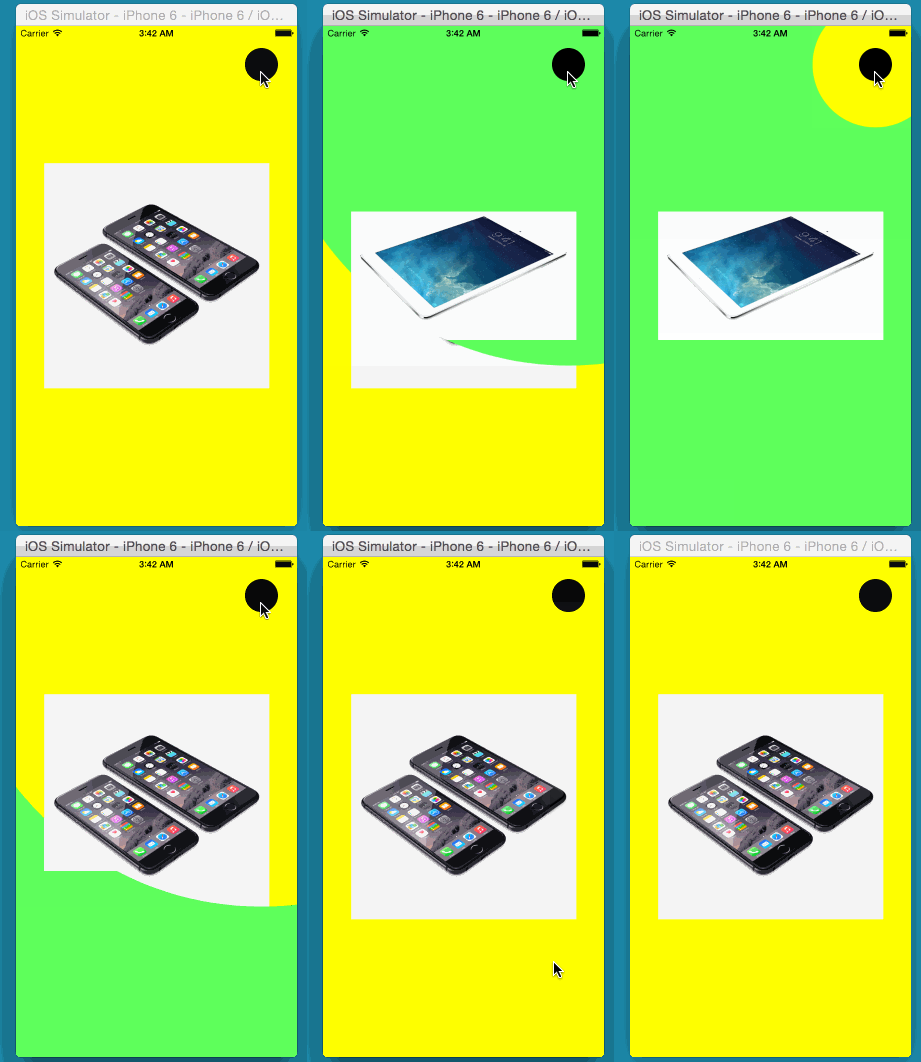
恭喜,你已經復刻了 Ping 的轉場。如果想再往前一步,讓動畫跟手,請繼續往下讀。
加入手勢交互
動畫跑通之後,可以進一步給它加上手勢控制。畢竟單純的點擊有點老套,跟手動畫能讓界面質感提升一個檔次。
交互式轉場的入口是 navigationController:interactionControllerForAnimationController:,這同樣是一個 UINavigationControllerDelegate 方法,要求返回遵循 UIViewControllerInteractiveTransitioning 的對象。
好消息是 iOS SDK 已經提供了 UIPercentDrivenInteractiveTransition,它把大部分髒活都替你乾了。
打開 NavigationControllerDelegate.swift,添加屬性與方法:
var interactionController: UIPercentDrivenInteractiveTransition?

func navigationController(navigationController: UINavigationController,
    interactionControllerForAnimationController animationController: UIViewControllerAnimatedTransitioning)
    -> UIViewControllerInteractiveTransitioning? {
    return self.interactionController
}
既然要做側滑返回,自然離不開手勢識別器。
我們把手勢掛在導航控制器上,所以先要拿到它的引用:
@IBOutlet weak var navigationController: UINavigationController?
在 Storyboard 中右鍵點擊 Navigation Controller Delegate 對象,把這個屬性連到導航控制器。
回到代碼實現 awakeFromNib():
override func awakeFromNib() {
    super.awakeFromNib()
    var panGesture = UIPanGestureRecognizer(target: self, action: Selector("panned:"))
    self.navigationController!.view.addGestureRecognizer(panGesture)
}
然後是手勢回調:
@IBAction func panned(gestureRecognizer: UIPanGestureRecognizer) {
    switch gestureRecognizer.state {
    case .Began:
        self.interactionController = UIPercentDrivenInteractiveTransition()
        if self.navigationController?.viewControllers.count > 1 {
            self.navigationController?.popViewControllerAnimated(true)
        } else {
            self.navigationController?.topViewController.performSegueWithIdentifier("PushSegue", sender: nil)
        }
    case .Changed:
        var translation = gestureRecognizer.translationInView(self.navigationController!.view)
        var completionProgress = translation.x / CGRectGetWidth(self.navigationController!.view.bounds)
        self.interactionController?.updateInteractiveTransition(completionProgress)
    case .Ended:
        if gestureRecognizer.velocityInView(self.navigationController!.view).x > 0 {
            self.interactionController?.finishInteractiveTransition()
        } else {
            self.interactionController?.cancelInteractiveTransition()
        }
        self.interactionController = nil
    default:
        self.interactionController?.cancelInteractiveTransition()
        self.interactionController = nil
    }
}
拆解一下:
- .Began:手勢一旦識別,就建立
UIPercentDrivenInteractiveTransition實例。若當前不在首屏則執行 pop,若在首屏則需要手動觸發此前建好的 PushSegue。隨後 push/pop 會回頭觸發 delegate 方法,此時 interactionController 已有值。 - .Changed:根據手指位移比例更新動畫進度。插入的計算蘋果已經代勞,你什麼都不用做。
- .Ended:依據 pan 手勢的水平速度判斷是完成還是取消,最後把 interactionController 置 nil 完成清理。
- default:其他任何狀態一律取消轉場並清空屬性。
構建運行,從左往右拖動,你會看到同樣的動畫,但這一次完全由你的手指驅動。
接下來可以做什麼
完整專案已可下載。這篇教程希望傳達的不只是一段能抄的代碼,而是一種拆解動畫的思路。你完全可以把它搬進自己的 App,再透過調整背景配色與動畫時長,做出屬於自己的手感。
回顧一下涉及的知識點:圖形圖層、遮罩、UIViewControllerAnimatedTransitioning 協議、UIPercentDrivenInteractiveTransition 類,以及手勢交互的接法。
有任何問題,歡迎一起討論。
轉載請註明來源與譯者。
- 上一篇文章: 源碼推薦 6.5:照片編輯元件與微信風格彈出菜單等五款實用控件
- 下一篇文章: weak 的生命週期:底層到底做了哪些事