
iOS 開發怎麼做才能事半功倍:四個基本習慣

最近為了公司 3.0 版 App 加班加點,前陣子总算收尾,有空坐下來寫點東西。既然這是關於 iOS 開發的第一篇,就先談談這些年累積下來最基本的經驗。編程裡有些小細節很容易被忽略,但往往正是這些細節讓你看起來更專業。
主要想聊 專案結構。專案裡的內容有沒有分組、整不整齊,基本不影響做出來的 App 長什麼樣,所以常被當成小事。其實不然。在真實工作專案(尤其是大型專案)裡,你會和其他工程師或設計師協作,而一個整潔的專案結構對合作開發幫助極大,對後續修 bug 或做 Code Review 也都能事半功倍。
專案結構就像家裡的管線配置:從外觀看不出好壞,但一旦要排查問題或改線路,一套清楚的內部系統能讓一切變得井井有條,也能反映作者的專業程度。
依我的經驗,好的專案結構包含四件事:合理的命名規則、內容分組、常用程式碼的封裝,以及有效的註解。我們逐條來看。
一、命名規則
這條比較抽象,因為不同專案需求各異。我只講最基礎、幾乎通用的幾點。
首先強烈建議使用 class prefix,也就是類別前綴名。前綴能在一定程度上避免你的 class 與其他 framework/library 撞名,也讓你在 import 或搜尋 class 時更好定位。慣例是用幾個大寫字母,Apple 的 iOS SDK 全部都有前綴:Foundation 與 App Kit 的 NS、UIKit 的 UI、Core Location 的 CL 等等。
命名 class 時,盡量讓名字涵蓋「用途」與「類別」。比方說你有一個用來顯示使用者資料的 UIViewController,就可以命名為 XXUserProfileViewController——前綴、用途、類別。這樣在一個大型工程裡,你或同事只要知道用途或類別,就能很快鎖定目標。
我還建議把寫在 XXUserProfileViewController 裡的自訂 subview 都用 XXUserProfile 開頭,例如 XXUserProfileAddressCell。這依然是同一套規則,而且在後面的檔案分組上效果很好,能快速撈出所有與 UserProfile 相關的內容。
命名 method 時,名字應該能傳達功能、參數型別與彼此關係,同時盡量簡潔。當然「簡潔」是相對的,重點是讓別人(還有幾個月後的你自己)看一眼就大致明白這個方法做什麼、需要什麼。連 Apple 的 SDK 裡都有一些超長的方法名,但關鍵是讀起來就知道它在做什麼、要什麼參數,例如 NSBitmapImageRep 裡的:
- (id)initWithBitmapDataPlanes:(unsigned char **)planes
                    pixelsWide:(NSInteger)width
                    pixelsHigh:(NSInteger)height
                 bitsPerSample:(NSInteger)bps
               samplesPerPixel:(NSInteger)spp
                      hasAlpha:(BOOL)alpha
                      isPlanar:(BOOL)isPlanar
                colorSpaceName:(NSString *)colorSpaceName
                  bitmapFormat:(NSBitmapFormat)bitmapFormat
                   bytesPerRow:(NSInteger)rowBytes
                   bitsPerPixel:(NSInteger)pixelBits;
Apple 的程式碼命名指南也講了不少:盡量別用縮寫、選用意義明確的詞等等。
我們 3.0 的 App 裡也有幾個比較長的方法,但目標是讓它讀起來像一句通順的話:
+ (NSMutableArray *)animateNavBarFromColor:(UIColor *)fromColor
                                   toColor:(UIColor *)toColor
                                  duration:(NSTimeInterval)duration;

+ (NSMutableAttributedString *)generateAttributedStringFromString:(NSString *)string
                                                     withFontName:(NSString *)fontName
                                                         fontSize:(float)fontSize
                                                    textAlignment:(NSTextAlignment)alignment
                                                    lineBreakMode:(NSLineBreakMode)lineBreakMode;
這兩個是我們專案的公開方法。即使完全不理解專案背景的人,也應該能猜到它們大概在做什麼。而對於常用且意義明確的名字,則可以適度縮短——比如 NavigationBar 寫成 NavBar 不會有任何歧義,同時也符合簡潔原則。
二、大型專案的內容分組
不論專案大小,我們都應該把 View Controllers、Views、Objects、Frameworks、Resources 等各種類型的檔案,依種類與用途歸類。這樣日後修改與新增都能省事。
中大型專案必然用到大量 View Controller、自訂 Object 與 Custom View。如果成百上千個檔案全部平鋪在一層,混亂程度足以把一個原本 20 分鐘的 bug fix 拖成一小時。當然,如果你記得部分檔名,Cmd + Shift + O 永遠是最好的朋友(所以合理的命名規則非常重要)。但分組的重要性在於「你不確定檔名」的時候:比如 review 同事的程式碼,或某個同事離職、休假時突然要緊急修 bug,清楚的分組就像一張好地圖,讓你很快找到目標。
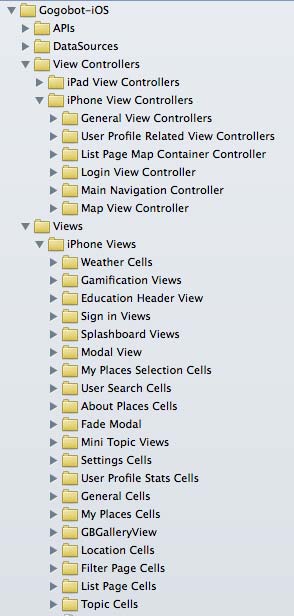
檔案分組算是相對普遍的習慣,但程式碼分組常被忽略。你在一堆檔案裡好不容易找到目標檔案,結果打開發現一個 View Controller 有幾百上千行。如果把程式碼也依型別與功能分組,效率還能再上一層。
最簡單有效的方法是用 #pragma mark -:
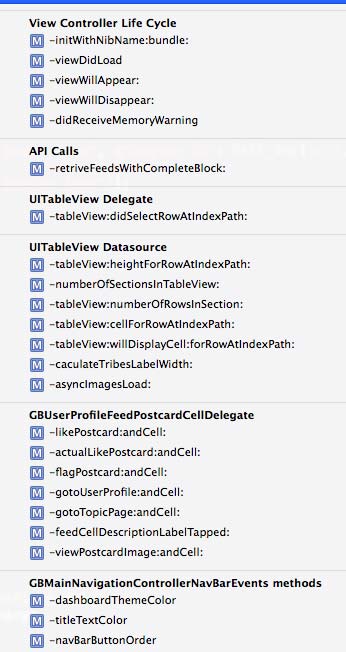
#pragma mark - View Controller Life Cycle

#pragma mark - API Calls

之後只要大概知道目標在哪一區,點一下跳轉欄就能直接過去。
三、常用程式碼的封裝
有些人不太確定什麼時候該把一段程式碼抽成方法。最簡單的判斷依據是:當你開始複製貼上的時候,就該問自己「這段是不是可以封裝成一個或多個方法來重複使用?」。
這麼做除了讓專案看起來清楚簡潔,也能實際省下一些程式碼量。我們常用的 stringWithFormat、isEqualToString: 背後,都是一大段被封裝起來的邏輯——只要理解介面方法的功能,內部實作就不重要了。
舉個簡單例子。我們 3.0 裡幾乎把所有使用者頭像都做成圓形。大家都知道這只要兩行:
imageView.clipsToBounds = YES;
imageView.layer.cornerRadius = image.frame.size.width/2;
但對有輕度程式碼潔癖的我來說,只要超過一行、又會被反覆使用,就該抽成方法:
+ (void)roundImage:(UIImageView *)imageView {
    imageView.clipsToBounds = YES;
    imageView.layer.cornerRadius = imageView.frame.size.width/2;
}
再看一個比較複雜的例子。我們專案大量使用 Attributed String,因為有大量使用者評論、飯店餐廳景點簡介,需要控制行距,否則文字看起來太擁擠。於是我們把相關程式碼都封裝起來:
+ (NSMutableAttributedString *)generateAttributedStringFromString:(NSString *)string
                                                     withFontName:(NSString *)fontName
                                                         fontSize:(float)fontSize
                                                    textAlignment:(NSTextAlignment)alignment
                                                    lineBreakMode:(NSLineBreakMode)lineBreakMode {
    NSMutableAttributedString *mutableAttributedString = [[NSMutableAttributedString alloc] initWithString:string];
    NSMutableParagraphStyle *style = [[NSMutableParagraphStyle alloc] init];
    style.lineSpacing = fontSize / 2;
    style.alignment = alignment;
    style.lineBreakMode = lineBreakMode;
    [mutableAttributedString addAttribute:(NSString*)kCTParagraphStyleAttributeName
                                   value:style
                                   range:NSMakeRange(0, [mutableAttributedString length])];
    [mutableAttributedString addAttribute:NSFontAttributeName
                                   value:[UIFont fontWithName:fontName size:fontSize]
                                   range:NSMakeRange(0, [mutableAttributedString length])];
    return mutableAttributedString;
}
原本要七八行才能完成的事,封裝後縮成一行。我在專案裡隨便搜了一下,這個方法有 42 處呼叫,粗略算下來至少省了兩百三十多行。
四、註解的重要性
工程師對註解的看法差很多。有人認為註解幾乎沒有意義,因為好的程式碼應該一眼就看懂作用與類別。這說法有它的道理,但我沒辦法百分之百贊同。
我認為註解的價值不在於解釋「這段程式碼在做什麼」,而在於把背後的邏輯與取捨寫下來。除非是一兩行的簡單程式碼,否則都該留下當時的推理脈絡。這些脈絡過了幾個月甚至一年,哪怕你是作者,回頭看也需要花時間才能想起當初為什麼這樣做,更別說協作的同事。
看這段控制顯示與隱藏的程式碼:
if (myPlaceView.currentTripPlan.isTemporary) {
    myPlaceView.myPlacesCountLabel.hidden = YES;
    myPlaceView.activityIndicator.hidden = NO;
    [myPlaceView.activityIndicator startAnimating];
} else {
    myPlaceView.activityIndicator.hidden = YES;
    [myPlaceView.activityIndicator stopAnimating];
    myPlaceView.myPlacesCountLabel.hidden = NO;
    myPlaceView.myPlacesCountLabel.text = [myPlaceView.currentTripPlan.trip.placesCount stringValue];
}
直接讀很難理解:為什麼 trip plan 是 temporary 就要隱藏 PlaceCountLabel?加上註解後就清楚多了:
// Since when user creates a new trip plan, we will save a temporary local copy of it
// so when they come back to splashboard, they will see the new trip plan before the api responses
if (myPlaceView.currentTripPlan.isTemporary) {
    // in this case, our api is not responded yet
    // we need to show the loader, and hide the place count
    myPlaceView.myPlacesCountLabel.hidden = YES;
    myPlaceView.activityIndicator.hidden = NO;
    [myPlaceView.activityIndicator startAnimating];
} else {
    // if current trip plan is not temporary, that means we get the data from the api
    myPlaceView.activityIndicator.hidden = YES;
    [myPlaceView.activityIndicator stopAnimating];
    myPlaceView.myPlacesCountLabel.hidden = NO;
    myPlaceView.myPlacesCountLabel.text = [myPlaceView.currentTripPlan.trip.placesCount stringValue];
}看過註解後就好懂了:temporary 是新建立的 trip plan 才有的標記,代表它還是本機暫存副本、不是從資料庫讀來的。等資料庫資料回來,我們會更新並顯示全部資訊。
另外,如果你的程式碼裡有數學計算、公式,或一些寫死的魔法數字,加註解也很有幫助。否則過一陣子回頭看,會被那些毫無來由的數字弄得頭暈。