
用 iCarousel 自定義模式實作 iOS 9 多工切換器效果(進階教學)
作者:裡脊串,經授權轉載於本站。
前言
那時 iOS 9 即將正式釋出,為了處理公司 App 的相容性問題,我把手上的 Mac 與 Xcode 都升到了最新的 beta 版,接著就看到 iOS 9 的多工切換器風格大改,變成了下面這個樣子:

我突然想起之前寫的文章提過,我最偏愛的 UI 控件 iCarousel 要做出類似效果其實並不難,一時興起就花了點時間實驗,成果還不錯。因此接下來要介紹的是 iCarousel 的進階用法:如何透過自定義類型還原 iOS 9 的多工切換器。
建立模型
先仔細觀察 iOS 9 的多工切換器長什麼樣子:
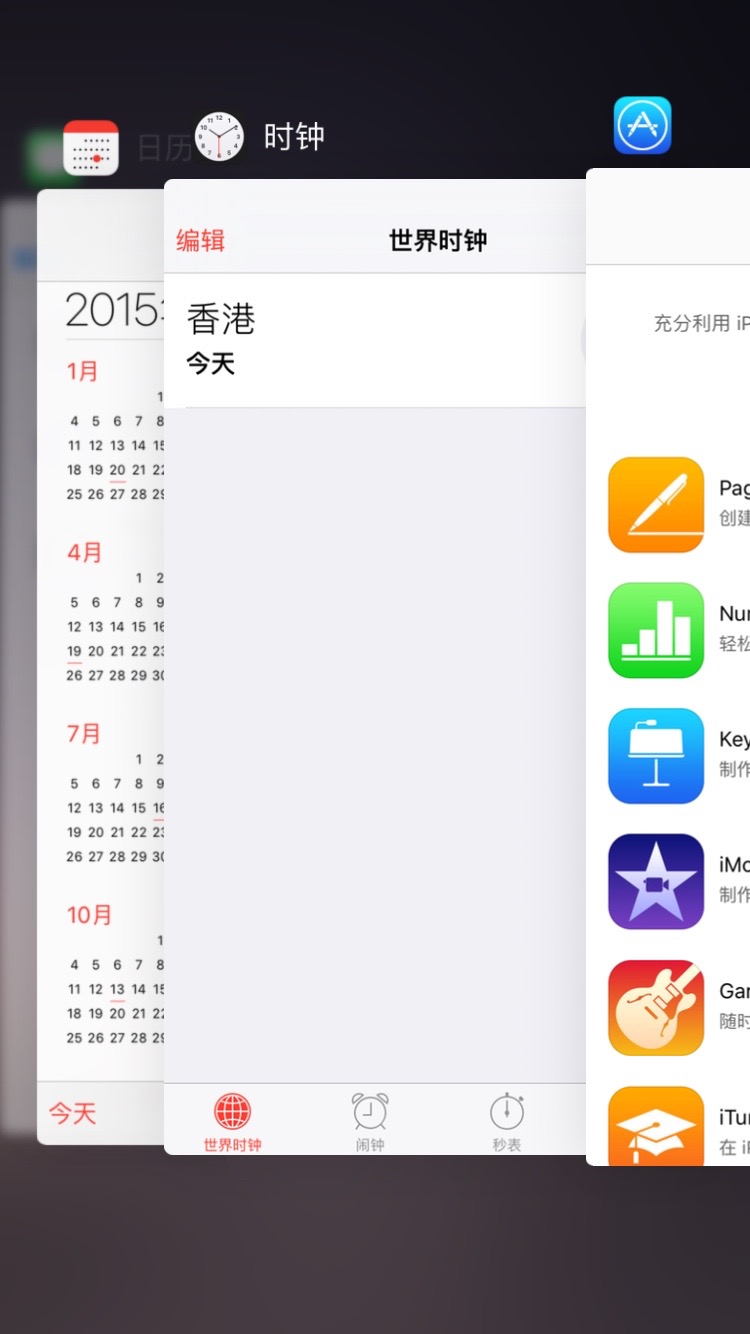
這個步驟很重要,會直接影響後續的計算。先把畫面擺正:
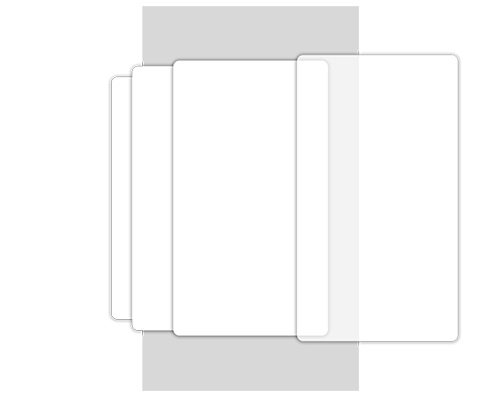
然後按比例用線分割:
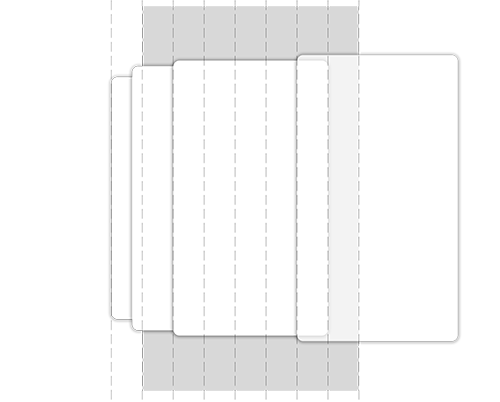
可以發現:若以太正中央的卡片(序號 0)為參照,最右邊卡片(序號 1)的位移量是中心卡片寬度的 4/5,最左邊卡片(序號 -2)的位移則是中心卡片寬度的 2/5。這兩個數值的確定對我們非常關鍵。
縮放比例則按線性遞減即可,計算很單純,這裡不再贅述。
細心的人可能會注意到,iOS 9 的中心卡片其實並不居中,而是偏右的。因此我們再把整體布局調整一下:
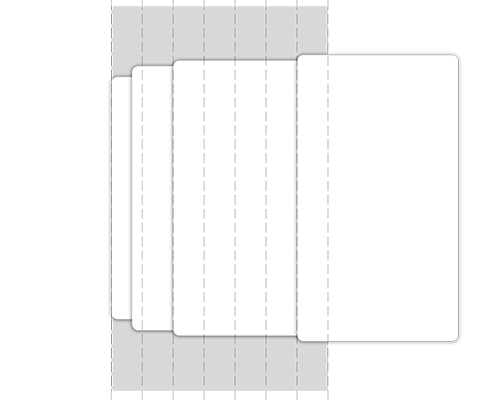
這樣就大致符合 iOS 9 的樣子了。
理解 iCarousel 的原理
iCarousel 內建了幾種顯示類型(沒用過的建議先跑 pod try iCarousel 看範例):
iCarouselTypeLinear
iCarouselTypeRotary
iCarouselTypeInvertedRotary
iCarouselTypeCylinder
iCarouselTypeInvertedCylinder
iCarouselTypeWheel
iCarouselTypeInvertedWheel
iCarouselTypeCoverFlow
iCarouselTypeCoverFlow2
iCarouselTypeTimeMachine
iCarouselTypeInvertedTimeMachine
效果圖可在官方 GitHub 首頁看到。這些類型雖然好用,卻無法滿足我們當前需求。沒關係,iCarousel 還支援自定義類型:
iCarouselTypeCustom
這就是今天的主角。先配置一個簡單的 iCarousel 範例,並把類型設為 iCarouselTypeCustom:
@interface ViewController () < iCarouselDelegate, iCarouselDataSource > @property (nonatomic, strong) iCarousel *carousel; @property (nonatomic, assign) CGSize cardSize; @end @implementation ViewController - (void)viewDidLoad { [super viewDidLoad]; CGFloat cardWidth = [UIScreen mainScreen].bounds.size.width*5.0f/7.0f; self.cardSize = CGSizeMake(cardWidth, cardWidth*16.0f/9.0f); self.view.backgroundColor = [UIColor blackColor]; self.carousel = [[iCarousel alloc] initWithFrame:[UIScreen mainScreen].bounds]; [self.view addSubview:self.carousel]; self.carousel.delegate = self; self.carousel.dataSource = self; self.carousel.type = iCarouselTypeCustom; self.carousel.bounceDistance = 0.2f; } - (NSInteger)numberOfItemsInCarousel:(iCarousel *)carousel { return 15; } - (CGFloat)carouselItemWidth:(iCarousel *)carousel { return self.cardSize.width; } - (UIView *)carousel:(iCarousel *)carousel viewForItemAtIndex:(NSInteger)index reusingView:(UIView *)view { UIView *cardView = view; if ( !cardView ) { cardView = [[UIView alloc] initWithFrame:CGRectMake(0, 0, self.cardSize.width, self.cardSize.height)]; UIImageView *imageView = [[UIImageView alloc] initWithFrame:cardView.bounds]; [cardView addSubview:imageView]; imageView.contentMode = UIViewContentModeScaleAspectFill; imageView.backgroundColor = [UIColor whiteColor]; cardView.layer.shadowPath = [UIBezierPath bezierPathWithRoundedRect:imageView.frame cornerRadius:5.0f].CGPath; cardView.layer.shadowRadius = 3.0f; cardView.layer.shadowColor = [UIColor blackColor].CGColor; cardView.layer.shadowOpacity = 0.5f; cardView.layer.shadowOffset = CGSizeMake(0, 0); CAShapeLayer *layer = [CAShapeLayer layer]; layer.frame = imageView.bounds; layer.path = [UIBezierPath bezierPathWithRoundedRect:imageView.bounds cornerRadius:5.0f].CGPath; imageView.layer.mask = layer; } return cardView; }
執行這段程式碼,你會看到下圖這個結果,而且完全滑不動:
原因是我們漏掉了最重要的 delegate 方法:
- (CATransform3D)carousel:(iCarousel *)carousel itemTransformForOffset:(CGFloat)offset
這個方法正是整個 iCarouselTypeCustom 的靈魂所在。
接著說明 iCarousel 的運作原理:
iCarousel 本身不是 UIScrollView,內部也不包含任何 UIScrollView
它透過 UIPanGestureRecognizer 計算並維護 scrollOffset 這個變數
它靠 scrollOffset 驅動整個動畫過程
iCarousel 並不會改變 itemView 的位置,而是透過修改 itemView 的 layer.transform 來達成位移與形變
文字描述可能不夠直觀,還是看程式碼:
- (UIView *)carousel:(iCarousel *)carousel viewForItemAtIndex:(NSInteger)index reusingView:(UIView *)view { UIView *cardView = view; if ( !cardView ) { cardView = [[UIView alloc] initWithFrame:CGRectMake(0, 0, self.cardSize.width, self.cardSize.height)]; ... ... //添加一個lbl UILabel *lbl = [[UILabel alloc] initWithFrame:cardView.bounds]; lbl.text = [@(index) stringValue]; [cardView addSubview:lbl]; lbl.font = [UIFont boldSystemFontOfSize:200]; lbl.textAlignment = NSTextAlignmentCenter; } return cardView; } - (CATransform3D)carousel:(iCarousel *)carousel itemTransformForOffset:(CGFloat)offset baseTransform:(CATransform3D)transform { NSLog(@"%f",offset); return transform; }
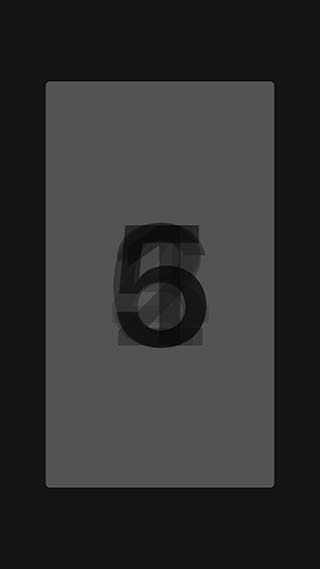
滑動時輸出的日誌大致如下:
2015-07-28 16:53:22.330 DemoTaskTray[1834:485052] -2.999739 2015-07-28 16:53:22.331 DemoTaskTray[1834:485052] 2.000261 2015-07-28 16:53:22.331 DemoTaskTray[1834:485052] -1.999739 2015-07-28 16:53:22.331 DemoTaskTray[1834:485052] 3.000261 2015-07-28 16:53:22.331 DemoTaskTray[1834:485052] -0.999739 2015-07-28 16:53:22.332 DemoTaskTray[1834:485052] 0.000261 2015-07-28 16:53:22.332 DemoTaskTray[1834:485052] 1.000261 2015-07-28 16:53:22.346 DemoTaskTray[1834:485052] -3.000000 2015-07-28 16:53:22.347 DemoTaskTray[1834:485052] 2.000000 2015-07-28 16:53:22.347 DemoTaskTray[1834:485052] -2.000000 2015-07-28 16:53:22.348 DemoTaskTray[1834:485052] 3.000000 2015-07-28 16:53:22.348 DemoTaskTray[1834:485052] -1.000000 2015-07-28 16:53:22.348 DemoTaskTray[1834:485052] 0.000000 2015-07-28 16:53:22.348 DemoTaskTray[1834:485052] 1.000000 2015-07-28 16:53:22.363 DemoTaskTray[1834:485052] -3.000000 2015-07-28 16:53:22.363 DemoTaskTray[1834:485052] 2.000000 2015-07-28 16:53:22.363 DemoTaskTray[1834:485052] -2.000000 2015-07-28 16:53:22.363 DemoTaskTray[1834:485052] 3.000000 2015-07-28 16:53:22.364 DemoTaskTray[1834:485052] -1.000000 2015-07-28 16:53:22.364 DemoTaskTray[1834:485052] 0.000000 2015-07-28 16:53:22.364 DemoTaskTray[1834:485052] 1.000000
可以清楚看到:所有 itemView 都是居中且重疊在一起的。滑動時並不會改變 itemView 的位置,但 offset 會改變,而且相鄰 offset 的差值恆為 1.0。
這正是 iCarousel 的核心設計理念。它雖然和 UIScrollView 一樣各自維護 scrollOffset,但 UIScrollView 滑動時改變的是自己的 ViewPort——也就是說,UIScrollView 上的 itemView 是真正被放到各自的位置上,只是透過移動可視窗口製造出滑動的錯覺。
iCarousel 則相反:它把所有 itemView 全部居中重疊放置,當 scrollOffset 變化時,它計算出每個 itemView 的 offset,再透過 itemTransformForOffset:baseTransform: 這個方法對每個 itemView 施加形變,用形變來「假裝」滑動。
這個非常大膽也相當另類的想法確實很巧妙。於是修改一下方法的實作:
- (CATransform3D)carousel:(iCarousel *)carousel itemTransformForOffset:(CGFloat)offset baseTransform:(CATransform3D)transform { NSLog(@"%f",offset); return CATransform3DTranslate(transform, offset * self.cardSize.width, 0, 0); }
效果如下:
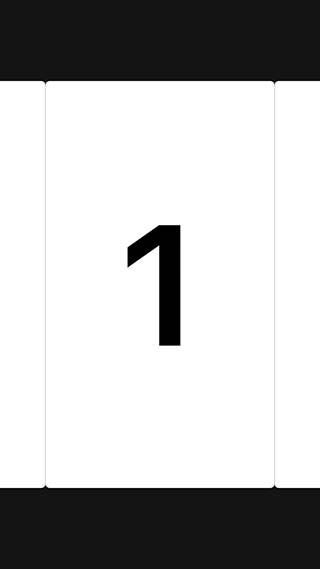
已經可以滑動了,而這個效果正是 iCarouselTypeLinear 的樣子。沒錯——iCarousel 所有內建類型都是這樣實作的,只是分別對 offset 施加了不同的形變,就造就了各種不同風格。
要特別說明的是:這個函數只提供 offset,並不提供 index 來指明對應哪一個 itemView。這樣做的好處是可以讓人專注於形變計算本身,不必再操心「與當前項目的距離」這類問題。
另外要注意,offset 是「元單位」——它不含寬度,只是一個偏移係數。下圖簡單說明:
未滑動時,offset 的關係是這樣:
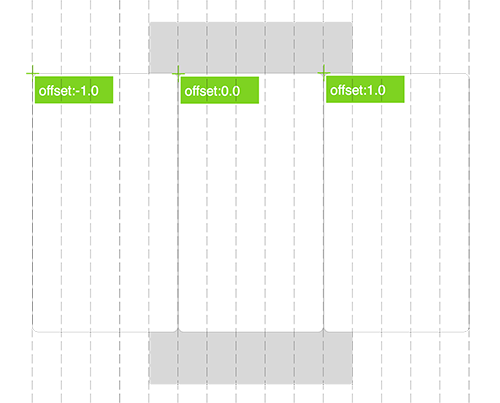
滑動時則變成:
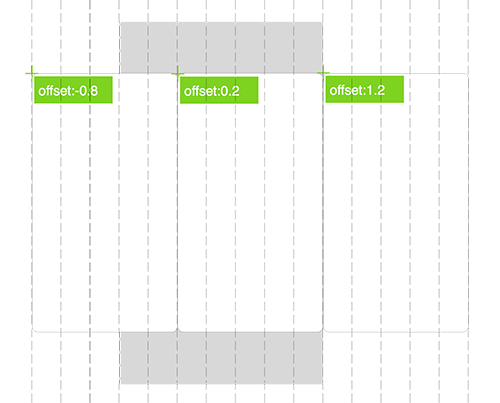
理解原理之後,是不是有點躍躍欲試了?接下來回到主題,一步步做出我們想要的效果。
數學計算
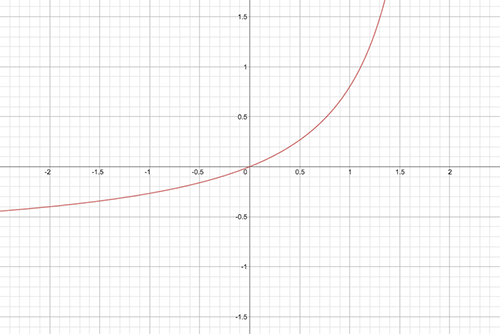
重點在於 offset 的計算方式。先確定函數曲線的形狀:觀察 iOS 9 的實機效果可以發現,itemView 由左向右滑動時是「越來越快」的,所以曲線大概長這樣:
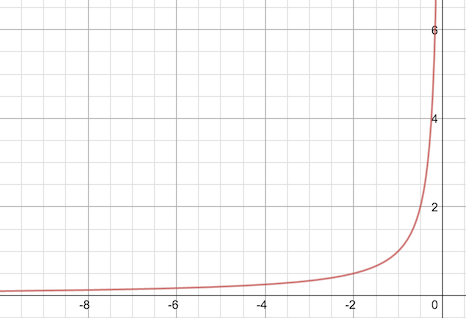
考驗高中數學的時候到了——怎麼找到這種函數?有一類叫直角雙曲線的函數,形式大致如下:

它的曲線圖是:
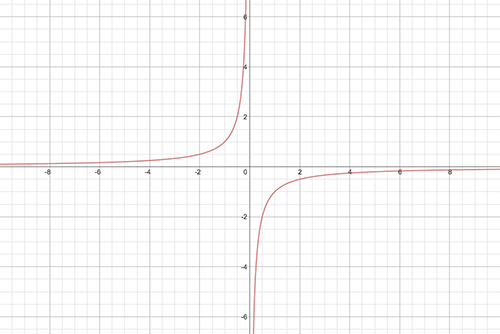
位於第二象限的那段,就是我們要的形狀。不過還需要調整才能得到最終結果。
由於 offset 為 0 時不該有形變,所以曲線必定過原點 (0,0),於是可以寫出函數的一般式:
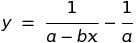
而文章開頭我們得到了兩組數據:
最右邊卡片(序號 1)的位移是中心卡片寬度的 4/5
最左邊卡片(序號 -2)的位移是中心卡片寬度的 2/5
代入一般式,可以得到兩個方程式:
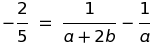
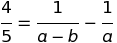
求解可得 a = 5/4,b = 5/8,於是得到最終公式:
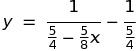
對照曲線圖:
接著修改程式碼(這段就是本文的關鍵):
- (CATransform3D)carousel:(iCarousel *)carousel itemTransformForOffset:(CGFloat)offset baseTransform:(CATransform3D)transform { CGFloat scale = [self scaleByOffset:offset]; CGFloat translation = [self translationByOffset:offset]; return CATransform3DScale(CATransform3DTranslate(transform, translation * self.cardSize.width, 0, 0), scale, scale, 1.0f); } - (void)carouselDidScroll:(iCarousel *)carousel { for ( UIView *view in carousel.visibleItemViews ) { CGFloat offset = [carousel offsetForItemAtIndex:[carousel indexOfItemView:view]]; if ( offset < -3.0 ) { view.alpha = 0.0f; } else if ( offset < -2.0f) { view.alpha = offset + 3.0f; } else { view.alpha = 1.0f; } } } //形變是線性的就ok了 - (CGFloat)scaleByOffset:(CGFloat)offset { return offset*0.04f + 1.0f; } //位移通過得到的公式來計算 - (CGFloat)translationByOffset:(CGFloat)offset { CGFloat z = 5.0f/4.0f; CGFloat n = 5.0f/8.0f; //z/n是臨界值 >=這個值時 我們就把itemView放到比較遠的地方不讓他顯示在屏幕上就可以了 if ( offset >= z/n ) { return 2.0f; } return 1/(z-n*offset)-1/z; }
再看看效果:

看起來已經是我們想要的樣子了。但滑動一下就會發現問題:

尺寸與位移都符合預期,但層級順序錯了。那 iCarousel 是怎麼決定 itemView 層級的?查閱原始碼可以知道:
NSComparisonResult compareViewDepth(UIView *view1, UIView *view2, iCarousel *self) { //compare depths CATransform3D t1 = view1.superview.layer.transform; CATransform3D t2 = view2.superview.layer.transform; CGFloat z1 = t1.m13 + t1.m23 + t1.m33 + t1.m43; CGFloat z2 = t2.m13 + t2.m23 + t2.m33 + t2.m43; CGFloat difference = z1 - z2; //if depths are equal, compare distance from current view if (difference == 0.0) { CATransform3D t3 = [self currentItemView].superview.layer.transform; if (self.vertical) { CGFloat y1 = t1.m12 + t1.m22 + t1.m32 + t1.m42; CGFloat y2 = t2.m12 + t2.m22 + t2.m32 + t2.m42; CGFloat y3 = t3.m12 + t3.m22 + t3.m32 + t3.m42; difference = fabs(y2 - y3) - fabs(y1 - y3); } else { CGFloat x1 = t1.m11 + t1.m21 + t1.m31 + t1.m41; CGFloat x2 = t2.m11 + t2.m21 + t2.m31 + t2.m41; CGFloat x3 = t3.m11 + t3.m21 + t3.m31 + t3.m41; difference = fabs(x2 - x3) - fabs(x1 - x3); } } return (difference < 0.0)? NSOrderedAscending: NSOrderedDescending; } - (void)depthSortViews { for (UIView *view in [[_itemViews allValues] sortedArrayUsingFunction:(NSInteger (*)(id, id, void *))compareViewDepth context:(__bridge void *)self]) { [_contentView bringSubviewToFront:view.superview]; } }
關鍵就是 compareViewDepth 這個比較函數,而它比較的是 CATransform3D 的各個欄位值。先來看 CATransform3D 的結構:
struct CATransform3D { CGFloat m11(x縮放), m12(y切變), m13(旋轉), m14(); CGFloat m21(x切變), m22(y縮放), m23(), m24(); CGFloat m31(旋轉), m32( ), m33(), m34(透視); CGFloat m41(x平移), m42(y平移), m43(z平移), m44(); };
而所有 CATransform3D 開頭的函數(例如 CATransform3DScale、CATransform3DTranslate)改動的也就是這些值。
回到那個比較函數:它先比較 t1.m13 + t1.m23 + t1.m33 + t1.m43。其中 m13 代表旋轉,m23 與 m33 暫無含義,m43 代表 z 軸平移。也就是說,我們只要改變 m43 就能控制層級。而改動 m43 最簡單的方式是:
CATransform3D CATransform3DTranslate (CATransform3D t, CGFloat tx, CGFloat ty, CGFloat tz)
最後一個參數正是用來改動 m43 的。所以把 delegate 方法稍微調整,將 offset 直接塞給最後一個參數即可(因為 offset 本身就是照順序傳入的):
return CATransform3DScale(CATransform3DTranslate(transform, translation * self.cardSize.width, 0, offset), scale, scale, 1.0f);
最後的效果:
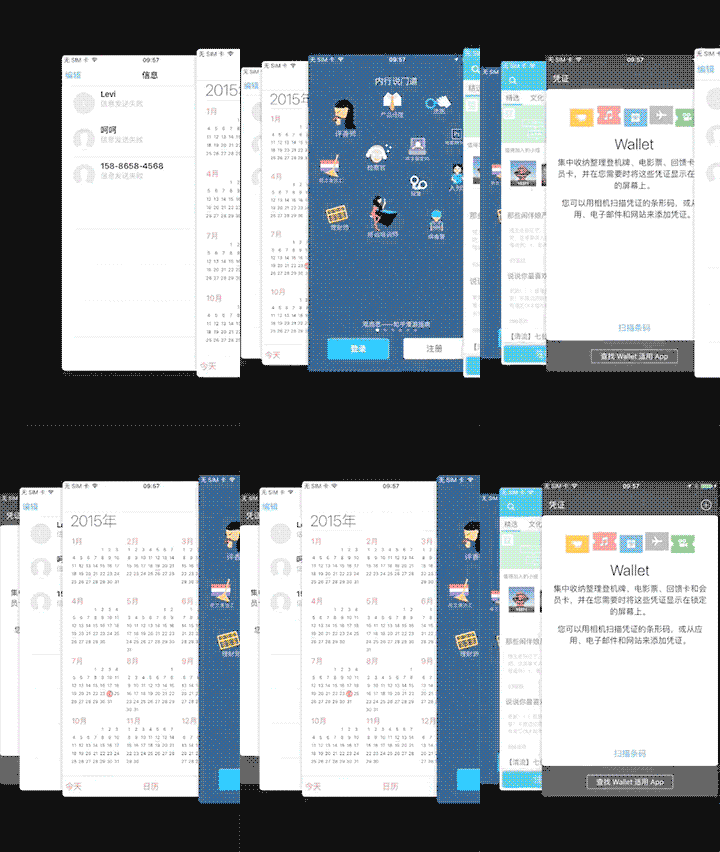
Bang!一個堪稱神似 iOS 9 的複製品就完成了。
小結
範例程式碼可從文中取得。可以看到,靠著 iCarousel,我們僅用不到 100 行(關鍵程式碼不到 50 行)就實作出相當不錯的效果,完全不需要額外處理手势、慣性、循環等麻煩事。當然,細節上仍有取捨——例如以淡入淡出代替真正的模糊、最後一張卡片居中等等——畢竟這不是要打造一個通用元件,而是示範一種思路。
如果你真的讀懂了這篇文章(作者自謙寫得未必清楚,建議搭配範例程式碼與 iCarousel 原始碼一起看),那麼日後遇到任何卡片滑動類的元件,都能輕鬆應對。
說到這裡,我個人並不喜歡重複造輪子。能用最少的程式碼達到需求,一直是我遵循的原則。而且很多經典的開源庫(例如 iCarousel)本身就值得深入研讀,理解作者的思路與取捨,站在巨人的肩膀上,是很不錯的學習方式,也能有效開闊視野。
另外補充一下工具:文中用到的數學曲線圖由 Desmos Graphing Calculator 繪製,公式圖片則由 Sciweaver 產生——直接把前者的公式複製到後者的輸入框即可,因為複跑出來本來就是 LaTeX 格式。有興趣的人可以研究一下,我自己也打算試試 MATLAB,說不定更方便。