
iOS 圖片無限輪播元件實作:從原理到封裝
作者:青玉伏案,授權本站轉載。
常有朋友問:「有沒有圖片無限滾動的 Demo?」正經的圖片輪播 Demo 我這兒還真沒有,於是乾脆自己封裝一個可以直接放進專案用的輪播元件。
我沒看過其他人 iOS 圖片無限輪播的原始碼,也不了解他們的做法。這次是借用 Web 前端的思路——以前寫網頁做幻燈片就是這樣,今天就在 iPhone 上試試。關於輪播,開源項目 iCarousel(github.com/nicklockwood/iCarousel)相當不錯,有興趣可以看看,非常強大。雖然沒必要重複造輪子,但理解原理還是有其必要。本文介紹其中一種解法,下一篇再談另一種。
一、運行效果、原理與呼叫方式
1. 運行效果
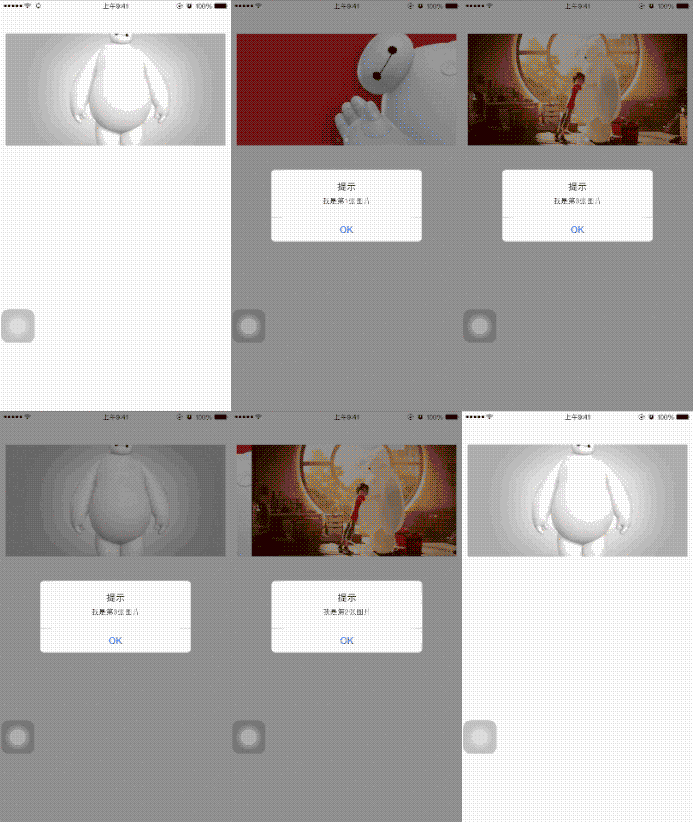
下面的 GIF 就是 Demo 的實際效果:間隔一段時間後圖片會自動切換,當然也支援手指滑動。切換到某張圖片時點擊它,會透過 Block 回呼把該圖的 index 傳出來;Demo 裡用提示框顯示,實際專案中拿到 index 能做很多事——它就是圖片的 tag,標記著你點的是哪一張。下圖是三張圖的輪播。
2. 原理
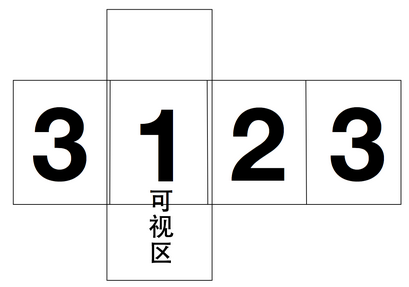
實現無限輪播的思路一句話就能講完:如果要顯示 3 張圖,就在 ScrollView 上貼 4 張,順序是 3-1-2-3。首次停在「1」的位置,往後滑動,滑到最後那張「3」時,無動畫地切回第一張「3」的位置,再繼續滾動。因為首尾兩張圖相同,使用者察覺不到那次瞬移,於是就形成了無限循環。
3. 元件呼叫方式
初始化和屬性設定分成五步:
(1)決定元件的位置;(2)準備圖片名稱陣列;(3)透過便利構造器初始化,傳入 imageName 陣列;(4)設定屬性(選用):scrollInterval 為切換間隔、animationInterVale 為動畫時長;(5)呼叫 addTapEventForImageWithBlock 註冊點擊回呼。
-(void)addZLImageViewDisPlayView{

    // 取得要顯示的位置
    CGRect screenFrame = [[UIScreen mainScreen] bounds];
    CGRect frame = CGRectMake(10, 60, screenFrame.size.width - 20, 200);

    NSArray *imageArray = @[@"01.jpg", @"02.jpg", @"03.jpg"];

    // 初始化元件
    ZLImageViewDisplayView *imageViewDisplay = [ZLImageViewDisplayView zlImageViewDisplayViewWithFrame:frame WithImages:imageArray];

    // 設定輪播間隔
    imageViewDisplay.scrollInterval = 2;
    // 圖片滾動動畫時間
    imageViewDisplay.animationInterVale = 0.6;

    // 加入父視圖
    [self.view addSubview:imageViewDisplay];

    [imageViewDisplay addTapEventForImageWithBlock:^(NSInteger imageIndex){
        NSString *str = [NSString stringWithFormat:@"我是第%ld張圖片", imageIndex];
        UIAlertView *alter = [[UIAlertView alloc] initWithTitle:@"提示" message:str delegate:nil cancelButtonTitle:@"OK" otherButtonTitles:nil, nil];
        [alter show];
    }];

}
二、核心程式碼解析
1. 便利初始化方法,參數是元件 frame 與圖片名稱陣列。其中會初始化各項屬性並依序呼叫相關的建置方法:
#pragma mark 遍歷初始化方法
- (instancetype)initWithFrame: (CGRect)frame
                   WithImages: (NSArray *)images {
    self = [super initWithFrame:frame];
    if (self) {
        // 元件寬高
        _widthOfView = frame.size.width;
        _heightView = frame.size.height;

        _scrollInterval = 3;
        _animationInterVale = 0.7;

        // 當前顯示頁
        _currentPage = 1;

        _imageViewcontentModel = UIViewContentModeScaleAspectFill;

        self.clipsToBounds = YES;

        // 初始化滾動視圖
        [self initMainScrollView];
        // 加入 ImageView
        [self addImageviewsForMainScrollWithImages:images];
        // 加入 timer
        [self addTimerLoop];

        [self addPageControl];

    }
    return self;
}
2. 便利構造器,本質上是類方法,參數與便利初始化方法相同,負責建立物件並回傳:
#pragma mark 便利構造器
+ (instancetype)zlImageViewDisplayViewWithFrame: (CGRect)frame
                                      WithImages: (NSArray *)images{
    ZLImageViewDisplayView *instance = [[ZLImageViewDisplayView alloc] initWithFrame:frame WithImages:images];
    return instance;
}
3. 初始化 ScrollView,大小與自訂元件一致,並設定分頁、隱藏捲軸、指定 delegate:
#pragma mark 初始化ScrollView
- (void)initMainScrollView{

    _mainScrollView = [[UIScrollView alloc] initWithFrame:CGRectMake(0, 0, _widthOfView, _heightView)];
    _mainScrollView.contentSize = CGSizeMake(_widthOfView, _heightView);
    _mainScrollView.pagingEnabled = YES;
    _mainScrollView.showsHorizontalScrollIndicator = NO;
    _mainScrollView.showsVerticalScrollIndicator = NO;
    _mainScrollView.delegate = self;
    [self addSubview:_mainScrollView];
}
4. 加入 PageControl,頁數取自圖片陣列,並同步目前頁碼:
#pragma mark 添加PageControl
- (void)addPageControl{
    _imageViewPageControl = [[UIPageControl alloc] initWithFrame:CGRectMake(0, _heightView - 20, _widthOfView, 20)];

    _imageViewPageControl.numberOfPages = _imageViewArray.count;
    _imageViewPageControl.currentPage = _currentPage - 1;
    _imageViewPageControl.tintColor = [UIColor blackColor];
    [self addSubview:_imageViewPageControl];
}
5. 加入 ImageView 與圖片,這段是核心。依序號計算每張圖的 frame 佈局,每張圖的尺寸等於元件本身。依照前述原理,ScrollView 上的第一張與最後一張是同一張圖,真正想讓使用者先看到的圖放在第二個位置,然後把 contentOffset 移過去:
#pragma mark 給ScrollView添加ImageView
-(void)addImageviewsForMainScrollWithImages: (NSArray *)images{
    // 設置ContentSize
    _mainScrollView.contentSize = CGSizeMake(_widthOfView * (images.count + 1), _heightView);

    _imageViewArray = images;

    for ( int i = 0; i < _imageViewArray.count + 1; i++ ) {

        CGRect currentFrame = CGRectMake(_widthOfView * i, 0, _widthOfView, _heightView);

        UIImageView *tempImageView = [[UIImageView alloc] initWithFrame:currentFrame];

        tempImageView.contentMode = _imageViewcontentModel;
        tempImageView.clipsToBounds = YES;

        NSString *imageName;

        if (i == 0) {
            imageName = [_imageViewArray lastObject];
        } else {
            imageName = _imageViewArray[i - 1];
        }

        UIImage *imageTemp = [UIImage imageNamed:imageName];
        [tempImageView setImage:imageTemp];

        [_mainScrollView addSubview:tempImageView];
    }

    _mainScrollView.contentOffset = CGPointMake(_widthOfView, 0);

}
6. 加入計時器,讓輪播自動跑起來:
- (void)addTimerLoop{

    if (_timer == nil) {
        _timer = [NSTimer scheduledTimerWithTimeInterval:_scrollInterval target:self selector:@selector(changeOffset) userInfo:nil repeats:YES];
    }
}
7. 計時器執行的動作。時間到時以動畫改變 contentOffset.x 切到下一張;如果目前已在最後一張,則無動畫切回第一張——由於兩張圖相同,使用者看不出那次跳躍,於是就形成了無限循環:
-(void)changeOffset{

    _currentPage++;

    if (_currentPage == _imageViewArray.count + 1) {
        _currentPage = 1;
    }

    [UIView animateWithDuration:_animationInterVale animations:^{
        _mainScrollView.contentOffset = CGPointMake(_widthOfView * _currentPage, 0);
    } completion:^(BOOL finished){
        if (_currentPage == _imageViewArray.count) {
            _mainScrollView.contentOffset = CGPointMake(0, 0);
        }
    }];

    _imageViewPageControl.currentPage = _currentPage - 1;

}
8. 手動切換。自動輪播靠 NSTimer,要支援手動則得在 ScrollView 的回呼裡處理:判斷是否滑到了頭尾並做位置校正,然後重新安排計時器。
- (void)scrollViewDidEndDecelerating:(UIScrollView *)scrollView{
    NSInteger currentPage = scrollView.contentOffset.x / _widthOfView;

    if(currentPage == 0){
        _mainScrollView.contentOffset = CGPointMake(_widthOfView * _imageViewArray.count, 0);
        _imageViewPageControl.currentPage = _imageViewArray.count;
        _currentPage = _imageViewArray.count;
    }

    if (_currentPage + 1 == currentPage || currentPage == 1) {
        _currentPage = currentPage;

        if (_currentPage == _imageViewArray.count + 1) {
            _currentPage = 1;
        }

        if (_currentPage == _imageViewArray.count) {
            _mainScrollView.contentOffset = CGPointMake(0, 0);
        }

        _imageViewPageControl.currentPage = _currentPage - 1;
        [self resumeTimer];
        return;

    }

}
9. 重置計時器。手動滑動後必須讓計時器暫停一會兒,否則剛切完就會立刻跳到下一張。做法是調整下一次觸發的時間,之後自然恢復:
#pragma mark 暫停定時器
-(void)resumeTimer{

    if(![_timer isValid]){
        return ;
    }

    [_timer setFireDate:[NSDate dateWithTimeIntervalSinceNow:_scrollInterval - _animationInterVale]];
}
三、對外介面
經過以上步驟,元件就可以在專案裡使用了。最後附上頭檔案對外暴露的介面:
typedef void(^TapImageViewButtonBlock)(NSInteger imageIndex);

@interface ZLImageViewDisplayView : UIView

// 切換圖片的時間間隔,可選,預設 3s
@property (nonatomic, assign) CGFloat scrollInterval;

// 切換圖片時的動畫時間間隔,可選,預設 0.7s
@property (nonatomic, assign) CGFloat animationInterVale;

// 便利構造器:frame + 圖片陣列
+ (instancetype)zlImageViewDisplayViewWithFrame: (CGRect)frame
                                       WithImages: (NSArray *)images;

// 便利初始化方法
- (instancetype)initWithFrame: (CGRect)frame
                   WithImages: (NSArray *)images;

// 為圖片加入點擊回呼
- (void)addTapEventForImageWithBlock: (TapImageViewButtonBlock)block;

@end
元件與 Demo 已放在 GitHub:https://github.com/lizelu/ZLImageViewDisplay
這只是圖片輪播的一種解法,下一篇會用「兩個 ImageView 複用」的方式實作另一種無限輪播。Demo 寫得比較趕,難免有疏漏之處,歡迎指正。
- 作者:青玉伏案
- 出處:https://www.cnblogs.com/ludashi/
- 本文版權歸作者與部落格園共有,歡迎轉載,但未經作者同意必須保留此段聲明,並在文章頁面顯著位置給出原文連結。
- 文中有任何錯誤,歡迎指出,以免更多人被誤導。
- 上一篇文章: 精選開源推薦:網易新聞風格 App、聚光燈新手引導與圖文混排
- 下一篇文章: 大型 iOS 專案開發隨筆:語言、架構、協作與工程化