
【iOS】彩色 TabBar 切換動畫的完整實現思路
偶然間看到一張彩色 TabBar 切換的設計圖,效果相當亮眼,於是抽空把它實現了出來,並在這裡記錄完整的思路與代碼。
環境信息
- Mac OS X 10.10.4
- Xcode 6.4
- iOS 8.4
效果圖:
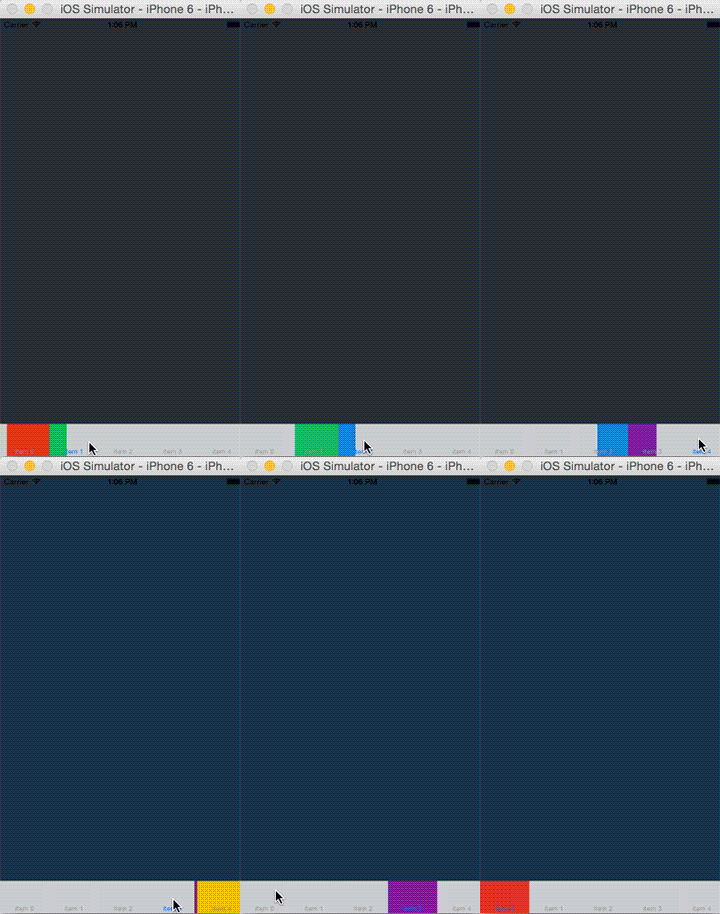
源碼下載地址:https://github.com/saitjr/TColorfulTabBar.git
一、實現分析
看到這個彩色切換效果,我的第一反應是:在 TabBar 上鋪一層彩色的 View,再通過 mask 遮罩來控制每個色塊的顯示範圍。最終的實現正是沿著這個思路展開的。
1. 設計思想
為了降低耦合與侵入性,我選擇繼承 UITabBar 來實現。集成時,只需把系統的 TabBar 換成自定義的 TColorfulTabBar 即可。
2. 視圖層級圖
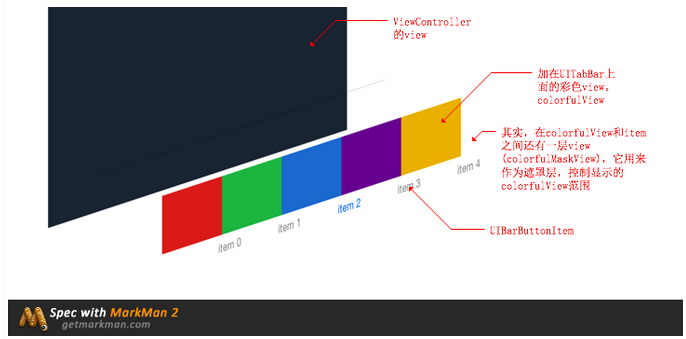
二、效果實現
1. 添加彩色視圖 colorfulView
TColorfulTabBar.m
- (void)setupColorView { // 初始化彩色視圖並添加到 tabbar 上 UIView *colorView = [[UIView alloc] initWithFrame:self.bounds]; [self addSubview:colorView]; self.colorfulView = colorView; // 彩色視圖的五種顏色,這是一個 UIColor 數組 NSArray *colors = self.itemColors; CGFloat itemWidth = self.bounds.size.width / self.itemCount; for (int i = 0; i < self.itemCount; i++ ) { UIView *view = [[UIView alloc] initWithFrame:CGRectMake(itemWidth * i, 0, itemWidth, self.bounds.size.height)]; view.backgroundColor = colors[i]; [self.colorfulView addSubview:view]; } }2. 添加彩色視圖的遮罩 colorfulMaskView
這裡的遮罩之所以選用 UIView 而非 CAShapeLayer 或 CALayer,原因如下:
- 遮罩是矩形,無需路徑,因此不必用 CAShapeLayer。
- 設計圖中,位移動畫之前有遮罩單向變寬(向左或向右)的效果。若用 CALayer,改 bounds 時是雙向變化,想單向就得加錨點,過於麻煩。
- 若用 UIView,向右變寬只需 x 不變、width 變長;向左變寬只需 x 減值、width 加值,方便得多。
- 最後,做動畫時 Layer 需要 CABaseAnimation,而 UIView 直接用 UIView 的 Animation 即可。
設置時,把 colorfulMaskView 的 layer 指定為 colorfulView 的 mask 就行。代碼如下:
TColorfulTabBar.m
- (void)setupMaskLayer { // 獲取每個 item 的寬度 CGFloat itemWidth = self.bounds.size.width / self.itemCount; // 初始化 colorMaskView,並將其 layer 設置為彩色視圖的遮罩 UIView *colorMaskView = [[UIView alloc] initWithFrame:CGRectMake(0, 0, itemWidth, self.bounds.size.height)]; colorMaskView.backgroundColor = [UIColor blackColor]; self.colorfulMaskView = colorMaskView; self.colorfulView.layer.mask = self.colorfulMaskView.layer; }3. 設置代理,獲取當前點擊的下標
UITabBar 本身沒有獲取點擊下標的接口,但 UITabBarDelegate 有,而該協議默認由 UITabBarController 遵守。為了降低耦合,我讓 UITabBar 自己成為自己的代理來拿取選中的下標。
值得注意的是,不能在初始化方法裡寫 self.delegate = self,因為即便設定了,也會被 UITabBarController 覆蓋。最終的解決辦法是等 UITabBar 加載到父視圖上時,再把 delegate 改為 self。
- (void)didMoveToSuperview { [super didMoveToSuperview]; self.delegate = self; }由於每次移動的方向與距離都取決於「上次下標」與「這次下標」,因此需要用屬性記錄這兩個值。
- (void)tabBar:(UITabBar *)tabBar didSelectItem:(UITabBarItem *)item { NSInteger index = [self.items indexOfObject:item]; self.fromeIndex = self.toIndex; self.toIndex = index; // 拿到下標後執行動畫 [self animation]; }4. 移動遮罩,顯示不同色塊
做動畫時要兼顧平滑性。整個動畫由兩段組成:一段是寬度放大,一段是縮回原尺寸並伴隨位移。整體呈現 EaseInOut 的效果,拆開來看就是第一段 EaseIn、第二段 EaseOut。
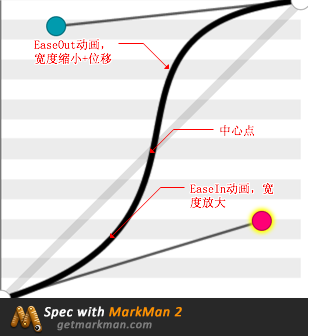
- (void)animation { CGFloat itemWidth = self.bounds.size.width / self.itemCount; // 為了效果更平滑,根據兩次下標差值計算需要放大的距離 CGFloat extraWidth = ABS(self.toIndex - self.fromeIndex) * itemWidth / 4; // 放大的大小 CGRect scaleFrame = CGRectMake(self.colorfulMaskView.x, 0, itemWidth + extraWidth, self.bounds.size.height); // 最終的大小與位置 CGRect toFrame = CGRectMake(self.toIndex * itemWidth, 0, itemWidth, self.bounds.size.height); // 如果是向左移動,則修改 x 軸坐標 if (self.fromeIndex > self.toIndex) { scaleFrame = CGRectMake(self.colorfulMaskView.x - extraWidth, 0, itemWidth + extraWidth, self.bounds.size.height); } // 兩個動畫合起來是 EaseInOut,所以第一段 EaseIn,第二段 EaseOut // 先放大 [UIView animateWithDuration:ANIMATION_DURATION delay:0 options:UIViewAnimationOptionCurveEaseIn animations:^{ self.colorfulMaskView.frame = scaleFrame; } completion:^(BOOL finished){ // 再縮小並位移 [UIView animateWithDuration:ANIMATION_DURATION delay:0 options:UIViewAnimationOptionCurveEaseOut animations:^{ self.colorfulMaskView.frame = toFrame; } completion:NULL]; }]; }