
iOS 常用 UI 組件梳理:從 UIAlertController 到 UINavigationController
作者:神獸 gcc,授權本站轉載。
最近把 iOS 的常用 UI 組件重新整理了一遍。這些組件如今都能通過 Storyboard 快速搭出來,但真正讓界面「活」起來、賦予它們完整的事件響應,仍需下一番功夫。
順帶談一點方法論:學習組件時最棘手的往往不是搞不定某個屬性,而是根本不知道有這個東西存在。因此最佳路徑是讀官方文檔——一開始會有些吃力,但啃下去總會豁然開朗。遇到問題先查文檔,實在不行再上 Stack Overflow。
UIButton
網上已有不少完整教程可參考,這裡不再贅述,配合官方文檔學習效果最好。
UIAlertController
彈出式提示框。市面書籍與網絡資料多停留在 iOS 8 之前,那時用的是 UIAlertView;從 iOS 8 起蘋果已棄用它,改用 UIAlertController。
下面這段來自我練習 UITableView 時的代碼(一個類似通訊錄的 Demo),重點看點擊 cell 後如何彈出提示框:
// 創建提示框
UIAlertController *alertController = [UIAlertController alertControllerWithTitle:@"System Info"
    message:[contact getName] preferredStyle:UIAlertControllerStyleAlert];

// 取消按鈕
UIAlertAction *cancelAction = [UIAlertAction actionWithTitle:@"Cancel"
    style:UIAlertActionStyleCancel handler:^(UIAlertAction *action) {
        NSLog(@"The \"Okay/Cancel\" alert's cancel action occured.");
    }];

// 確定按鈕
UIAlertAction *otherAction = [UIAlertAction actionWithTitle:@"OK"
    style:UIAlertActionStyleDefault handler:^(UIAlertAction *action) {
        NSLog(@"The \"Okay/Cancel\" alert's other action occured.");
        // 取當前行數據
        UITextField *textfield = alertController.textFields[0];
        KCContactGroup *group = _contacts[_selectedIndexPath.section];
        KCContact *contact = group.contacts[_selectedIndexPath.row];
        contact.phoneNumber = textfield.text;
        NSArray *indexPaths = @[_selectedIndexPath];
        [_tableview reloadRowsAtIndexPaths:indexPaths withRowAnimation:UITableViewRowAnimationLeft];
    }];

[alertController addAction:cancelAction];
[alertController addAction:otherAction];

[alertController addTextFieldWithConfigurationHandler:^(UITextField *textField) {
    // 可在這裡定製 textField,例如背景色
    textField.text = contact.phoneNumber;
}];

[self presentViewController:alertController animated:YES completion:nil];
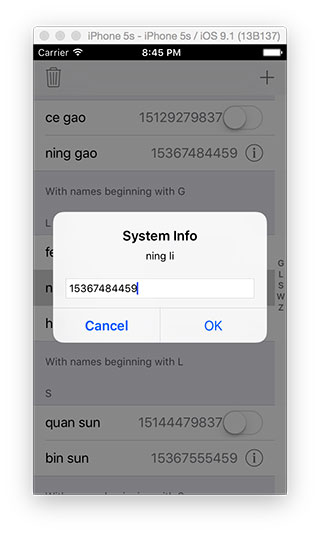
效果大致如下,文本框中的內容取自 cell。
再說一次:網上幾乎找不到 UIAlertController 的新教程,我當初是花整個下午啃官方文檔才調通。文檔真的是越用越香。
UISegmentedControl
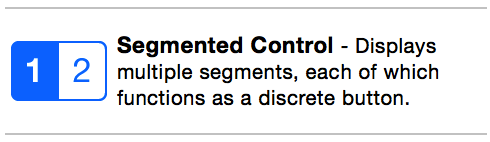
分段控件,把一排按鈕集成在一起,用法與 Button 類似。
UISwitch
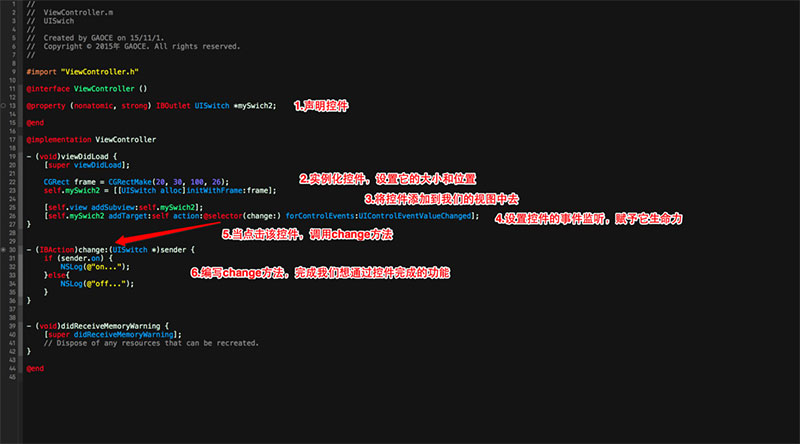
就是設置裡飛行模式那種開關。Storyboard 拖拽即可,別忘了連線。純代碼實現與 UISegmentedControl 等基本一致。
UISlider
滑塊式選擇控件,常見於音量、亮度調節,依官方文檔可自定義大量外觀屬性,實現方式同上。
UIPageControl
值得說三遍的好東西。它體積很小但格調很高,搭配 UIScrollView 能立刻讓界面檔次上來。相關示例代碼暫缺,之後做歡迎頁時再補充。
UITextField
基礎輸入框。此前〈從一道題看 Delegate〉中已大致覆蓋其用法,更多配置請查文檔。
UIDatePicker
日期選擇控件,實現方式同上。
UIScrollView
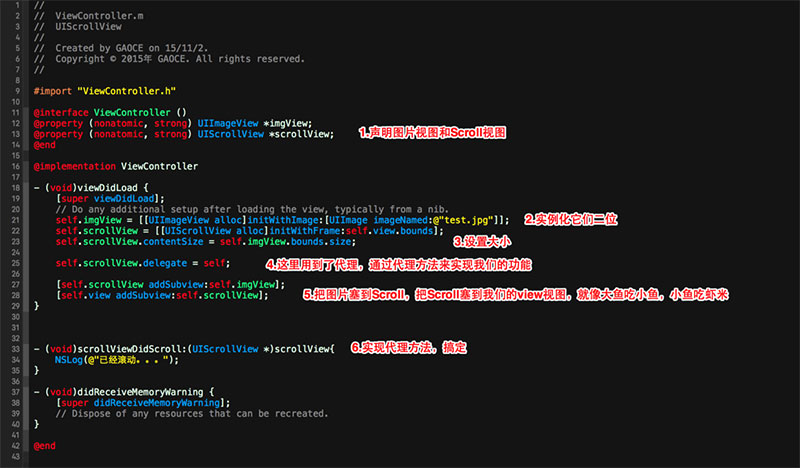
當圖片尺寸超出可視區域時,就需要它來承載滾動瀏覽。
UITextView
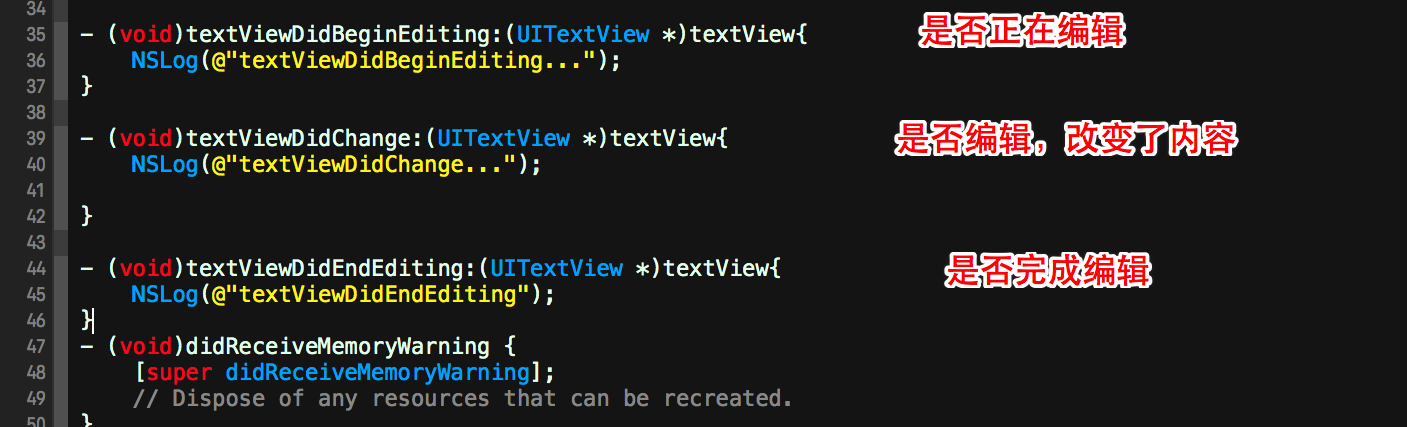
與 UITextField 相比,它支持多行內容,並提供編輯狀態的代理監聽。發布長文本等場景經常用到。幾個關鍵代理方法如下。
UIToolbar
開發中經常使用的控件,實現簡單。同時要認識 UIBarButtonItem 與 Fixed Space Bar Button Item——工具欄上的按鈕和間距都被對象化了。
@interface ViewController ()
@property (nonatomic, strong) UIToolbar *mytoolbar;
@end

@implementation ViewController

- (void)viewDidLoad {
    [super viewDidLoad];

    self.mytoolbar = [[UIToolbar alloc] initWithFrame:CGRectMake(0, 100, self.view.frame.size.width, 30)];
    [self.view addSubview:self.mytoolbar];
    self.mytoolbar.barStyle = UIBarStyleBlack;

    // 按鈕與間距均為對象,按鈕可綁定方法
    UIBarButtonItem *item1 = [[UIBarButtonItem alloc] initWithTitle:@"hello"
        style:UIBarButtonItemStylePlain target:self action:@selector(sayhello)];
    UIBarButtonItem *fixed = [[UIBarButtonItem alloc] initWithBarButtonSystemItem:UIBarButtonSystemItemFixedSpace
        target:nil action:nil];
    UIBarButtonItem *item2 = [[UIBarButtonItem alloc] initWithTitle:@"bye"
        style:UIBarButtonItemStylePlain target:self action:@selector(saybye)];

    self.mytoolbar.items = @[item1, fixed, item2];
}

- (IBAction)sayhello { NSLog(@"hello"); }
- (IBAction)saybye   { NSLog(@"bye"); }

@end
UIPickerView
與 UIDatePicker 類似,但內容可以自定義。
UITableView
強大且必須掌握的核心控件。推薦閱讀〈iOS 開發系列 — UITableView 全面解析〉。我自己在這上面投入了大量時間,也不敢說已經用得嫻熟。
UICollectionView
壁紙、電商類 App 中隨處可見。實現步驟可歸納為:
- .h 中聲明代理與數據源。
- .m 中:聲明 UICollectionView → 實例化(含 frame、背景色等)→ 綁定 dataSource 與 delegate → 添加為子視圖 → 註冊 cell → 實現數據源方法 → 實現代理方法。
具體代碼:
@interface ViewController ()
@property (nonatomic, strong) UICollectionView *collectionView;
@end

static NSString *cid = @"cid";

@implementation ViewController

- (void)viewDidLoad {
    [super viewDidLoad];

    UICollectionViewFlowLayout *flowlayout = [[UICollectionViewFlowLayout alloc] init];
    CGRect flame = CGRectMake(20, 40, self.view.frame.size.width - 40, self.view.frame.size.height - 60);
    self.collectionView = [[UICollectionView alloc] initWithFrame:flame collectionViewLayout:flowlayout];
    self.collectionView.dataSource = self;
    self.collectionView.delegate = self;
    [self.view addSubview:self.collectionView];

    [self.collectionView registerClass:[UICollectionViewCell class] forCellWithReuseIdentifier:cid];
}

- (NSInteger)collectionView:(UICollectionView *)collectionView numberOfItemsInSection:(NSInteger)section {
    return 50;
}

// 返回的 cell 必須來自 dequeueReusableCellWithReuseIdentifier:forIndexPath:
- (UICollectionViewCell *)collectionView:(UICollectionView *)collectionView cellForItemAtIndexPath:(NSIndexPath *)indexPath {
    UICollectionViewCell *cell = [collectionView dequeueReusableCellWithReuseIdentifier:cid forIndexPath:indexPath];
    cell.backgroundColor = [UIColor blueColor];
    return cell;
}

- (UIEdgeInsets)collectionView:(UICollectionView *)collectionView layout:(UICollectionViewLayout *)collectionViewLayout insetForSectionAtIndex:(NSInteger)section {
    return UIEdgeInsetsMake(10, 10, 10, 10);
}

- (CGSize)collectionView:(UICollectionView *)collectionView layout:(UICollectionViewLayout *)collectionViewLayout sizeForItemAtIndexPath:(NSIndexPath *)indexPath {
    return CGSizeMake(120, 100);
}

- (void)collectionView:(UICollectionView *)collectionView didSelectItemAtIndexPath:(NSIndexPath *)indexPath {
    UICollectionViewCell *cell = [collectionView cellForItemAtIndexPath:indexPath];
    cell.backgroundColor = [UIColor yellowColor];
    NSLog(@"%ld", indexPath.row);
}

- (void)collectionView:(UICollectionView *)collectionView didDeselectItemAtIndexPath:(NSIndexPath *)indexPath {
    UICollectionViewCell *cell = [collectionView cellForItemAtIndexPath:indexPath];
    cell.backgroundColor = [UIColor blueColor];
}

@end
數據源與代理方法究竟有哪些,用 Command 點進協議裡翻一遍,文檔始終是最終歸宿。
UIViewController
視圖控制器在 MVC 模式中扮演樞紐角色,是數據與展示的調度者,直接決定 App 呈現在用戶面前的樣子。新建 Single View 工程默認使用的就是它。
UINavigationController
導航視圖控制器,本質是一個「先進後出」的視圖棧,逐層管理其中的視圖。學習時還需掌握 UINavigationBar、UINavigationItem,以及一組 push / pop 方法。
下面用純代碼實現一個四頁的導航示例。
第一步:Command+N 新建四個 Cocoa Touch Class(myViewController1 ~ 4),父類均為 UIViewController。
第二步:在 AppDelegate.m 中配置初始界面。
- (BOOL)application:(UIApplication *)application didFinishLaunchingWithOptions:(NSDictionary *)launchOptions {
    UIScreen *screen = [UIScreen mainScreen];
    self.window = [[UIWindow alloc] initWithFrame:screen.bounds];

    // 首屏
    myViewController1 *vc1 = [[myViewController1 alloc] init];
    vc1.view.backgroundColor = [UIColor blueColor];

    // 用導航控制器包裝並設為根視圖
    UINavigationController *nc = [[UINavigationController alloc] initWithRootViewController:vc1];
    self.window.rootViewController = nc;
    [self.window makeKeyAndVisible];

    return YES;
}第三步:在各視圖中通過按鈕事件實現跳轉。
#import "myViewController1.h"
#import "myViewController2.h"

@implementation myViewController1

- (void)viewDidLoad {
    [super viewDidLoad];

    UIButton *btn = [UIButton buttonWithType:UIButtonTypeSystem];
    [btn setTitle:@"GO" forState:UIControlStateNormal];
    btn.frame = CGRectMake(160, 100, 30, 36);
    [btn addTarget:self action:@selector(go:) forControlEvents:UIControlEventTouchUpInside];
    [self.view addSubview:btn];

    UILabel *lable = [[UILabel alloc] initWithFrame:CGRectMake(160, 160, 100, 36)];
    lable.text = @"第一頁";
    [self.view addSubview:lable];
}

// 跳轉的關鍵就在這裡
- (IBAction)go:(id)sender {
    myViewController2 *vc2 = [[myViewController2 alloc] init];
    vc2.view.backgroundColor = [UIColor greenColor];
    [self.navigationController pushViewController:vc2 animated:YES];
}

@end
myViewController2 ~ 4 同理。若希望從第四頁跳回第二頁,可以這樣寫:
- (IBAction)go:(id)sender {
    // 回到上一頁
    // [self.navigationController popViewControllerAnimated:YES];

    // 直接回到根視圖
    // [self.navigationController popToRootViewControllerAnimated:YES];

    NSArray *controllers = self.navigationController.viewControllers;
    // 回到指定頁面
    [self.navigationController popToViewController:[controllers objectAtIndex:1] animated:YES];
}
UITabBarController
與 UINavigationController 的頂部導航不同,它是底部標簽導航,同樣用於在多個視圖間直接切換。微信、QQ 都是典型代表,實現思路與 UINavigationController 類似。可參考〈iOS 開發 UI 篇 — UITabBarController 簡單介紹〉。
以上只是最基礎的用法,更深入的內容留待日後結合文檔慢慢補充。