Interface Builder 的實用技巧:別再手寫那些樣板代碼

譯者:王小北(CC 論壇 ID) 原文:Tips for Interface Builder
年紀輕一些的時候,寫出成千上萬行代碼是件值得炫耀的事。做得久了才慢慢意識到:代碼其實很貴——維護、除錯、追根因,樣樣都要花時間。
這也正是我們應該善用工具、少寫樣板代碼的原因。Interface Builder 就是其中一件趁手的工具。以下是一些我常用的技巧。
Storyboards 還是 Xib
蘋果的態度很明確:優先用 storyboard。因為有些能力只在 storyboard 裡才有——Prototype cells、Segues、Container View Controllers。
不少人抱怨團隊協作時 storyboard 容易衝突。以前確實頻繁,但如今它的檔案格式更結構化、更好讀,衝突處理起來已經沒那麼痛苦。
即便如此,我也不喜歡手動合併。幸運的是,只要把多個 storyboard 按職責合理拆分,大部分潛在衝突自然就不存在了。我的做法是按場景各建一個 storyboard,例如最近這個專案:
- 入職——建立帳號與初始資料的相關界面
- 新建流——使用者可以產出內容的環節
- 活動——查看提到自己或他人的互動記錄
iOS 9 帶來的 Storyboard References,讓多 storyboard 拆分變得更順手。
低於 iOS 9 的部署目標怎麼辦
如果你還得支援更老的系統版本,也完全可以自己造一套。多花一點功夫,但很值得。這些年我一直用一個簡單的擴展,讓自己擁有自訂的 storyboard / xib / 類引用能力。
核心思路:
- 在 storyboard 中放一個空的 UIViewController 作為佔位
- 用 IBInspectable 暴露一個自訂的 replacementIdentifier
約定的字串格式:
storyboard.StoryboardName.ControllerIdentifier
storyboard.StoryboardName(載入該 storyboard 的初始 VC)
class.name
xib.name
@interface UIViewController (KZReplacement)
@property (nonatomic, copy) IBInspectable NSString *replacementIdentifier;
//! 設了 replacementIdentifier 就回傳新 controller,否則回傳 self
- (UIViewController *)kz_replacementController;
@end
在 Interface Builder 裡長這樣:

最複雜的那部分實現如下:
- (UIViewController *)kz_replacementControllerWithIdentifier:(NSString *)identifier {
    NSDictionary *replacementSchemes = @{
        @"class"      : [NSValue valueWithPointer:@selector(kz_createControllerWithClassIdentifier:)],
        @"storyboard" : [NSValue valueWithPointer:@selector(kz_loadControllerWithStoryboardIdentifier:)],
        @"xib"        : [NSValue valueWithPointer:@selector(kz_loadControllerWithXibIdentifier:)]
    };

    __block UIViewController *replacement = nil;
    [replacementSchemes enumerateKeysAndObjectsUsingBlock:^(NSString *scheme, NSValue *selectorValue, BOOL *stop) {
        const struct _NSRange range = [identifier rangeOfString:scheme];
        if (range.location == 0) {
            *stop = YES;
            UIViewController *(*objc_msgSendTyped)(id, SEL, NSString *) = (UIViewController *(*)(id, SEL, NSString *))objc_msgSend;
            replacement = objc_msgSendTyped(self, selectorValue.pointerValue, [identifier substringFromIndex:range.length + 1]);
        }
    }];

    return replacement;
}
接著只要在容器裡的每個 VC 上跑一遍這個方法。以 TabBar 為例,下面這段放在 UITabBarController 的子類裡就足夠:
- (void)awakeFromNib {
    [super awakeFromNib];
    [super setViewControllers:[self processViewControllersByReplacingMocks:self.viewControllers] animated:NO];
}

- (void)setViewControllers:(NSArray *)viewControllers animated:(BOOL)animated {
    [super setViewControllers:[self processViewControllersByReplacingMocks:viewControllers] animated:animated];
}

- (void)setViewControllers:(NSArray *)viewControllers {
    [super setViewControllers:[self processViewControllersByReplacingMocks:viewControllers]];
}

- (NSArray *)processViewControllersByReplacingMocks:(NSArray *)viewControllersAndMocks {
    NSMutableArray *array = [NSMutableArray new];
    [viewControllersAndMocks enumerateObjectsUsingBlock:^(UIViewController *viewController, NSUInteger idx, BOOL *stop) {
        UIViewController *replacement = [viewController kz_replacementController];
        [array addObject:replacement ?: viewController];
    }];
    return [array copy];
}
善用 Behaviours
如果只能推薦一種設計取向,我會選「組合」。它是極好的模式,而且會自然帶來其他好處。Behaviours 就是一種組合,而且完全可以在 Interface Builder 裡配置完成。
運行時屬性與 @IBInspectable
IB 裡直接配置自訂屬性這件事已經存在很多年了,但知道的人遠比想像中少。很多人還在 IB 裡拉好視圖,再回代碼裡設屬性。
Xcode 6 讓運行時屬性升級成了 @IBInspectable。從前那種容易拼錯、又脆弱的老式寫法:
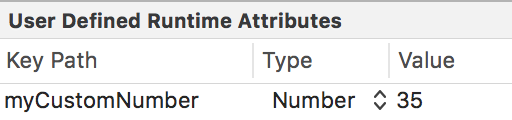
變成了有型別提示、不會拼錯的可編輯屬性:

支援的型別包括 Int、CGFloat、Double、String、Bool、CGPoint、CGSize、CGRect、UIColor、UIImage。
擴展 UIKit
你也可以直接給系統類加屬性:
extension UIView {
    @IBInspectable var kz_borderColor: UIColor? {
        get {
            if let colorRef = layer.borderColor {
                return UIColor(CGColor: colorRef)
            }
            return nil
        }
        set {
            layer.borderColor = newValue?.CGColor
        }
    }
}
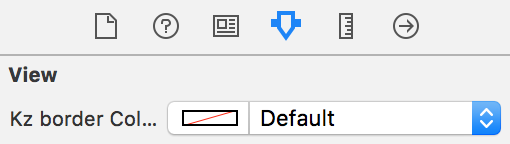
於是你得到了一個漂亮的邊框顏色選擇器:
用 identifier 消除樣板代碼
給 NSLayoutConstraint 掛一個標識會怎樣?iOS 7 就加了 identifier 欄位供除錯用,但我把它挪到了另一個用途上。
我們的 App 在不同尺寸設備上的顯示略有差異,而 Size Classes 無法覆蓋這個特定設計需求。於是我寫了一套簡短的 DSL 來描述每種設備的取值:
KZ_SPEC(Create, (@{
    @"create.size.captionTextWidth"                : kz_spec(260, 250, 234, 220),
    @"create.size.segmentCollectionView.height"    : kz_spec(116, 116, 116, 116).offsetBy(16)
}))
再擴展 NSLayoutConstraint,讓界面上的約束直接綁定規格名,view 裡就不必再寫一堆樣板:
@interface NSLayoutConstraint (KZDesignSpec)
@property (nonatomic, copy) IBInspectable NSString *kz_specName;
@end

@implementation NSLayoutConstraint (KZDesignSpe)
static void const *kDesignSpecKey = &kDesignSpecKey;

- (NSString *)kz_specName {
    return objc_getAssociatedObject(self, kDesignSpecKey);
}

- (void)setKz_specName:(NSString *)kz_specName {
    objc_setAssociatedObject(self, kDesignSpecKey, kz_specName, OBJC_ASSOCIATION_COPY_NONATOMIC);
    self.constant = kz_floatForSpec(kz_specName);
    self.identifier = kz_specName;
}
@end
快捷鍵與隱藏功能
花點時間熟悉 IB 的快捷鍵,還有一些不太起眼的小功能。我用了兩年 IB 之後,才第一次看到有人從 Media 面板直接拖出一張圖片、並自動生成尺寸合適的 UIImageView——而那時的我還在手動建。
另外,配置 Auto Layout 時記得:拉約束的同時按住 Option,或者使用 Edit 選單裡的相關命令。
小結
Interface Builder 離完美還很遠,但它絕不像部分開發者口中那樣糟糕。當我問「為什麼不用 IB」,最常見的回答是「我的界面太複雜了,IB 搞不定」。而事實上,Foldify 和 Storest 這類應用都大量使用了 IB。
多數情況下 IB 是夠用的,特別是搭配前面提到的那些擴展,或者你自己寫的擴展。剩下的場景就用代碼。代碼與 IB 並不是二選一的問題。
本文僅供學習交流,轉載請保留譯者、出處與原文連結。感謝博文視點對本期翻譯活動的支持。