
iOS 9 Core Spotlight 框架完整實戰教學

本文由 CocoaChina 譯者 KingOfOnePiece 翻譯,原作者 GABRIEL THEODOROPOULOS,校對 hyhSuper,原文為《How To Use Core Spotlight Framework in iOS 9》。
iOS 每次大版本更新都會丟出一批新知識點,同時打磨既有 API。iOS 9 延續了這個傳統,帶來若干新框架,Core Spotlight 就是其中值得深挖的一個。
Core Spotlight(簡稱 CS)屬於 Search API 的一部分,它的作用是提升 App 的曝光度,讓使用者更容易發現並進入你的應用——而這套 API 在 iOS 9 之前並不存在。除了 Core Spotlight,iOS 9 的搜尋能力還包括:為 NSUserActivity 新增的方法與屬性(用於保存 App 退出時的狀態以便恢復)、在裝置上建立 web 標記讓 App 內容可被搜到,以及能透過網頁連結直接喚起 App 的 Universal Links。本文只聚焦 Core Spotlight。

一句話概括它的價值:Core Spotlight 讓 App 內的資料出現在系統 Spotlight 的搜尋結果裡,和使用者原本會看到的內容並排展示。點擊結果時不僅能喚起 App,開發者還可以決定要直接呈現哪一條具體內容。
從開發角度看,整合難度不高,核心工作只有一件事:把 App 的資料按規定格式餵給系統索引。
關於 Demo
我們用一個電影清單 App 來演示。資料來源是 IMDB,每部電影包含概要、導演、主演、評分等欄位,列表點擊後進入詳情頁。
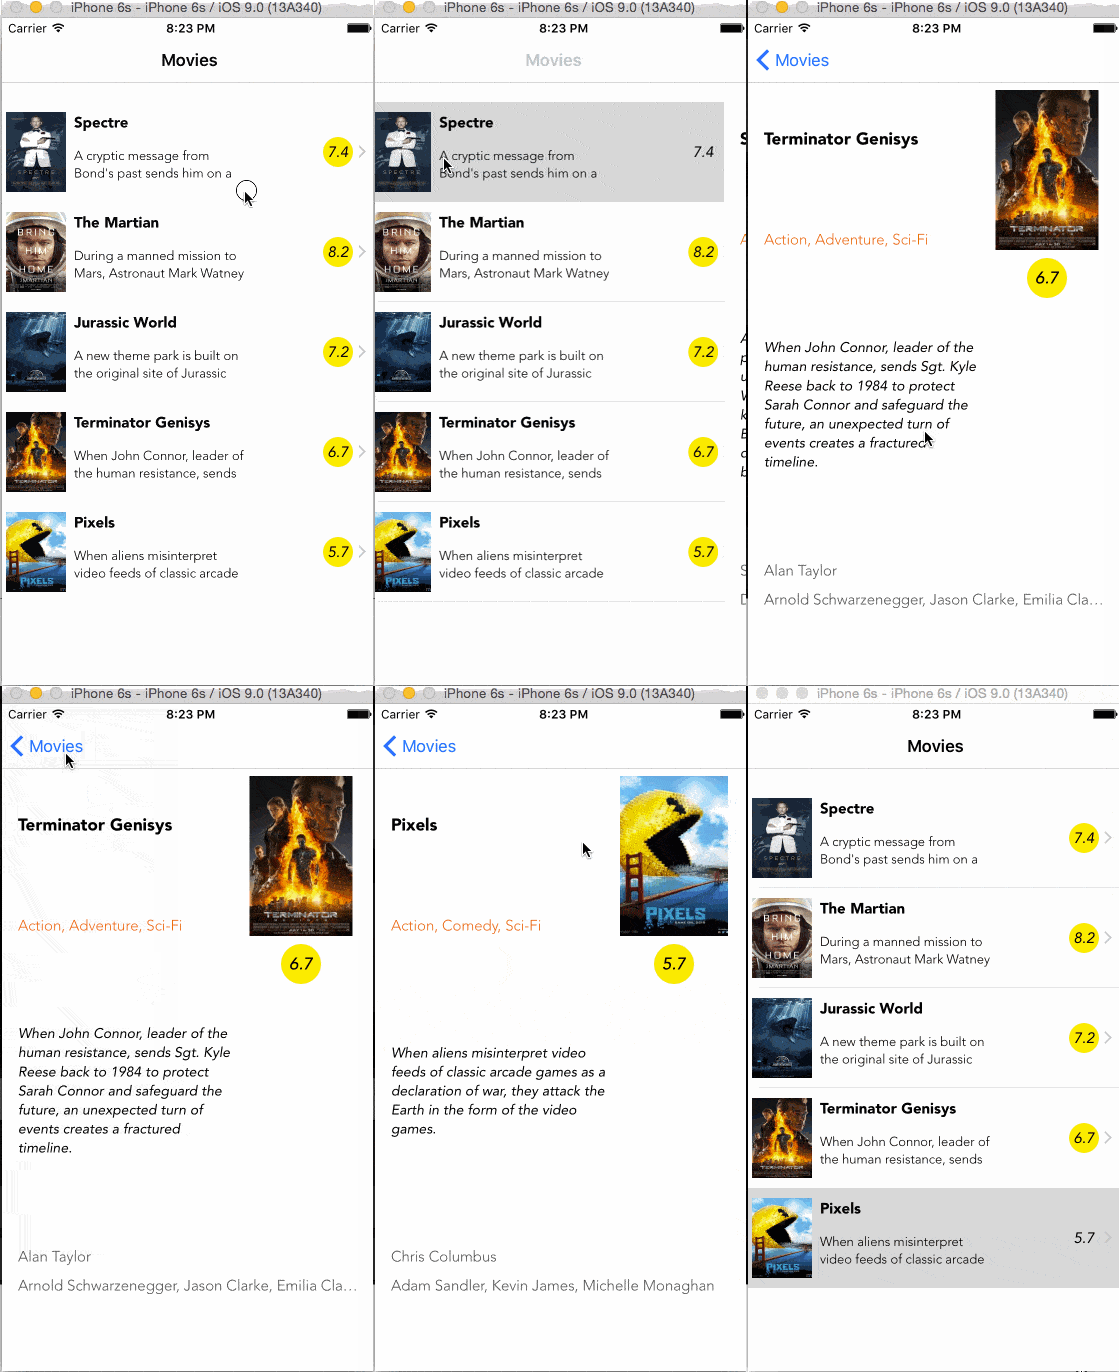
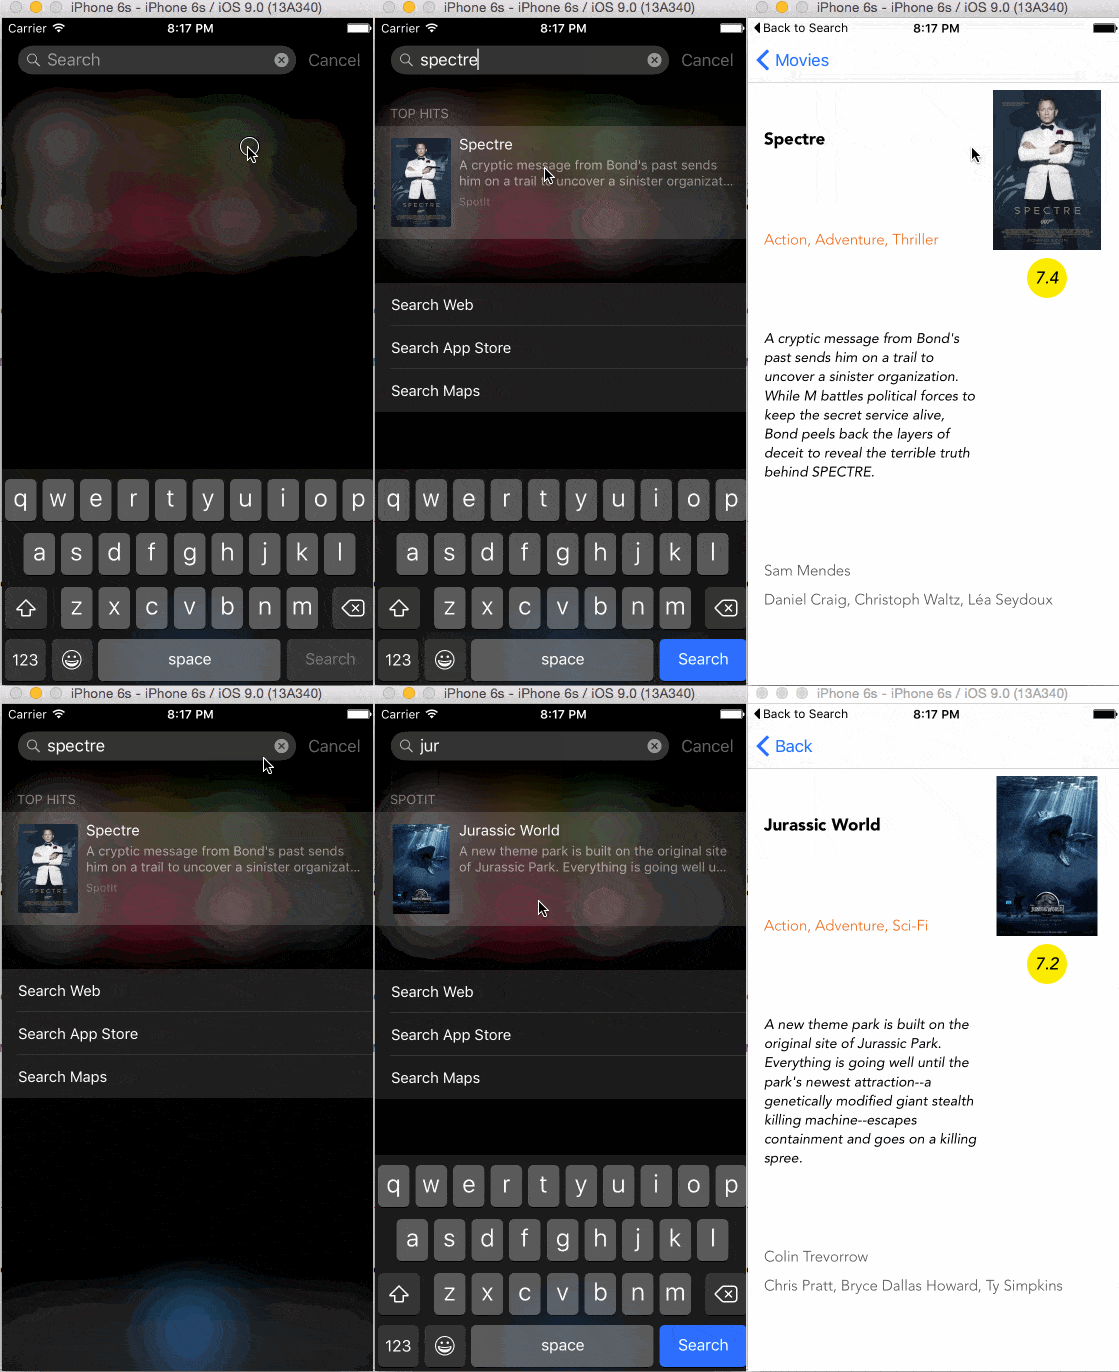
本教學要達成兩個目標。第一,讓 App 內所有電影資料都能被 Spotlight 搜到,關鍵在於關鍵字的設定。第二,使用者點擊搜尋結果時,不要只丟出預設列表,而應該直接跳到該電影的詳情頁。
起始工程已經準備好:介面與所有 IBOutlet 都已連線,列表視圖是最小可用狀態,電影資料放在 plist 中,另有 5 張對應的電影圖片。
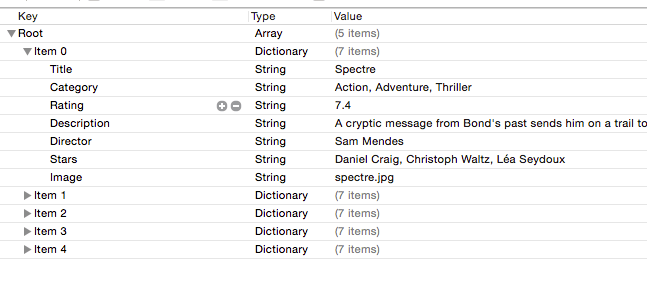
起始工程刻意沒有實作兩件事:列表的資料載入與展示,以及點擊後的頁面跳轉。這樣做只是為了讓你親手摸到即將被索引的那批資料。
載入並展示資料
在 ViewController.swift 中先宣告容器:
var moviesInfo: NSMutableArray!
每部電影以字典形式存放,key 與 plist 中的欄位一致。接著寫一個載入方法:
func loadMoviesInfo() {
    if let path = NSBundle.mainBundle().pathForResource("MoviesData", ofType: "plist") {
        moviesInfo = NSMutableArray(contentsOfFile: path)
    }
}
在 viewDidLoad() 中呼叫它,順序要在 configureTableView() 之前:
override func viewDidLoad() {
    super.viewDidLoad()

    // 從檔案載入電影資料
    loadMoviesInfo()

    configureTableView()
    navigationItem.title = "Movies"
}
行數就是電影數量,但要記得做 nil 判斷,否則檔案沒載入成功時會直接崩潰:
func tableView(tableView: UITableView, numberOfRowsInSection section: Int) -> Int {
    if moviesInfo != nil {
        return moviesInfo.count
    }
    return 0
}
每個 cell 使用自訂的 MovieSummaryCell(含 .xib):
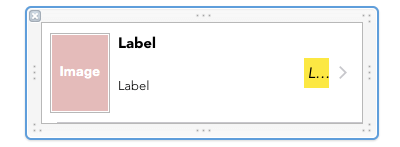
它負責展示電影海報、標題、簡介與評分,對應的 IBOutlet 如下:
@IBOutlet weak var imgMovieImage: UIImageView!
@IBOutlet weak var lblTitle: UILabel!
@IBOutlet weak var lblDescription: UILabel!
@IBOutlet weak var lblRating: UILabel!
填充資料:
func tableView(tableView: UITableView, cellForRowAtIndexPath indexPath: NSIndexPath) -> UITableViewCell {
    let cell = tableView.dequeueReusableCellWithIdentifier("idCellMovieSummary", forIndexPath: indexPath) as! MovieSummaryCell

    let currentMovieInfo = moviesInfo[indexPath.row] as! [String: String]

    cell.lblTitle.text = currentMovieInfo["Title"]!
    cell.lblDescription.text = currentMovieInfo["Description"]!
    cell.lblRating.text = currentMovieInfo["Rating"]!
    cell.imgMovieImage.image = UIImage(named: currentMovieInfo["Image"]!)

    return cell
}
這時跑一次,列表應該已經能正常顯示電影資訊。
跳轉到詳情頁
在 MovieDetailsViewController 中宣告接收用的字典:
var movieInfo: [String: String]!
回到列表頁,用一個屬性記住被點選的索引:
var selectedMovieIndex: Int!
func tableView(tableView: UITableView, didSelectRowAtIndexPath indexPath: NSIndexPath) {
    selectedMovieIndex = indexPath.row
    performSegueWithIdentifier("idSegueShowMovieDetails", sender: self)
}
然後在 prepareForSegue:sender: 中把對應字典傳過去:
override func prepareForSegue(segue: UIStoryboardSegue, sender: AnyObject?) {
    if let identifier = segue.identifier {
        if identifier == "idSegueShowMovieDetails" {
            let movieDetailsViewController = segue.destinationViewController as! MovieDetailsViewController
            movieDetailsViewController.movieInfo = moviesInfo[selectedMovieIndex] as! [String: String]
        }
    }
}
詳情頁這邊寫一個填充方法:
func populateMovieInfo() {
    lblTitle.text = movieInfo["Title"]!
    lblCategory.text = movieInfo["Category"]!
    lblDescription.text = movieInfo["Description"]!
    lblDirector.text = movieInfo["Director"]!
    lblStars.text = movieInfo["Stars"]!
    lblRating.text = movieInfo["Rating"]!
    imgMovieImage.image = UIImage(named: movieInfo["Image"]!)
}
在 viewWillAppear 中呼叫即可:
override func viewWillAppear(animated: Bool) {
    ...
    if movieInfo != nil {
        populateMovieInfo()
    }
}
把資料加入 Spotlight 索引
關鍵在於:要能被搜到的資料必須包裝成 CSSearchableItem 物件,組成陣列後交給 CS API 索引。每個 CSSearchableItem 透過 CSSearchableItemAttributeSet 描述內容細節,例如搜尋結果要顯示哪些欄位、哪些關鍵字需要被匹配。
流程分四步:
- 為每一條資料建立並設定
CSSearchableItemAttributeSet。 - 用它初始化對應的
CSSearchableItem。 - 把所有可搜尋項收集到一個陣列。
- 把陣列交給索引 API。
先引入兩個框架:
import CoreSpotlight
import MobileCoreServices
定義方法並準備容器:
func setupSearchableContent() {
    var searchableItems = [CSSearchableItem]()

    for i in 0...(moviesInfo.count - 1) {
        let movie = moviesInfo[i] as! [String: String]

        let searchableItemAttributeSet = CSSearchableItemAttributeSet(itemContentType: kUTTypeText as String)

        // 標題
        searchableItemAttributeSet.title = movie["Title"]!

        // 縮圖
        let imagePathParts = movie["Image"]!.componentsSeparatedByString(".")
        searchableItemAttributeSet.thumbnailURL = NSBundle.mainBundle().URLForResource(imagePathParts[0], withExtension: imagePathParts[1])

        // 描述
        searchableItemAttributeSet.contentDescription = movie["Description"]!
    }
}
縮圖有兩種設定方式:給 URL,或給 NSData。這裡圖片就在 App bundle 裡,給 URL 最省事,只不過要先把檔名拆成主名稱與副檔名。
接下來設定關鍵字。這一步值得多想幾分鐘,因為它直接決定你的 App 能在什麼查詢下被搜到。Demo 中我用電影類型和主演作為關鍵字:
func setupSearchableContent() {
    var searchableItems = [CSSearchableItem]()

    for i in 0...(moviesInfo.count - 1) {
        ...

        var keywords = [String]()

        let movieCategories = movie["Category"]!.componentsSeparatedByString(", ")
        for movieCategory in movieCategories {
            keywords.append(movieCategory)
        }

        let stars = movie["Stars"]!.componentsSeparatedByString(", ")
        for star in stars {
            keywords.append(star)
        }

        searchableItemAttributeSet.keywords = keywords
    }
}
plist 裡類型和主演都是用逗號串成一個字串,所以必須先拆開。最後那行賦值不能漏,漏了 Spotlight 一條結果都不會出現。
接著初始化搜尋項並收集起來:
func setupSearchableContent() {
    var searchableItems = [CSSearchableItem]()

    for i in 0...(moviesInfo.count - 1) {
        ...

        let searchableItem = CSSearchableItem(uniqueIdentifier: "com.appcoda.SpotIt.\(i)",
                                             domainIdentifier: "movies",
                                                 attributeSet: searchableItemAttributeSet)

        searchableItems.append(searchableItem)
    }
}
初始化的三個參數分別是:
- uniqueIdentifier:全域唯一的識別碼。我這裡把索引帶了進去,因為後面要靠它反查是哪部電影。一般來說,把詳情頁所需的定位資訊編進唯一識別碼是個好習慣。
- domainIdentifier:用於把搜尋項分組。
- attributeSet:剛剛設定好的屬性集。
最後一步,在迴圈之外呼叫索引 API:
func setupSearchableContent() {
    ...

    CSSearchableIndex.defaultSearchableIndex().indexSearchableItems(searchableItems) { (error) -> Void in
        if error != nil {
            print(error?.localizedDescription)
        }
    }
}
並在 viewDidLoad() 中呼叫它:
override func viewDidLoad() {
    ...

    setupSearchableContent()
}
現在跑一次 App,退出,用 Spotlight 搜尋設定過的關鍵字,結果應該會出現,點擊即可喚起 App。
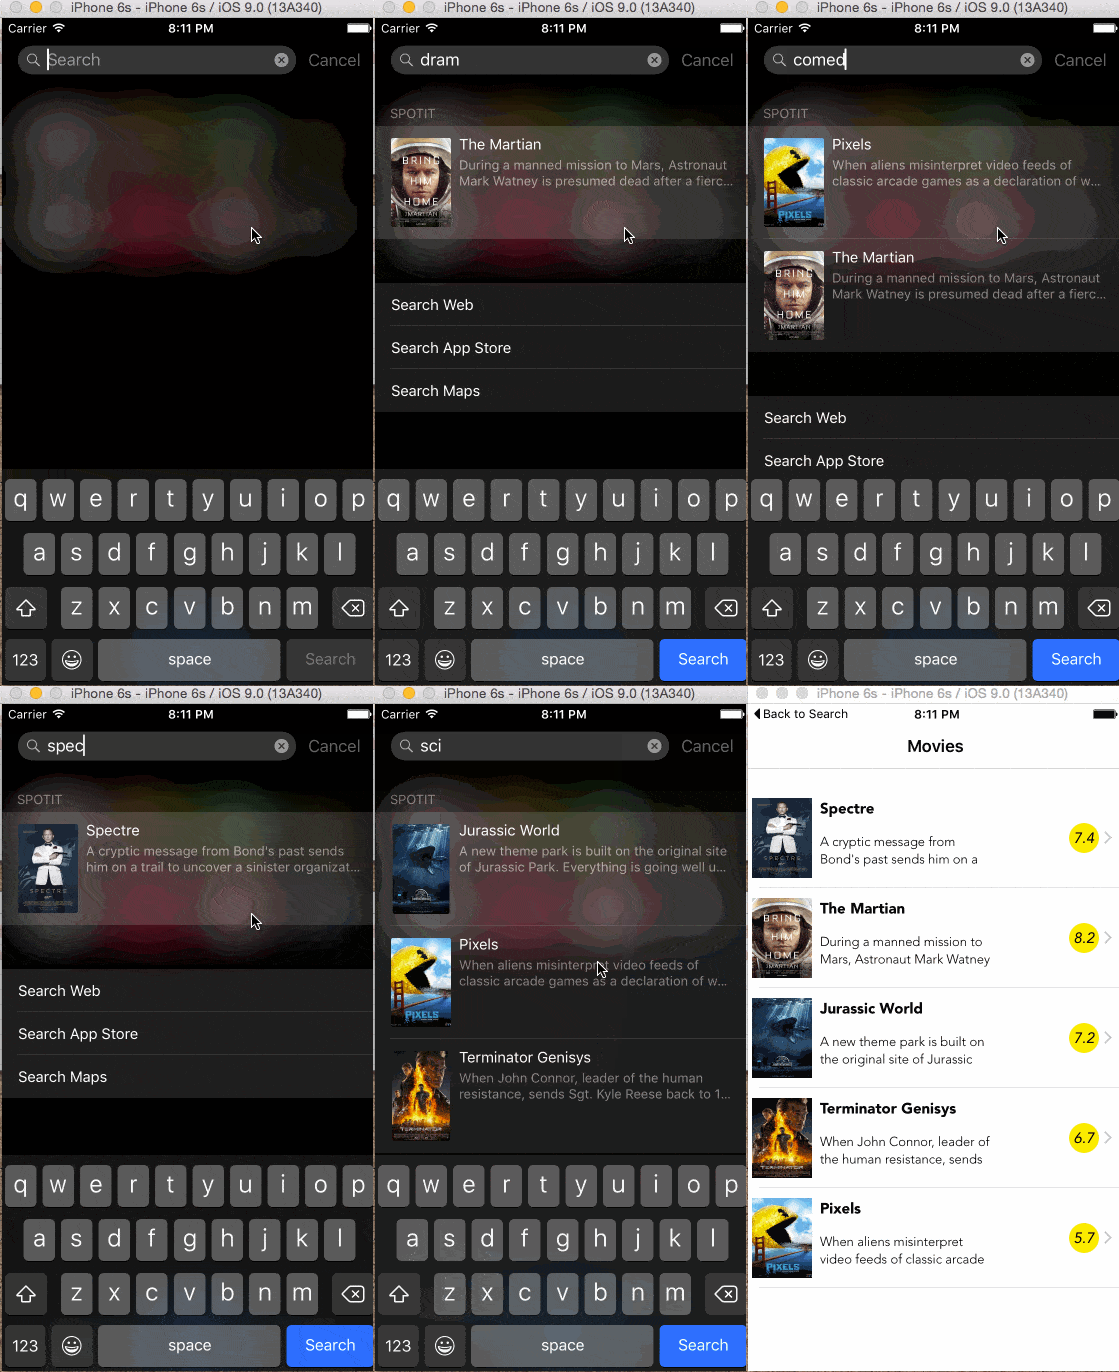
直接進入對應詳情頁
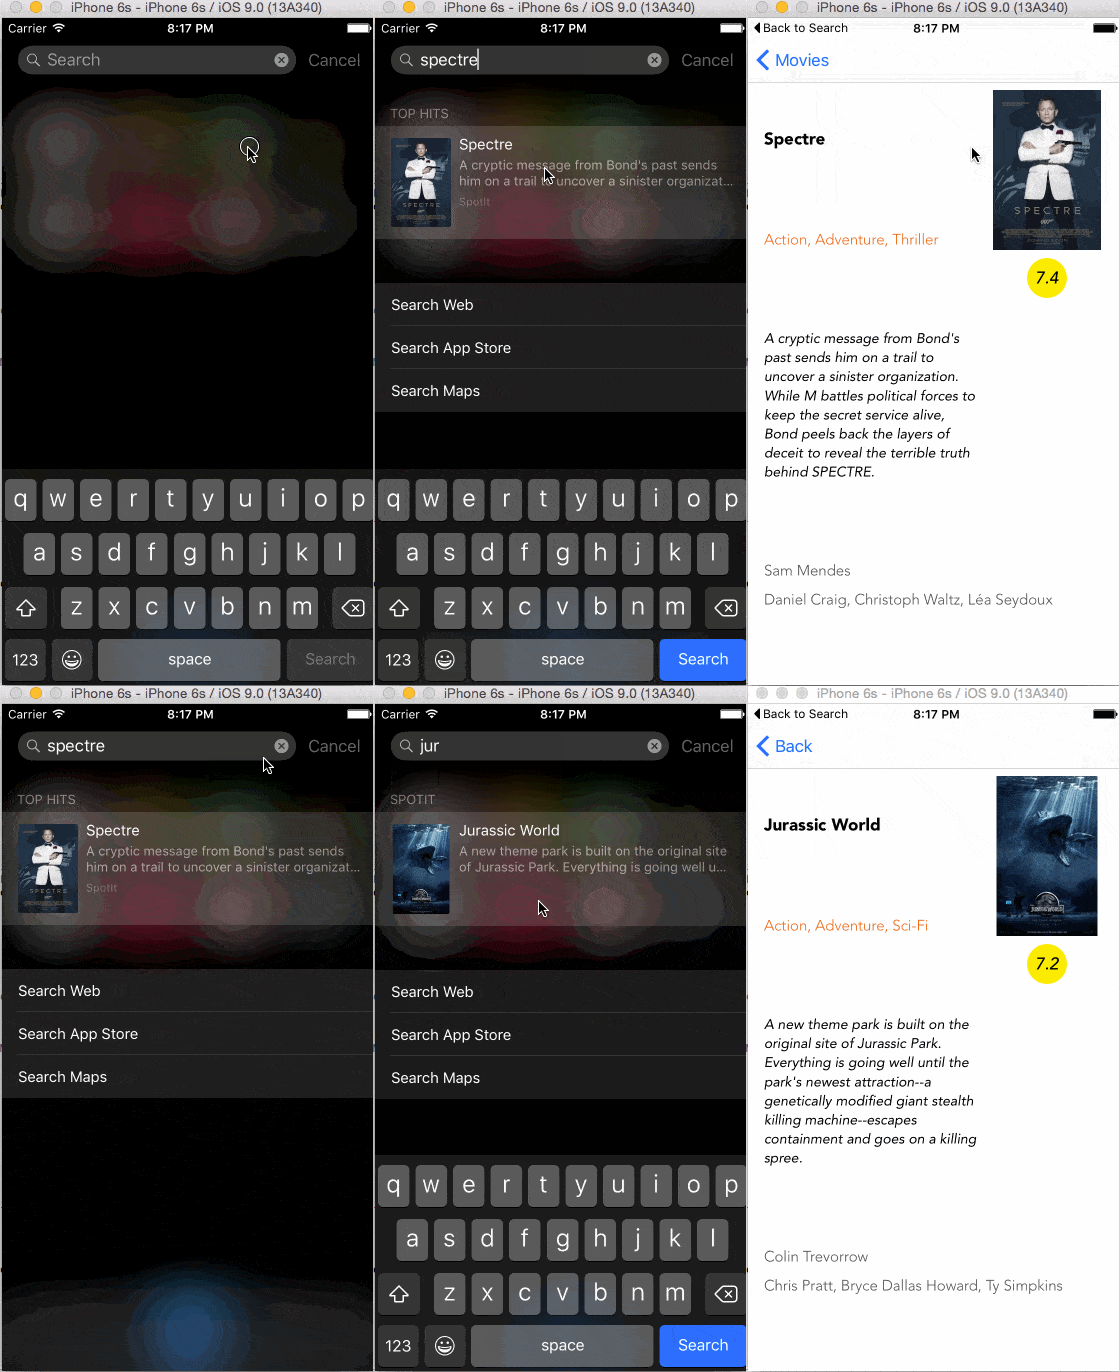
預設情況下點擊結果只會開啟 App 並停在列表頁,體驗算不上好。要做到精準跳轉,需要覆寫 restoreUserActivityState:。
它的參數是 NSUserActivity,其中 userInfo 字典帶著被點選搜尋項的識別碼。從中取出索引,就能定位到具體電影:
override func restoreUserActivityState(activity: NSUserActivity) {
    if activity.activityType == CSSearchableItemActionType {
        if let userInfo = activity.userInfo {
            let selectedMovie = userInfo[CSSearchableItemActivityIdentifier] as! String
            selectedMovieIndex = Int(selectedMovie.componentsSeparatedByString(".").last!)
            performSegueWithIdentifier("idSegueShowMovieDetails", sender: self)
        }
    }
}
先檢查 activityType 是否為 CSSearchableItemActionType。在這個 Demo 裡這步可有可無,但如果你同時處理多個 NSUserActivity(例如 iOS 8 帶來的 Handoff),就必須判斷。拿到識別碼後以點號切分,取最後一段就是電影在陣列中的索引,賦值給 selectedMovieIndex 再觸發跳轉即可。
最後切到 AppDelegate.swift,實作尚未完成的代理方法:
func application(application: UIApplication,
           continueUserActivity userActivity: NSUserActivity,
             restorationHandler: ([AnyObject]?) -> Void) -> Bool {
    let viewController = (window?.rootViewController as! UINavigationController).viewControllers[0] as! ViewController
    viewController.restoreUserActivityState(userActivity)
    return true
}
這裡透過 window 拿到列表控制器並呼叫還原方法。當然你也可以改用 NSNotificationCenter 發通知,只是直接呼叫更省事。
總結
iOS 9 的搜尋 API 對開發者相當有吸引力,它實實在在地縮短了使用者抵達 App 的路徑。本文示範了完整的 Spotlight 整合流程:建立索引、設定屬性與關鍵字,以及攔截點擊事件直接跳到對應內容。這個能力對使用者體驗的提升很明顯,值得在現在和未來的專案裡認真評估。
完整工程可從 GitHub 下載。
- 更多譯者文章:https://www.cocoachina.com/special/translation/
- 本文僅供學習交流,轉載請註明譯者、出處與本文連結。
- 感謝博文視點對本期活動的支持。

- 上一篇文章: 自己動手做一個 Mac 相似圖片搜尋工具
- 下一篇文章: Runtime 機制與常用場景的系統性梳理