
iOS 自定義轉場動畫實戰:從 Animator 到交互式與 Presentation 定製
轉場動畫說簡單也簡單:presentViewController:animated:completion: 與 dismissViewControllerAnimated:completion: 這組方法就能完成模態展示與隱藏;若使用 UINavigationController,還有 pushViewController:animated: 與 pop 一組方法可用。
但下面這些效果,僅靠系統方法很難甚至無法實現:
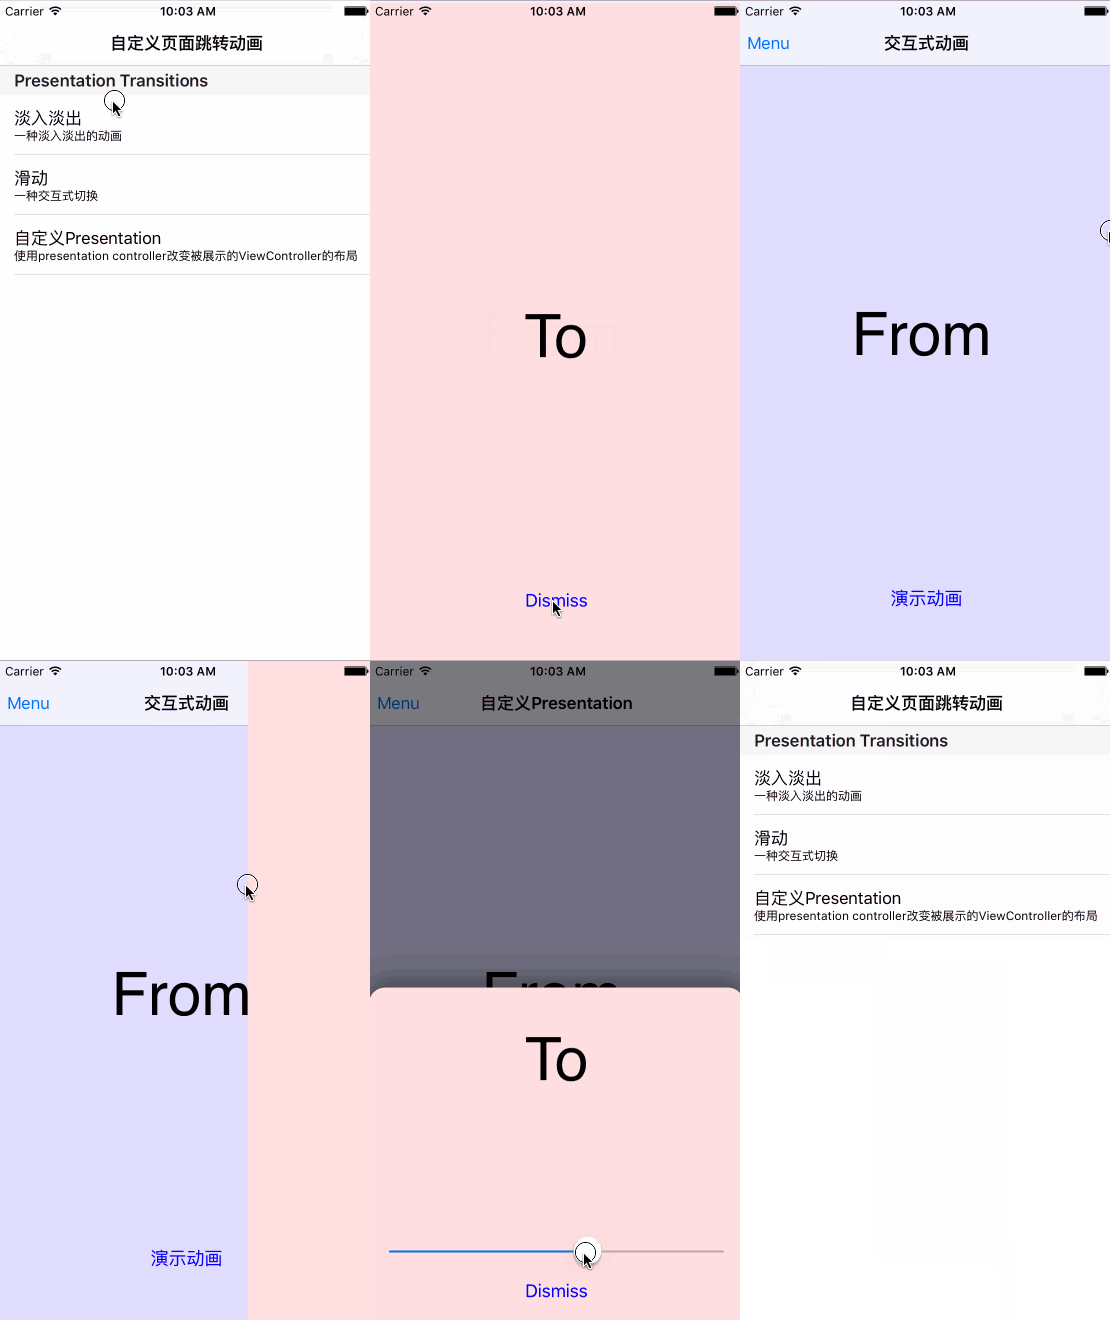
demo 演示(受錄屏限制,部分效果未能完整呈現,比如它其實還支持橫屏)
自定義轉場實現起來比想象中複雜,如果只拷一份能跑的代碼卻不明白原理,很容易埋各種隱藏 bug。本文由淺入深講解五件事:
傳統基於閉包的實現方式及其缺點
自定義 present 轉場動畫
交互式(Interactive)轉場動畫
轉場協調器與 UIModalPresentationCustom
UINavigationController 轉場動畫
本文 demo 已上傳 github(CustomTransition),本文以 Swift + 純代碼實現,demo 中同時附帶了蘋果官方的 OC + Storyboard 版本,正確性更有保障。工程使用了 CocoaPods,可能需要執行 pod install 後打開 .xcworkspace。開始之前,先明確幾組容易混淆的概念。
From 與 To
fromView 表示當前視圖,toView 表示要跳轉到的視圖。A present 到 B 時,A 是 from、B 是 to;B dismiss 回 A 時,B 變成 from、A 是 to。理解錯這一點,動畫邏輯會整個反過來。
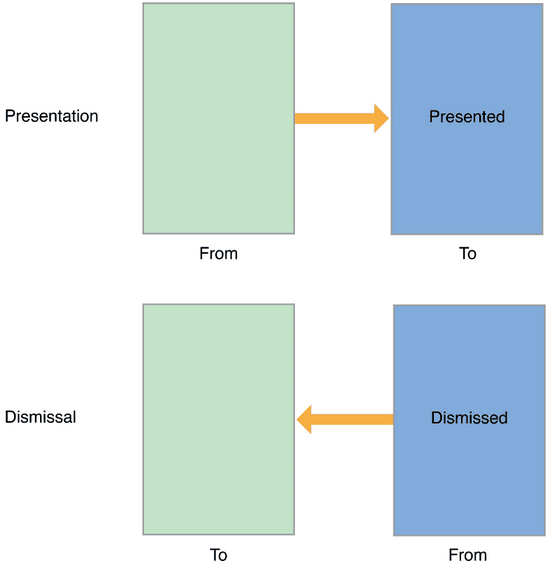
from 和 to
Presented 與 Presenting
這組概念不受 present 或 dismiss 影響:只要 A present 了 B,那麼 A 永遠是 presentingViewController,B 永遠是 presentedViewController。它很容易與 from/to 混淆,務必分清。
modalPresentationStyle
這個枚舉表示 present 時的動畫類型,其中可自定義的只有 FullScreen 與 Custom 兩種,區別在於 FullScreen 會移除 fromView,而 Custom 不會。
傳統的 block 實現及其局限
最簡單的方式是 transitionFromViewController:

傳統的轉場動畫實現
這個方法雖然已被標記過時,但分析它有助於理解後續內容。它共六個參數:前兩個說明從哪個 VC 跳到哪個 VC,中間兩個是時長與 options,最後兩個分別是動畫體與完成回調。這六個參數恰好就是一次轉場動畫的全部要素,並天然分為兩組:頁面跳轉關係,與動畫執行邏輯。
缺點有兩個:可自定義程度低;重用性差、耦合度高。在最後兩個閉包裡,from 與 to 必然都被用到,於是當 A 可以跳轉到 B、C、D、E、F 且動畫相似時,同一段代碼只能反覆複製、每次改幾行。
自定義 present 轉場動畫
為了這一點,我們需要認識關鍵角色:轉場動畫代理,即實現了 UIViewControllerTransitioningDelegate 協議的對象。它的職責是向 UIKit 提供以下一或多個對象:
Animator:實現
UIViewControllerAnimatedTransitioning協議,負責動畫時長與展示邏輯。代理可以為 present 和 dismiss 分別提供,也可以共用同一個。交互式 Animator:與 Animator 類似,但是交互式的。
Presentation 控制器:可對 present 過程做更徹底的自定義,比如修改被展示視圖的大小、添加自定義視圖。
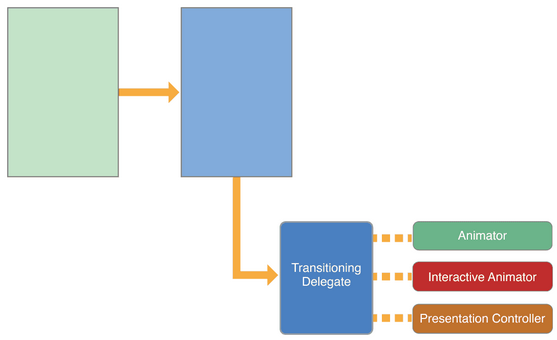
轉場動畫代理
先看最簡單的 Animator。回顧那六個要素:Animator 只對應後一組的四個要素,也就是說同一個 Animator 既可用於 A→B,也可用於 A→C。它描述的是「一種通用的頁面切換動畫邏輯」,與具體視圖控制器無關。理解這句話,自定義轉場的全貌就清楚了。以 A 跳 B 為例:
創建動畫代理(簡單場景下 A 自己當代理即可)
把 B 的 transitioningDelegate 設為該代理
調用 present 並把 animated 設為 true
系統從代理處取得 Animator,由它執行動畫邏輯
// 這個類相當於 A
class CrossDissolveFirstViewController: UIViewController, UIViewControllerTransitioningDelegate {
    // 這個對象相當於 B
    crossDissolveSecondViewController.transitioningDelegate = self

    func animationButtonDidClicked() {
        self.presentViewController(crossDissolveSecondViewController, animated: true, completion: nil)
    }

    // 為 present 提供 animator
    func animationControllerForPresentedController(presented: UIViewController, presentingController presenting: UIViewController, sourceController source: UIViewController) -> UIViewControllerAnimatedTransitioning? {
        return HalfWaySpringAnimator()
    }

    // 為 dismiss 提供 animator
    func animationControllerForDismissedController(dismissed: UIViewController) -> UIViewControllerAnimatedTransitioning? {
        return CrossDissolveAnimator()
    }
}
關鍵在 Animator 的實現,它至少需要兩個方法,其中 animateTransition 是整個動畫的核心:
class HalfWaySpringAnimator: NSObject, UIViewControllerAnimatedTransitioning {
    func transitionDuration(transitionContext: UIViewControllerContextTransitioning?) -> NSTimeInterval {
        return 2
    }

    func animateTransition(transitionContext: UIViewControllerContextTransitioning) {
        let fromViewController = transitionContext.viewControllerForKey(UITransitionContextFromViewControllerKey)
        let toViewController = transitionContext.viewControllerForKey(UITransitionContextToViewControllerKey)
        let containerView = transitionContext.containerView()

        // For a Presentation: fromView = presenting view, toView = presented view
        // For a Dismissal:    fromView = presented view, toView = presenting view
        var fromView = fromViewController?.view
        var toView = toViewController?.view

        // iOS8 起應優先使用 viewForKey:,而非直接訪問 controller.view
        // 例如 form sheet 樣式中,動畫對象是 decoration view,controller.view 只是其子視圖
        if transitionContext.respondsToSelector(Selector("viewForKey:")) {
            fromView = transitionContext.viewForKey(UITransitionContextFromViewKey)
            toView = transitionContext.viewForKey(UITransitionContextToViewKey)
        }

        // 讓 toView 從屏幕中間彈起,並在過程中漸顯
        toView?.frame = CGRectMake(fromView!.frame.origin.x, fromView!.frame.maxY / 2, fromView!.frame.width, fromView!.frame.height)
        toView?.alpha = 0.0

        // present 和 dismiss 時都必須把 toView 加入視圖層次
        containerView?.addSubview(toView!)

        let transitionDuration = self.transitionDuration(transitionContext)
        UIView.animateWithDuration(transitionDuration, delay: 0, usingSpringWithDamping: 0.6, initialSpringVelocity: 0, options: .CurveLinear, animations: { () -> Void in
            toView!.alpha = 1.0
            toView?.frame = transitionContext.finalFrameForViewController(toViewController!)
        }) { (finished: Bool) -> Void in
            let wasCancelled = transitionContext.transitionWasCancelled()
            transitionContext.completeTransition(!wasCancelled)
        }
    }
}
animateTransition 的本質是:從轉場上下文(實現了 UIViewControllerContextTransitioning 的對象)中取出所需信息,完成動畫。有一條實踐準則值得牢記——不要緩存任何動畫相關信息,總是從上下文即時獲取,這樣才能拿到最新且正確的 from/to。
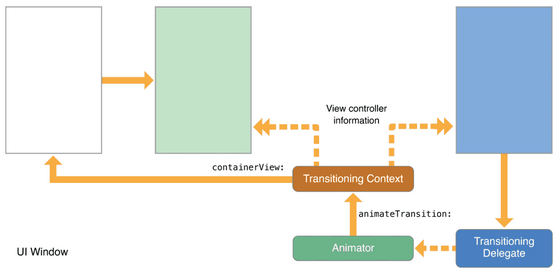
轉場動畫上下文
拿到信息後交給 Core Animation 執行,並且有兩條鐵律:千萬別忘記在動畫結束時調用 completeTransition;present 時要把 toView 加入容器,dismiss 時要把 fromView 從容器移除。
如果暫時記不住細節,至少要記住主流程:設置 presentedViewController 的 transitioningDelegate → 代理提供 animator → animator 的 animateTransition 承載核心邏輯。
交互式轉場動畫
設置代理並 present 時,UIKit 除了索取 animator,還會調用代理的 interactionControllerForPresentation:。返回 nil 就走非交互流程;返回非 nil 對象時,UIKit 不再調用 animateTransition,而是調用交互式控制器的 startInteractiveTransition:。
交互式動畫通常基於手勢驅動,按完成百分比控制進度,任何時刻都能改變百分比甚至取消。這需要一個 UIPercentDrivenInteractiveTransition 子類與 animator 協同工作。聽起來複雜,但 UIKit 已封裝好細節:我們只需定義手勢處理函數,在新事件到來時算出百分比並調用 updateInteractiveTransition。
// 相當於 fromViewController
class InteractivityFirstViewController: UIViewController {
    lazy var interactivitySecondViewController: InteractivitySecondViewController = InteractivitySecondViewController()
    lazy var customTransitionDelegate: InteractivityTransitionDelegate = InteractivityTransitionDelegate()

    override func viewDidLoad() {
        super.viewDidLoad()
        setupView()
        // 代理邏輯較複雜,單獨建一個對象而不是讓 self 兼任
        interactivitySecondViewController.transitioningDelegate = customTransitionDelegate
    }

    func interactiveTransitionRecognizerAction(sender: UIScreenEdgePanGestureRecognizer) {
        if sender.state == .Began { self.animationButtonDidClicked(sender) }
    }

    func animationButtonDidClicked(sender: AnyObject) {
        self.presentViewController(interactivitySecondViewController, animated: true, completion: nil)
    }
}
交互式代理除了提供 animator,還要提供交互式控制器:
class InteractivityTransitionDelegate: NSObject, UIViewControllerTransitioningDelegate {
    func animationControllerForPresentedController(presented: UIViewController, presentingController presenting: UIViewController, sourceController source: UIViewController) -> UIViewControllerAnimatedTransitioning? {
        return InteractivityTransitionAnimator(targetEdge: targetEdge)
    }

    func animationControllerForDismissedController(dismissed: UIViewController) -> UIViewControllerAnimatedTransitioning? {
        return InteractivityTransitionAnimator(targetEdge: targetEdge)
    }

    func interactionControllerForPresentation(animator: UIViewControllerAnimatedTransitioning) -> UIViewControllerInteractiveTransitioning? {
        return TransitionInteractionController(gestureRecognizer: gestureRecognizer, edgeForDragging: targetEdge)
    }

    func interactionControllerForDismissal(animator: UIViewControllerAnimatedTransitioning) -> UIViewControllerInteractiveTransitioning? {
        return TransitionInteractionController(gestureRecognizer: gestureRecognizer, edgeForDragging: targetEdge)
    }
}
交互式動畫只是錦上添花,它必須同時支持非交互方式——比如本例中點擊按鈕仍走非交互動畫,只有滑動手勢才觸發交互版本。
class TransitionInteractionController: UIPercentDrivenInteractiveTransition {
    func gestureRecognizeDidUpdate(gestureRecognizer: UIScreenEdgePanGestureRecognizer) {
        switch gestureRecognizer.state {
        case .Began: break
        case .Changed:
            self.updateInteractiveTransition(self.percentForGesture(gestureRecognizer))
        case .Ended:
            // 超過一半則完成,否則取消
            if self.percentForGesture(gestureRecognizer) >= 0.5 {
                self.finishInteractiveTransition()
            } else {
                self.cancelInteractiveTransition()
            }
        default: self.cancelInteractiveTransition()
        }
    }
}
轉場協調器與 UIModalPresentationCustom
轉場的同時還可以跑一些同步的附屬動畫(比如 gif 的第三個效果):presentedView 與 presentingView 可以調整層級、加陰影或圓角。UIKit 用「轉場協調器」管理這些附屬動畫,通過視圖控制器的 transitionCoordinator 屬性取得,它僅在轉場過程中有效。
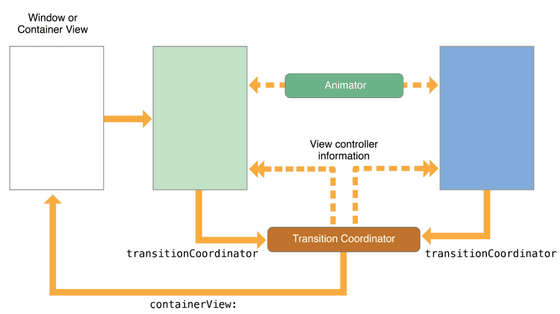
轉場動畫協調器
要實現第三個效果,還需把 present 方式改為 .Custom,因為 .FullScreen 會移除 fromViewController。採用 .Custom 後,還可以使用 UIPresentationController 做更徹底的控制,它具備四項能力:設置 presentedViewController 的視圖大小;添加自定義視圖改變外觀;為自定義視圖提供轉場動畫;根據 size class 響應式佈局。可以說,.FullScreen 等系統風格都是 .Custom 的特例。
UIPresentationController 提供四個時機點:presentationTransitionWillBegin、presentationTransitionDidEnd、dismissalTransitionWillBegin、dismissalTransitionDidEnd。
// 相當於 fromViewController
class CustomPresentationFirstViewController: UIViewController {
    lazy var customPresentationSecondViewController: CustomPresentationSecondViewController = CustomPresentationSecondViewController()
    lazy var customPresentationController: CustomPresentationController = CustomPresentationController(presentedViewController: self.customPresentationSecondViewController, presentingViewController: self)

    override func viewDidLoad() {
        super.viewDidLoad()
        setupView()
        customPresentationSecondViewController.transitioningDelegate = customPresentationController
    }

    func animationButtonDidClicked() {
        self.presentViewController(customPresentationSecondViewController, animated: true, completion: nil)
    }
}
class CustomPresentationController: UIPresentationController, UIViewControllerTransitioningDelegate {
var presentationWrappingView: UIView? // 封裝原視圖,加上陰影與圓角
var dimmingView: UIView? = nil // alpha 為 0.5 的黑色蒙版
// 告訴 UIKit 對哪個視圖施加動畫
override func presentedView() -> UIView? {
return self.presentationWrappingView
}
}
extension CustomPresentationController {
override func presentationTransitionWillBegin() {
let transitionCoordinator = self.presentingViewController.transitionCoordinator()
self.dimmingView?.alpha = 0
// 通過協調器執行同步動畫
transitionCoordinator?.animateAlongsideTransition({ (context: UIViewControllerTransitionCoordinatorContext) -> Void in
self.dimmingView?.alpha = 0.5
}, completion: nil)
}
override func presentationTransitionDidEnd(completed: Bool) {
if !completed {
self.presentationWrappingView = nil
self.dimmingView = nil
}
}
override func dismissalTransitionWillBegin() {
let transitionCoordinator = self.presentingViewController.transitionCoordinator()
transitionCoordinator?.animateAlongsideTransition({ (context: UIViewControllerTransitionCoordinatorContext) -> Void in
self.dimmingView?.alpha = 0
}, completion: nil)
}
override func dismissalTransitionDidEnd(completed: Bool) {
if completed {
self.presentationWrappingView = nil
self.dimmingView = nil
}
}
}此外該類還要處理子視圖佈局,並作為動畫代理提供 animator,完整代碼可查看 demo 的 Custom Presentation 文件夾。
UINavigationController 轉場動畫
以上都針對 present/dismiss,實際上 UINavigationController 也能自定義,兩者是平行關係,概念可以類推:
class FromViewController: UIViewController, UINavigationControllerDelegate {
    let toViewController: ToViewController = ToViewController()

    override func viewDidLoad() {
        super.viewDidLoad()
        setupView()
        self.navigationController.delegate = self
    }

    func navigationController(navigationController: UINavigationController,
        animationControllerForOperation operation: UINavigationControllerOperation,
        fromViewController fromVC: UIViewController,
        toViewController toVC: UIViewController) -> UIViewControllerAnimatedTransitioning? {
        if operation == .Push { return PushAnimator() }
        if operation == .Pop { return PopAnimator() }
        return nil
    }
}
差別在於此時控制器實現的是 UINavigationControllerDelegate,讓自己成為 navigationController 的代理,作用類似於此前的 UIViewControllerTransitioningDelegate。而 animator 本身與之前沒有任何區別——可見一個封裝良好的 animator,既能用於 present/dismiss,也能用於 push/pop。UINavigationController 同樣支持交互式轉場,原理類似。
總結
非交互式動畫:設置 presentedViewController 的 transitioningDelegate,由代理提供 animator,在 animator 中規定時長與表現邏輯。
交互式動畫:在此基礎上由代理提供交互式控制器,在控制器中處理事件並更新完成進度。
自定義呈現效果:通過 UIPresentationController 的四個回調,自定義動畫前後的行為,調整 presentedViewController 的大小與外觀,並同步執行其他動畫。
自定義轉場的水比你想象的深,本文僅適合入門,歡迎互相交流。