
評鑒 Maze 源碼(2):GamePlayKit 的狀態機怎麼用
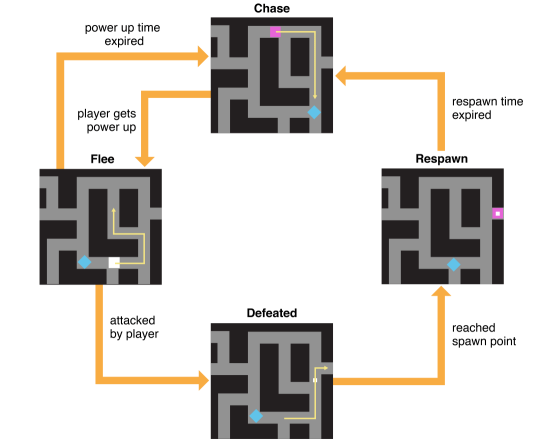
上一篇《評鑒 Maze 源碼(1):GamePlayKit 的 ECS「實體-元件-系統」》介紹了 Maze 遊戲中的 ECS 方法。在那套結構裡,Enemy 實體的行為需要狀態機來配合管理,這一篇就來談談 GameplayKit 中狀態機的用法。
一、狀態機是什麼
狀態機能準確地表達「同一實體在不同階段的狀態」以及「狀態之間的遷移條件」。
狀態:可能是實體對象的單一屬性,也可能是屬性集合。
遷移條件:外界的突發事件,以及滿足特殊條件的屬性變化。
遊戲裡的實體往往存在多種狀態。以 Apple 的 SceneKit 為例,女性探險家有幾個運動狀態,遊戲過程中她會在這些狀態之間遷移。
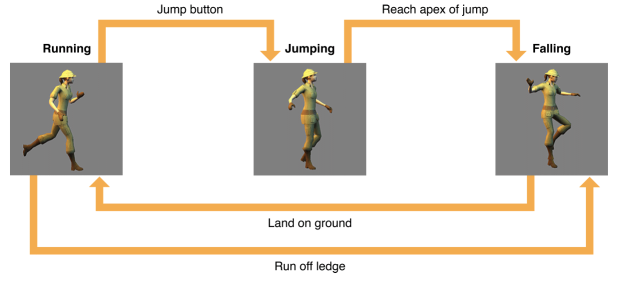
狀態機示意圖
圖中分為 Running、Jumping、Falling 三個狀態,遷移條件標在帶箭頭的直線上。狀態機模式給我們的好處很明顯:透過條件判斷,方便地管理對象實體的狀態。
狀態機的實作方式有很多,最樸素的是 if-else 判斷。但如果狀態數量多、遷移需求又持續變化,if-else 會帶來大量維護問題。《Head First 設計模式》(Head First 是我覺得很輕鬆愉快的一套讀物,推薦給想快速入門某項新技術的人;但入門之後仍需毅力與付出才能真正掌握,對任何事都是如此)為我們提供了不錯的狀態機編程模式教學,示範了簡單且具可擴展性的狀態機設計。
好消息是,在 iOS 裡我們不必再為狀態機的程式碼煩惱了——Apple 已經把這個模式實作好了,我們只要學會怎麼用。而且不僅限於遊戲開發,其他類型的 App 也能很從容地使用 GameplayKit 提供的狀態機框架。
二、GameplayKit 的狀態機 API
先說樸素的實作方式,純粹為了對照。
以小明為例,狀態定義為吃飯、睡覺、工作三種。小明作為一個物件,有一個 currentState 屬性代表當前狀態,暫定為 int 型,三種狀態值分別是 1、2、3。把狀態變化簡化為「吃飯 → 睡覺 → 工作 → 吃飯」的循環。小明提供一個 changeState 方法,參數是下一個要轉換的狀態:
- (Bool)changeState:(XMState *)state {
    switch (state) {
        case eat:
            // 判斷 work 到 eat 的遷移是否有效
            if (self.currentState == work) {
                self.currentState = state;
                return YES;
            }
            return NO;
        case sleep:
            if (self.currentState == eat) {
                self.currentState = state;
                return YES;
            }
            return NO;
        case work:
            if (self.currentState == sleep) {
                self.currentState = state;
                return YES;
            }
            return NO;
    }
    return NO;
}
這裡其實只做了兩件事:判斷遷移是否有效(檢查當前狀態),以及執行遷移(設定 currentState)。一旦新增狀態,或狀態循環規則改變,switch-case 與 if-else 就會不斷膨脹,可維護性下降、冗餘程式碼上升。
而狀態機模式正是為了解決這個問題,GameplayKit 又替我們實作好了,接下來好好掌握它。
1. 狀態物件 GKState
GameplayKit 中,Apple 提供了狀態物件 GKState,作為所有狀態的基類。它提供的方法有兩類作用:
(1)管理狀態物件本身的屬性,並驗證狀態遷移的有效性:
// 驗證下一個狀態是否有效,若無效則不會發生遷移
- (BOOL)isValidNextState:(Class)stateClass {
    return stateClass == [WJSSleepState class];
}
(2)為狀態的更新與遷移提供填寫業務邏輯的位置。實體狀態變化的具體邏輯,由開發者在這些回調中補上。
(3)依小明那個例子,定義三個狀態類:
@interface WJSWorkState : WJSState
@end

@interface WJSEatState : WJSState
@end

@interface WJSSleepState : WJSState
@end
那怎麼驅動實體更新與遷移狀態?也就是樸素編程裡那個 changeState 的角色。GameplayKit 提供了狀態機物件 GKStateMachine 來管理 GKState。
2. 驅動狀態變化的 GKStateMachine
首先,在初始化階段把實體的所有狀態都註冊進 GKStateMachine:
// 1. 初始化各個狀態
WJSWorkState *workState = [WJSWorkState new];
WJSEatState *eatState = [WJSEatState new];
WJSSleepState *sleepState = [WJSSleepState new];

// 2. 初始化狀態機,並將各個狀態加入管理
_stateMachine = [GKStateMachine stateMachineWithStates:@[workState, eatState, sleepState]];

// 3. 進入 work 狀態
[_stateMachine enterState:[workState class]];
其次,狀態機物件負責狀態的更新與遷移,這裡包含兩層意思:
(1)狀態的更新:指當前狀態的更新。系統運行期間,當前狀態可能需要持續更新、計算並執行既定操作。呼叫狀態機的 updateWithDeltaTime:,狀態機會轉而呼叫當前狀態的 updateWithDeltaTime:;開發者在 GKState 子類中覆寫該方法,填入更新邏輯即可。
// 狀態機更新當前狀態
[_stateMachine updateWithDeltaTime:1];
(2)狀態的遷移:從當前狀態轉到下一個狀態。GKState 提供的回調,就是給開發者放遷移邏輯的地方。
// 狀態機執行狀態遷移
[_stateMachine enterState:[workState class]];
狀態物件的活動流程是:進入新狀態前先檢查狀態是否可靠;若可靠,再呼叫遷移相關方法做業務處理。需要覆寫的方法如下:
// 1. 狀態遷移時填寫邏輯的位置

// 離開當前狀態時呼叫,參數是下一個狀態
- (void)willExitWithNextState:(GKState *)nextState {
    NSLog(@"[WJSState Eat] willExitWithNextState:%@", nextState);
}

// 進入當前狀態時呼叫,參數是上一個狀態
- (void)didEnterWithPreviousState:(GKState *)previousState {
    [super didEnterWithPreviousState:previousState];
    NSLog(@"[WJSState Eat] didEnterWithPreviousState:%@", previousState);
}

// 2. 狀態更新
// 狀態機呼叫 updateWithDeltaTime 時,會轉呼叫當前狀態的 updateWithDeltaTime
- (void)updateWithDeltaTime:(NSTimeInterval)seconds {
    NSLog(@"[WJSState Eat] updateWithDeltaTime");
}
為了方便理解,我把小明這個例子的 Demo 程式碼上傳到了 GitHub(點我點我)。
點擊 update 按鈕,狀態更新,實際呼叫的是當前狀態裡的 updateWithDeltaTime:;點擊 change 按鈕,狀態依設定遷移:離開當前狀態時呼叫 willExitWithNextState,進入新狀態後呼叫新狀態的 didEnterWithPreviousState。
3. 使用步驟總結
分析需求,理清實體在各狀態下的更新與遷移邏輯,畫出狀態機設計圖;
繼承 GKState,實作各個具體狀態;
使用 GKStateMachine,在對應的處理邏輯中觸發狀態遷移。
三、Maze 遊戲裡如何應用狀態機
Maze 中,Player(那個菱形 ◇)由玩家直接控制,只需要管理「生」與「死」兩個狀態,邏輯並不複雜。但四個方塊組成的 enemies 就不同了,它們依情況有四種狀態(下圖由 Apple 提供):
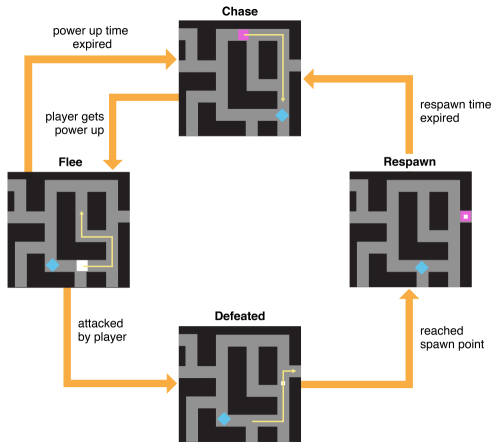
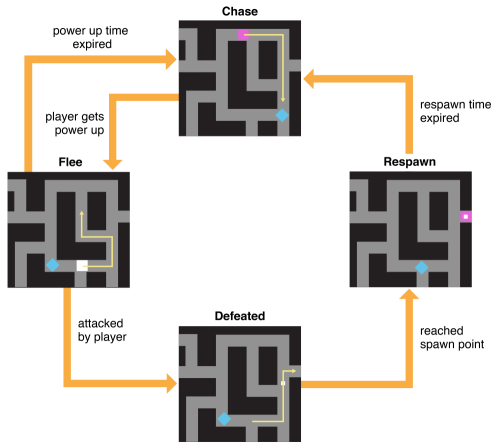
Maze 狀態機
Enemy 四種狀態之間的遷移邏輯如下。
(1)Flee(逃離)與 Chase(捕獵)之間的遷移,取決於「Player gets power up」——玩家點擊螢幕後 power up,狀態從 Chase 轉為 Flee;power up 時間結束後,再從 Flee 回到 Chase。
// 進入 Chase 狀態,呼叫 Sprite 元件恢復 enemies 的外觀
- (void)didEnterWithPreviousState:(__nullable GKState *)previousState {
    // Set the enemy sprite to its normal appearance, undoing any changes that happened in other states.
    AAPLSpriteComponent *component = (AAPLSpriteComponent *)[self.entity componentForClass:[AAPLSpriteComponent class]];
    [component useNormalAppearance];
}

// 進入 Flee 狀態,呼叫 Sprite 元件改變外觀,並設定逃離目標(隨機)
- (void)didEnterWithPreviousState:(__nullable GKState *)previousState {
    AAPLSpriteComponent *component = (AAPLSpriteComponent *)[self.entity componentForClass:[AAPLSpriteComponent class]];
    [component useFleeAppearance];

    // Choose a location to flee towards.
    self.target = [[self.game.random arrayByShufflingObjectsInArray:self.game.level.enemyStartPositions] firstObject];
}
(2)Flee 到 Defeated(被擊敗)的遷移,依賴物理碰撞檢測系統。初始化階段就定義了 enemies 與 player 的碰撞類別與回調;檢測到碰撞後,在回調中呼叫 GKStateMachine 完成遷移。
- (void)didBeginContact:(SKPhysicsContact *)contact {
    // 1. 發生碰撞時(碰撞檢測由引擎負責),呼叫該函數
    AAPLSpriteNode *enemyNode;
    if (contact.bodyA.categoryBitMask == ContactCategoryEnemy) {
        enemyNode = (AAPLSpriteNode *)contact.bodyA.node;
    } else if (contact.bodyB.categoryBitMask == ContactCategoryEnemy) {
        enemyNode = (AAPLSpriteNode *)contact.bodyB.node;
    }
    NSAssert(enemyNode != nil, @"Expected player-enemy/enemy-player collision");

    // 2. 若 enemy 處於 chase 狀態,則 player 掛掉;反之 enemy 切入 defeated 狀態
    AAPLEntity *entity = (AAPLEntity *)enemyNode.owner.entity;
    AAPLIntelligenceComponent *aiComponent = (AAPLIntelligenceComponent *)[entity componentForClass:[AAPLIntelligenceComponent class]];

    if ([aiComponent.stateMachine.currentState isKindOfClass:[AAPLEnemyChaseState class]]) {
        [self playerAttacked];
    } else {
        // Otherwise, that enemy enters the Defeated state only if in a state that allows that transition.
        [aiComponent.stateMachine enterState:[AAPLEnemyDefeatedState class]];
    }
}
(3)Defeated 狀態在持續更新中讓 enemy 尋路回到重生點,抵達後遷移到 Respawn(重生)狀態。
// 在 defeated 狀態裡,enemy 尋路回到重生點,抵達後呼叫狀態機進入 Respawn 狀態
NSArray *path = [graph findPathFromNode:enemyNode toNode:self.respawnPosition];
[component followPath:path completion:^{
    [self.stateMachine enterState:[AAPLEnemyRespawnState class]];
}];
(4)在 Respawn 狀態中,重生倒計時結束後回到 Chase 狀態。這裡的倒計時由 stateMachine 透過 updateWithDeltaTime 自減時間變數實現。
// 1. 從 Defeated 進入 Respawn 狀態時呼叫
- (void)didEnterWithPreviousState:(__nullable GKState *)previousState {
    // 2. 倒計時 static 變數置為 10
    static const NSTimeInterval defaultRespawnTime = 10;
    self.timeRemaining = defaultRespawnTime;

    // 3. 呼叫 Sprite 元件,設定重生動畫
    AAPLSpriteComponent *component = (AAPLSpriteComponent *)[self.entity componentForClass:[AAPLSpriteComponent class]];
    component.pulseEffectEnabled = YES;
}

// 4. _stateMachine 受系統的 updateWithDeltaTime 驅動進行倒計時自減,歸零後進入 Chase 狀態
- (void)updateWithDeltaTime:(NSTimeInterval)seconds {
    self.timeRemaining -= seconds;
    if (self.timeRemaining < 0) {
        [self.stateMachine enterState:[AAPLEnemyChaseState class]];
    }
}

// 5. 從 Respawn 離開進入 Chase 時,呼叫 Sprite 元件還原外觀
- (void)willExitWithNextState:(GKState *__nonnull)nextState {
    // Restore the sprite's original appearance.
    AAPLSpriteComponent *component = (AAPLSpriteComponent *)[self.entity componentForClass:[AAPLSpriteComponent class]];
    component.pulseEffectEnabled = NO;
}
在 Xcode 中搜尋 stateMachine,可以看到 Maze 裡 enemies 狀態變遷的所有呼叫點,歸納起來有三處:
響應玩家點擊時,進行 power up;
物理碰撞檢測的回調裡呼叫;
狀態更新時,於
updateWithDeltaTime中呼叫。
實際上,驅動遊戲裡狀態機更新的力量與路徑,在上一篇文章的圖中已經相當清晰(上回的圖可能有誤,這裡修正):
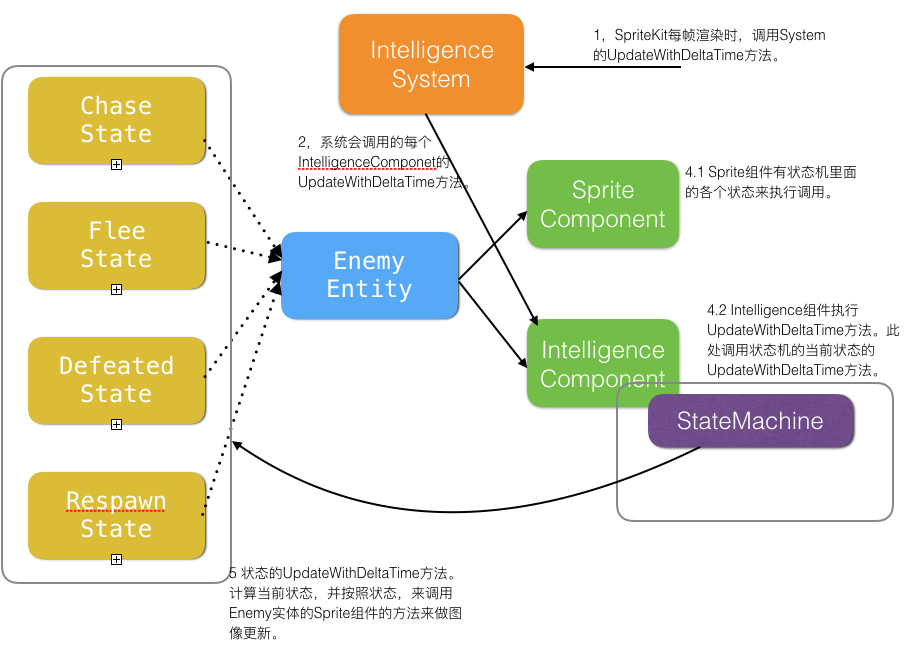
enemy 狀態更新圖示(修正後)
componentSystem 的 updateWithDeltaTime: 會呼叫 stateMachine 的 updateWithDeltaTime:,後者再呼叫當前狀態的 updateWithDeltaTime:,狀態更新就此完成。
四、接下來寫什麼
除了前兩篇談的 ECS 與狀態機,我還打算再寫兩篇,說明 Maze 遊戲裡出現的其他技術:
尋路系統
隨機數與 rule system
- 上一篇文章: 作為開發者,你希望 Apple 如何改進開發者工具?
- 下一篇文章: iOS 音頻篇:用 AVPlayer 播放網絡音樂的完整實踐