
高效圖片輪播:僅用兩個 imageView 就能實現
本文為投稿文章,作者:codingZero
導語
在不少專案裡,圖片輪播都是必備功能。如今網路上關於圖片輪播的框架層出不窮、五花八門,而筆者依循自己的思路,僅用兩個 imageView 便實現了圖片輪播。這裡就來談談筆者的主要思路與大致步驟,具體程式碼請見文末;若你覺得好用,別忘了獻上你的 star。
這個輪播框架的優勢:
檔案少,程式碼簡潔
不依賴任何第三方庫,耦合度低
同時支持本地圖片與網路圖片
可調整分頁控制項的位置,顯示或隱藏
自訂分頁控制項的圖片,就是這麼個性
自帶圖片緩存,一次加載,永久使用
效能佳,佔用記憶體少,輪播順暢
實際使用
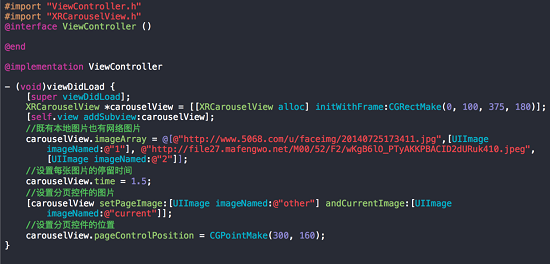
我們先看 demo,程式碼如下。
運行效果
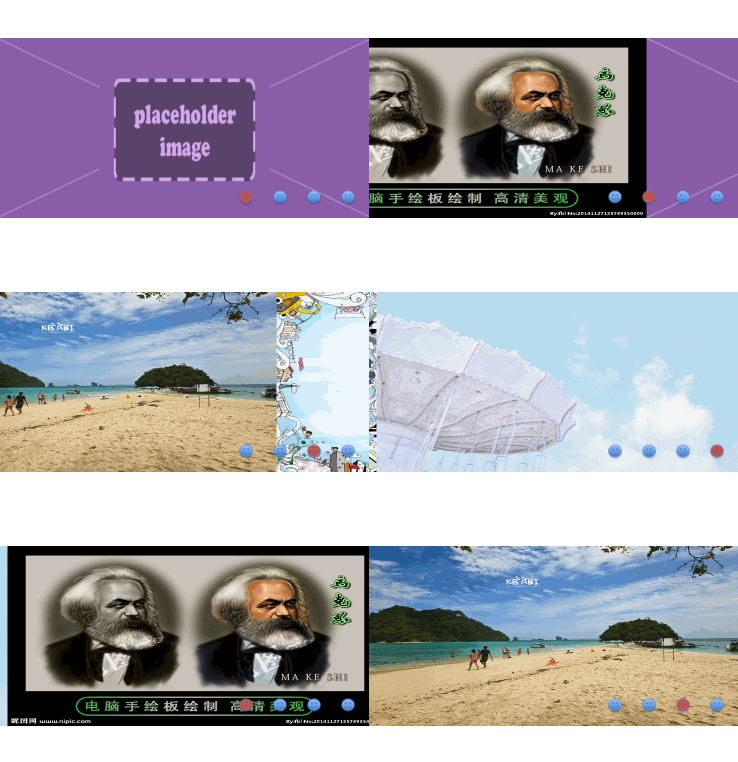
輪播實現步驟
接下來,筆者將從各個層面逐一剖析。
層級結構
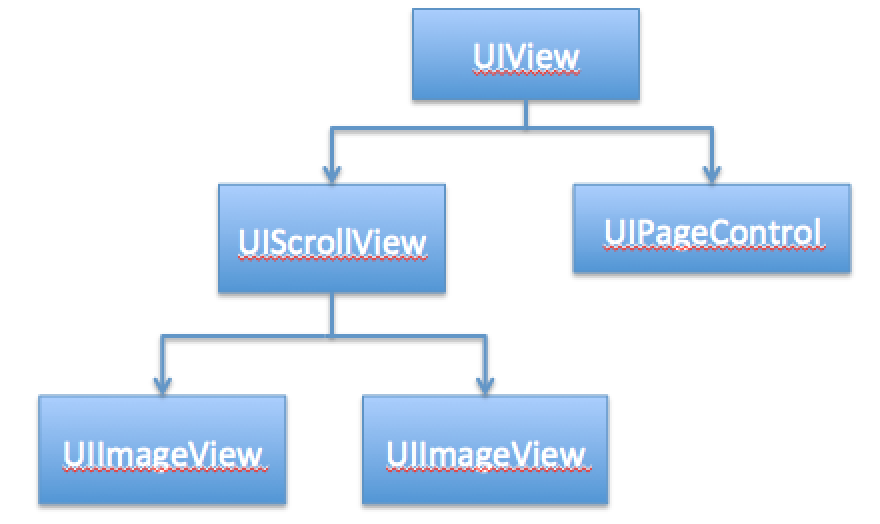
最底層是一個 UIView,其上放著一個 UIScrollView 與一個 UIPageControl,scrollView 上則有兩個 UIImageView,且 imageView 的寬高 = scrollview 寬高 = view 寬高。
輪播原理
假設輪播控制項的寬度為 x、高度為 y,我們把 scrollview 的 contentSize.width 設為 3x,並讓 scrollview 的水平偏移量為 x,也就是顯示最中間的內容。
scrollView.contentSize = CGSizeMake(3x, y); scrollView.contentOffset = CGPointMake(x, 0);
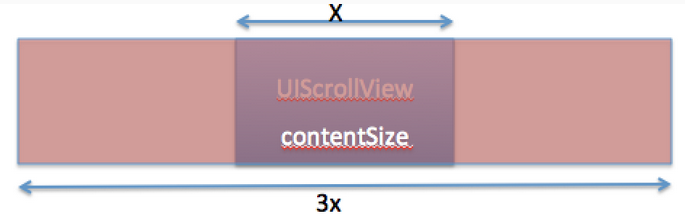
把 imageView 加到 scrollview 內容視圖的中間位置。

接著用代理方法 scrollViewDidScroll 來監聽 scrollview 的滾動,並定義一個列舉變數記錄滾動方向。
typedef enum{ DirecNone, DirecLeft, DirecRight } Direction;@property (nonatomic, assign) Direction direction; - (void)scrollViewDidScroll:(UIScrollView *)scrollView { self.direction = scrollView.contentOffset.x >x? DirecLeft : DirecRight; }用 KVO 監聽 direction 屬性值的變化
[self addObserver:self forKeyPath:@"direction" options:NSKeyValueObservingOptionNew context:nil];
判斷滾動方向:當偏移量大於 x,表示左移,則把 otherImageView 放在右邊;偏移量小於 x,表示右移,則把 otherImageView 放在左邊。
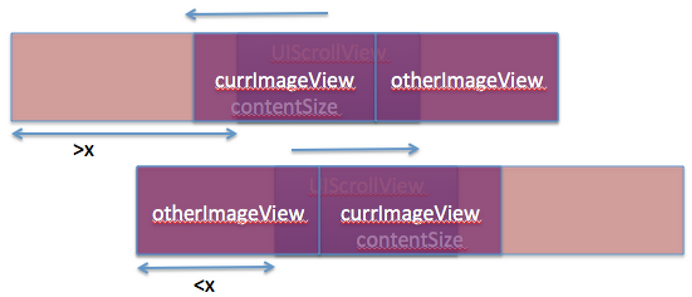
- (void)observeValueForKeyPath:(NSString *)keyPath ofObject:(id)object change:(NSDictionary *)change context:(void *)context { //self.currIndex表示當前顯示圖片的索引,self.nextIndex表示將要顯示圖片的索引 //_images為圖片數組 if(change[NSKeyValueChangeNewKey] == change[NSKeyValueChangeOldKey]) return; if ([change[NSKeyValueChangeNewKey] intValue] == DirecRight){ self.otherImageView.frame = CGRectMake(0, 0, self.width, self.height); self.nextIndex = self.currIndex - 1; if (self.nextIndex < 0) self.nextIndex = _images.count – 1; } else if ([change[NSKeyValueChangeNewKey] intValue] == DirecLeft){ self.otherImageView.frame = CGRectMake(CGRectGetMaxX(_currImageView.frame), 0, self.width, self.height); self.nextIndex = (self.currIndex + 1) % _images.count; } self.otherImageView.image = self.images[self.nextIndex]; }透過代理方法 scrollViewDidEndDecelerating 監聽滾動結束,結束後會變成以下兩種情況。
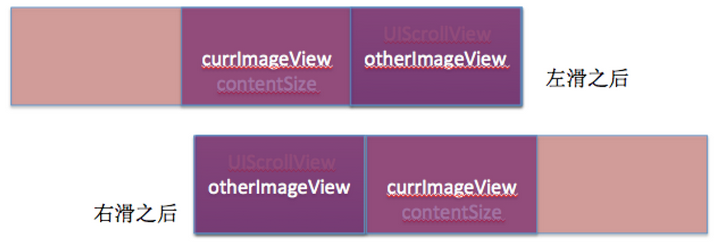
此時,scrollview 的偏移量為 0 或 2x,我們再透過程式碼把 scrollview 的偏移量設回 x,並把 currImageView 的圖片改為 otherImageView 的圖片。
- (void)scrollViewDidEndDecelerating:(UIScrollView *)scrollView { [self pauseScroll]; } - (void)pauseScroll { self.direction = DirecNone;//清空滾動方向 //判斷最終是滾到了右邊還是左邊 int index = self.scrollView.contentOffset.x / x; if (index == 1) return;//等於1表示最後沒有滾動,返回不做任何操作 self.currIndex = self.nextIndex;//當前圖片索引改變 self.pageControl.currentPage = self.currIndex; self.currImageView.frame = CGRectMake(x, 0, x, y); self.currImageView.image = self.otherImageView.image; self.scrollView.contentOffset = CGPointMake(x, 0); }這樣一來,我們看到的還是 currImageView,只不過展示的是下一張圖片,如下圖,又回到了最初的狀態。

自動滾動
輪播功能實現後,接著加上定時器讓它自動滾動,相當簡單。
- (void)startTimer { //如果只有一張圖片,則直接返回,不開啟定時器 if (_images.count <= 1) return; //如果定時器已開啟,先停止再重新開啟 if (self.timer) [self stopTimer]; self.timer = [NSTimer timerWithTimeInterval:self.time target:self selector:@selector(nextPage) userInfo:nil repeats:YES]; [[NSRunLoop currentRunLoop] addTimer:self.timer forMode:NSRunLoopCommonModes]; } - (void)nextPage { //動畫改變scrollview的偏移量就可以實現自動滾動 [self.scrollView setContentOffset:CGPointMake(self.width * 2, 0) animated:YES]; }注意:setContentOffset:animated: 方法執行完畢後不會呼叫 scrollview 的 scrollViewDidEndDecelerating 方法,但會呼叫 scrollViewDidEndScrollingAnimation,因此我們要在該方法中呼叫 pauseScroll。
- (void)scrollViewDidEndScrollingAnimation:(UIScrollView *)scrollView { [self pauseScroll]; }拖拽時停止自動滾動
當我們手動拖拽圖片時,需要停止自動滾動,此時只要讓定時器失效即可;停止拖拽時,再重新啟動定時器。
- (void)scrollViewWillBeginDragging:(UIScrollView *)scrollView { [self.timer invalidate]; } - (void)scrollViewDidEndDragging:(UIScrollView *)scrollView willDecelerate:(BOOL)decelerate{ [self startTimer]; }加載圖片
實際開發中,我們很少輪播本地圖片,大多數都是從伺服器取得的,也有可能既有本地圖片又有網路圖片,那要如何加載呢?
先定義 4 個屬性:
NSArray imageArray:暴露在 .h 檔中,外界把要加載的圖片或路徑陣列賦值給它
NSMutableArray images:用來存放圖片的陣列
NSMutableDictionary imageDic:用來緩存圖片的字典,key 為 URL
NSMutableDictionary operationDic:用來保存下載操作的字典,key 為 URL
判斷外界傳入的是圖片還是路徑:若是圖片,直接加入圖片陣列;若是路徑,先放一張占位圖片,再依路徑去下載圖片。
_images =[NSMutableArray array];for (int i = 0; i < imageArray.count; i++) { if ([imageArray[i] isKindOfClass:[UIImage class]]) { [_images addObject:imageArray[i]];//如果是圖片,直接添加到images中 } else if ([imageArray[i] isKindOfClass:[NSString class]]){ [_images addObject:[UIImage imageNamed:@"placeholder"]];//如果是路徑,添加一個占位圖片到images中 [self downloadImages:i]; //下載網絡圖片 } }下載圖片時,先從緩存取,若有則替換占位圖片;若無,則去沙盒取,若有則替換占位圖片並加入緩存;若都沒有,就開啟非同步執行緒下載。
- (void)downloadImages:(int)index { NSString *key = _imageArray[index]; //從字典緩存中取圖片 UIImage *image = [self.imageDic objectForKey:key]; if (image) { _images[index] = image;//如果圖片存在,則直接替換之前的占位圖片 }else{ //字典中沒有從沙盒中取圖片 NSString *cache = [NSSearchPathForDirectoriesInDomains(NSCachesDirectory, NSUserDomainMask, YES) lastObject]; NSString *path = [cache stringByAppendingPathComponent:[key lastPathComponent]]; NSData *data = [NSData dataWithContentsOfFile:path]; if (data) { //沙盒中有,替換占位圖片,並加入字典緩存中 image = [UIImage imageWithData:data]; _images[index] = image; [self.imageDic setObject:image forKey:key]; }else{ //字典沙盒都沒有,下載圖片 NSBlockOperation *download = [self.operationDic objectForKey:key];//查看下載操作是否存在 if (!download) {//不存在 //創建一個隊列,默認為並發隊列 NSOperationQueue *queue = [[NSOperationQueue alloc] init]; //創建一個下載操作 download = [NSBlockOperation blockOperationWithBlock:^{ NSURL *url = [NSURL URLWithString:key]; NSData *data = [NSData dataWithContentsOfURL:url]; if (data) { //下載完成後,替換占位圖片,存入字典並寫入沙盒,將下載操作從字典中移除掉 UIImage *image = [UIImage imageWithData:data]; [self.imageDic setObject:image forKey:key]; self.images[index] = image; //如果只有一張圖片,需要在主線程主動去修改currImageView的值 if (_images.count == 1) [_currImageView performSelectorOnMainThread:@selector(setImage:) withObject:image waitUntilDone:NO]; [data writeToFile:path atomically:YES]; [self.operationDic removeObjectForKey:key]; } }]; [queue addOperation:download]; [self.operationDic setObject:download forKey:key];//將下載操作加入字典 } } } }監聽圖片點擊
當圖片被點擊時,我們往往需要執行某些操作,因此需要監聽圖片的點擊,思路如下:
1. 定義一個 block 屬性暴露給外界:void(^imageClickBlock)(NSInteger index)
(不會用 block 的可以改用代理,或參考文末連結)
2. 把 currImageView 的 userInteractionEnabled 設為 YES
3. 給 currImageView 加上一個點擊手勢
4. 在手勢方法裡呼叫 block,並傳入圖片索引
結束語
以上是筆者的主要思路與部分程式碼,需要源碼的朋友請移步筆者的 GitHub 下載:https://github.com/codingZero/XRCarouselView,記得獻上你的星星哦。
- 上一篇文章: 用 Xcode Targets 優雅管理開發版與正式版的建置
- 下一篇文章: 移動開發的革命之路,究竟指向何方