
用 HealthKit 開發一個健身 App:以 OneHourWalker 為例
看新聞就知道,比起歷史上任何一個時刻,健身與健康在今天都更加重要。說起來也有點好笑,我似乎記得幾天前新聞也在說同樣的事——也許是因為年紀越來越大,我確實更需要關注健康。不管怎樣,這是個熱門話題。隨著技術不斷進步,手機應用與周邊硬體在全球範圍內普及,也為這個持續升溫的話題加上了新的維度。
HealthKit 是蘋果搭建的一座重要橋樑,把被追蹤的健康數據,與有健康意識的科技消費者、運動愛好者、以及每天在用 iPhone 的普通人連接起來。使用者可以輕鬆追蹤一段時間內的健身與健康指標;除了那些說得出來的好處,光是看著圖表裡向上的曲線,本身就是極大的鼓勵。
可以想見,在處理健康資訊時,資料安全成為關鍵環節。HealthKit 對所有健康資訊保有絕對控制權,資料直接回到使用者手上——使用者可以准許或拒絕任何 App 存取他們的健康數據。
對開發者而言,我們必須先請求授權才能讀取或寫入 HealthKit 數據,而且需要明確聲明想存取哪些具體類別。此外,任何使用 HealthKit 的 App 都必須包含一份 Privacy Policy(隱私協議),這樣使用者在進行資訊交換時會更安心。
關於走路一小時(OneHourWalker)
今天我們要做一個有趣的 App,既能讀取也能寫入 HealthKit 數據。先看看它的樣子:
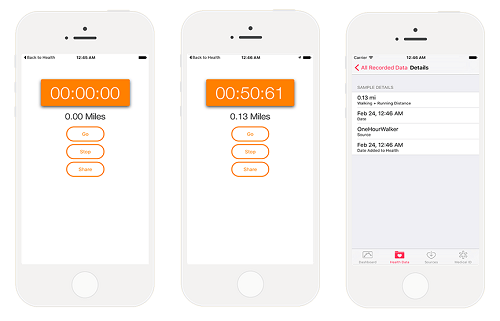
OneHourWalker 是一款健身 App,用來追蹤使用者在一小時內走路或跑步的距離,並可把距離分享至 HealthKit,之後就能在健康應用中查看。我知道整整一小時聽起來有點嚇人(至少對我是這樣),所以使用者可以提前結束,此時仍然能分享已記錄的距離。
如此看來,似乎只需要把資料寫入 HealthKit 就夠了。那我們要讀取的資料是什麼?
好問題!我喜歡在樹林小徑上散步,途中常會穿越一些枝杈橫生的區域。因為我個子高,這偶爾會帶來麻煩。我們的解法很樸素:從 HealthKit 讀取使用者的身高,顯示在 Label 上,藉此提醒使用者避開不適合的運動環境。
下面是初始專案,下載後執行看起來就像個能跑的 App。計時器與定位系統都已經就緒,所以我們只需把注意力放在 HealthKit 上。順帶一提,六十分鐘後計時器與定位系統會自動停止。
啟用 HealthKit
第一步是在專案中開啟 HealthKit 功能。在 Project Navigator 中選中 OneHourWalker,點擊 Targets 下方的 OneHourWalker,接著在上方 tab 欄點擊 Capabilities。

在 Capabilities 底部把 HealthKit 設為 On。這一動作會:把 HealthKit entitlement 加入 App ID、把 HealthKit key 加入 info plist、把 HealthKit entitlement 加入權利檔,並連結 HealthKit.framework。就這麼簡單。
開始寫程式碼
找到 TimerViewController.swift。首先建立一個 HealthKitManager 實例:
import UIKit
import CoreLocation
import HealthKit

class TimerViewController: UIViewController, CLLocationManagerDelegate {

    @IBOutlet weak var timerLabel: UILabel!
    @IBOutlet weak var milesLabel: UILabel!
    @IBOutlet weak var heightLabel: UILabel!

    var zeroTime = NSTimeInterval()
    var timer : NSTimer = NSTimer()

    let locationManager = CLLocationManager()

    var startLocation: CLLocation!
    var lastLocation: CLLocation!
    var distanceTraveled = 0.0

    let healthManager: HealthKitManager = HealthKitManager()
HealthKitManager.swift 裡會包含所有與 HealthKit 相關的操作,其中幾個關鍵方法稍後再實作。
如開頭所述,我們必須先取得授權才能讀寫健康數據。在 viewDidLoad() 中處理:
override func viewDidLoad() {
    super.viewDidLoad()

    locationManager.requestWhenInUseAuthorization()

    if CLLocationManager.locationServicesEnabled() {
        locationManager.delegate = self
        locationManager.desiredAccuracy = kCLLocationAccuracyBest
    } else {
        print("Need to Enable Location");
    }

    // 不向使用者請求許可就無法取得使用者的 HealthKit 數據
    getHealthKitPermission()
}
getHealthKitPermission() 會呼叫 manager 的 authorizeHealthKit()。一切順利時,我們再呼叫 setHeight():
func getHealthKitPermission() {
    // 在 HealthKitManager.swift 文件中尋找授權情況
    healthManager.authorizeHealthKit { (authorized, error) -> Void in
        if authorized {
            // 獲得然後設置用戶的高度
            self.setHeight()
        } else {
            if error != nil {
                print(error)
            }
            print("Permission denied.")
        }
    }
}
在 HealthKitManager.swift 中建立 authorizeHealthKit(),同時建立 HealthKit store,把 App 連上 HealthKit 數據:
let healthKitStore: HKHealthStore = HKHealthStore()

func authorizeHealthKit(completion: ((success: Bool, error: NSError!) -> Void)!) {

    // 聲明我們想從 HealthKit 裡讀取的健康數據類型
    let healthDataToRead = Set(arrayLiteral:
        HKObjectType.quantityTypeForIdentifier(HKQuantityTypeIdentifierHeight)!)

    // 聲明我們想寫入 HealthKit 的數據類型
    let healthDataToWrite = Set(arrayLiteral:
        HKObjectType.quantityTypeForIdentifier(HKQuantityTypeIdentifierDistanceWalkingRunning)!)

    // 以防萬一 OneHourWalker 在 iPad 中打開
    if !HKHealthStore.isHealthDataAvailable() {
        print("Can't access HealthKit.")
    }

    // 請求可以讀取和寫入數據的權限
    healthKitStore.requestAuthorizationToShareTypes(healthDataToWrite,
                                                   readTypes: healthDataToRead) { (success, error) -> Void in
        if (completion != nil) {
            completion(success: success, error: error)
        }
    }
}
請求授權時必須明確表明我們只想讀取與寫入哪些資料。對這個 App 來說,我們要讀取身高(用來提醒使用者避開樹枝),並申請寫入權限,以便把步行與跑步的距離寫入 HealthKit。我們期望 HealthKit 回傳一個 HKObject 實例,再把它轉成可讀性更好的身高值。
處理完 iPad 螢幕適配之後,就可以發起權限請求了。
接著在 HealthKitManager.swift 中建立 getHeight(),從 HealthKit 讀取身高:
func getHeight(sampleType: HKSampleType, completion: ((HKSample!, NSError!) -> Void)!) {

    // 創建斷言,以查詢高度
    let distantPastHeight = NSDate.distantPast() as NSDate
    let currentDate = NSDate()
    let lastHeightPredicate =
        HKQuery.predicateForSamplesWithStartDate(distantPastHeight,
                                                 endDate: currentDate,
                                                 options: .None)

    // 獲得最近的高度值
    let sortDescriptor = NSSortDescriptor(key: HKSampleSortIdentifierStartDate,
                                          ascending: false)

    // 從 HealthKit 裡獲取最近的高度值
    let heightQuery = HKSampleQuery(sampleType: sampleType,
                                    predicate: lastHeightPredicate,
                                    limit: 1,
                                    sortDescriptors: [sortDescriptor]) { (sampleQuery, results, error) -> Void in
        if let queryError = error {
            completion(nil, queryError)
            return
        }

        // 把第一個 HKQuantitySample 作為最近的高度值
        let lastHeight = results!.first

        if completion != nil {
            completion(lastHeight, nil)
        }
    }

    // 是時候執行查詢了
    self.healthKitStore.executeQuery(heightQuery)
}
查詢身高的第一步是建立一個斷言(predicate)來定義時間範圍——我們會取一段時間內的所有身高記錄,這自然會回傳一個陣列。但我們只想要最近的那筆,所以依日期排序,讓最新的排在最前面。
建立查詢時把結果數量限制為 1,處理完可能的錯誤後,把第一個也是唯一一個項目作為 lastHeight 回傳,最後執行查詢。
回到 TimerViewController.swift,授權完成後、使用者開始使用前,需要在 getHealthKitPermission() 中呼叫 setHeight()。
先為 HKQuantitySample 宣告一個變數:
var height: HKQuantitySample?
接著實作 setHeight():
func setHeight() {
    // 創建高度 HKSample
    let heightSample = HKSampleType.quantityTypeForIdentifier(HKQuantityTypeIdentifierHeight)

    // 調用 HealthKitManager 的 getSample() 方法,來獲取用戶的高度
    self.healthManager.getHeight(heightSample!, completion: { (userHeight, error) -> Void in
        if (error != nil) {
            print("Error: \(error.localizedDescription)")
            return
        }

        var heightString = ""
        self.height = userHeight as? HKQuantitySample

        // 把高度轉換成用戶本地的計量單位
        if let meters = self.height?.quantity.doubleValueForUnit(HKUnit.meterUnit()) {
            let formatHeight = NSLengthFormatter()
            formatHeight.forPersonHeightUse = true
            heightString = formatHeight.stringFromMeters(meters)
        }

        // 設置 label 顯示用戶的高度
        dispatch_async(dispatch_get_main_queue(), { () -> Void in
            self.heightLabel.text = heightString
        })
    })
}
我們請求的身高資料會回傳一個 HKQuantity,其 identifier 為 HKQuantityTypeIdentifierHeight。呼叫 manager 的 getHeight() 取得資料後,把它轉換成合適的字串顯示在 Label 上;照例,所有可能的錯誤都要處理。
現在使用者可以打開 App、查看身高、把記錄寫入健康應用,然後開始計時並追蹤走路或跑步的距離。下一步就是處理寫入。
使用者結束運動後(無論滿一小時與否)會點擊 Share 按鈕,把距離送進 Health 應用。所以我們在 share() 中呼叫 HealthKitManager.swift 的 saveDistance(),讓資料與日期一併歸檔——明天使用者就能試著挑戰自己的紀錄:
@IBAction func share(sender: AnyObject) {
    healthManager.saveDistance(distanceTraveled, date: NSDate())
}
回到 manager,建立 saveDistance()。先讓 HealthKit 知道我們要寫入跑步/走路距離,再把計量單位換成英里並賦值給實例,最後透過 saveObject() 寫入:
func saveDistance(distanceRecorded: Double, date: NSDate ) {
    // 設置跑步距離或走路步數的數量的類型
    let distanceType =
        HKQuantityType.quantityTypeForIdentifier(HKQuantityTypeIdentifierDistanceWalkingRunning)

    // 把計量單位設置成英里
    let distanceQuantity = HKQuantity(unit: HKUnit.mileUnit(), doubleValue: distanceRecorded)

    // 設置正式的 Quantity Sample
    let distance = HKQuantitySample(type: distanceType!,
                                    quantity: distanceQuantity,
                                    startDate: date,
                                    endDate: date)

    // 保存距離數量,把健康數據寫入 HealthKit
    healthKitStore.saveObject(distance, withCompletion: { (success, error) -> Void in
        if (error != nil) {
            print(error)
        } else {
            print("The distance has been recorded! Better go check!")
        }
    })
}
打開健康應用,記錄的資料會出現在 Walking + Running Distance 裡。查看路徑是:Health Data tab > Fitness > Walking + Running Distance > Show All Data。點擊任意一行會看到我們的圖示(目前還空著),再點一次就會顯示完整詳情。

有了 OneHourWalker,我們就能為全球 iOS 使用者的健康盡一份力。不過這僅僅是個起點,HealthKit 的可能性遠不止於此。
讓使用者查看所有追蹤資訊固然有用——人們可以對比每天、每週或任意時間段的數據,從中獲得動力。但真正有價值的是:開發者能用無數種新穎、有創意、有趣的方式來取用這些資料。
此外,HealthKit 應用的測試過程也相當有意思。
這就是最終版本的 OneHourWalker。
作者:AppCoda,原文鏈接
譯者:Crystal Sun;校對:numbbbbb;定稿:Cee
- 上一篇文章: iOS 動畫篇:從 drawRect 到 CALayer 的自定義動畫實作
- 下一篇文章: iOS 用不到 10 行程式碼實現購物車緩存