
iOS 圖片動態緩存方案設計與實現

項目地址:LDSImageCache
一直想寫一篇關於圖片緩存方案的文章,但積累不夠便擱置了,最近開始動手嘗試,就從我寫的下載說起。
下載
下載部分,我查閱了不少資料,像 SDWebImage 用的是 NSURLConnection,而我這裡選擇 NSURLSession,通過 NSURLSessionDataDelegate 的代理方法實現數據下載。題外話:為何選 NSURLSession 而非 NSURLConnection?因為 iOS 9 之前網絡連接多用 NSURLConnection,但 iOS 9 之後它被宣布棄用。其實早在 2013 年的 WWDC,蘋果就設計了它的繼任者 NSURLSession,無論易用性還是能力都更勝一籌。
這個過程還會用到 GCD 與 NSOperation 來管理下載線程。為何混用?我們用子類化 NSOperation 對下載線程做抽象,讓下載模塊更清晰、接口更簡單;GCD 則在下載的局部發揮所長——簡單、易用、省代碼,用 block 讓代碼更簡潔。
基本技術選型盤點完畢,進入下載設計。
線程管理器
用子類化的自定義 NSOperation,一個下載即一條線程;管理這些線程則需要一個下載管理器,我們先來構建它。這個管理器在整個下載模塊中負責對線程資源進行管理,起工具作用,因此要構建為單例類以實現數據共享:
+(instancetype)shareDownloader{ static LYImageDownloader *lyImageDownloader; static dispatch_once_t onceToken; dispatch_once(&onceToken, ^{ lyImageDownloader = [[LYImageDownloader alloc] init]; }); return lyImageDownloader; }閱讀開源庫、查找資料後發現,很多設計者的下載都具備狀態監聽——如下載進度、完成進度、錯誤信息回調,這些都是下載過程需要實時掌握的。這些信息以 block 回調形式呈現:
/** 無參數block */ typedef void(^DownloaderCreateBlock)(); /** 下載回調信息,下載進度Block @param AlreadyReceiveSize 已經接收大小 @param NotReceiveSize 未接收大小 */ typedef void(^DownloaderProgressBlock)(NSInteger alreadyReceiveSize,NSInteger expectedContentLength); /** 下載回調信息,完成下載Block @param data data @param image 圖片 @param error 錯誤信息 @param finished 是否完成 */ typedef void(^DownloaderCompletedBlock)(NSData *data,UIImage *image,NSError *error,BOOL finished);
下載中還需一些配置項,例如是否允許後台下載、隊列方式還是棧方式,於是定義了以下選項:
typedef NS_OPTIONS(NSInteger,DownloaderOptions) { //默認下載操作 DownloaderDefault = 1, //允許後台操作 DownloaderContinueInBackground = 2 }; typedef NS_ENUM(NSInteger,DownloaderOrder){ //默認下載順序,先進先出 DownloaderFIFO, //先進後出 DownloaderLIFO };基本結構完成後,我考慮把這些狀態回調信息存進一個 NSMutableDictionary:key 為下載地址,value 為 NSMutableArray,內含多組 DownloaderProgressBlock 與 DownloaderCompletedBlock。
/** 將所有的下載回調信息存儲在這裡,Key是URL,Value是多組回調信息 */ @property(strong,nonatomic) NSMutableDictionary *downloaderCallBack;
在一個下載開始前,需要加載或刪除一些狀態信息,構造了如下函數:
-(void)addWithDownloaderProgressBlock:(DownloaderProgressBlock)progressBlock DownloaderCompletedBlock:(DownloaderCompletedBlock)completedBlock URL:(NSURL *)url DownloaderCreateBlock:(DownloaderCreateBlock)downloaderCreateBlock{ if ([url isEqual:nil]) { completedBlock(nil,nil,nil,NO); } dispatch_barrier_sync(self.concurrentQueue, ^{ BOOL firstDownload = NO; if(!self.downloaderCallBack[url]){ self.downloaderCallBack[url] = [NSMutableArray new]; firstDownload = YES; } NSMutableArray *callBacksArray = self.downloaderCallBack[url]; NSMutableDictionary *callBacks = [[NSMutableDictionary alloc] init]; if (progressBlock) { callBacks[@"progress"] = [progressBlock copy]; } if (completedBlock) { callBacks[@"completed"] = [completedBlock copy]; } [callBacksArray addObject:callBacks]; self.downloaderCallBack[url] = callBacksArray; if (firstDownload) { downloaderCreateBlock(); } }); }先判斷 url 是否為空,為空則直接回調空處理;不為空時,為防止同一 URL 的 value 被重複創建,需判斷是否為首次下載。若是首次,會觸發 downloaderCreateBlock() 回調去配置 operation;若非首次,只需把新的進度/完成 block 放進 callBacksArray 即可。這裡還加了一個屏障(dispatch_barrier_sync),保證同一時刻只有一個線程操作 downloaderCallBack,確保並行時讀寫一致。這麼做的好處是:同一 URL 的請求會做「偽下載」——看似下載實則不重新下載,正在進行的下載進度會同步反饋給其他相同 URL 的請求。
整個下載管理器把下載統一管理:
-(void)downloaderImageWithDownloaderWithURL:(NSURL *)url DownloaderProgressBlock:(DownloaderProgressBlock)progressBlock DownloaderCompletedBlock:(DownloaderCompletedBlock)completedBlock{ __weak __typeof(self)myself = self; __block LYDownloaderOperation *operation; [self addWithDownloaderProgressBlock:progressBlock DownloaderCompletedBlock:completedBlock URL:url DownloaderCreateBlock:^{ NSMutableURLRequest *request = [[NSMutableURLRequest alloc] initWithURL:url cachePolicy: NSURLRequestReloadIgnoringLocalCacheData timeoutInterval:20]; operation = [[LYDownloaderOperation alloc] initWithRequest:request DownloaderOptions:1 DownloaderProgressBlock:^(NSInteger alreadyReceiveSize,NSInteger expectedContentLength){ __block NSArray *urlCallBacks; dispatch_sync(self.concurrentQueue, ^{ urlCallBacks = [myself.downloaderCallBack[url] copy]; }); for (NSDictionary *callbacks in urlCallBacks) { dispatch_async(dispatch_get_main_queue(), ^{ DownloaderProgressBlock progress = callbacks[@"progress"]; if (progress) { progress(alreadyReceiveSize,expectedContentLength); } }); } } DownloaderCompletedBlock:^(NSData *data,UIImage *image,NSError *error,BOOL finished){ completedBlock(data,image,error,finished); } cancelled:{}]; [myself.downloadQueue addOperation:operation]; }]; }這部分主要配置 operation 並加入下載隊列(downloadQueue 為 NSOperationQueue)。其中進度回調裡用 dispatch_sync 拷貝回調數組,保證通知對象的完整性,再異步逐一在主線程回調。完成下載時移除對應 url 的狀態,同樣加屏障保證線程安全。
子類化 NSOperation
接下來做下載處理,重寫 start 方法,在其中創建並配置 NSURLSession:
-(void)start{ NSLog(@"start"); NSURLSessionConfiguration *configura = [NSURLSessionConfiguration defaultSessionConfiguration]; NSURLSession *session = [NSURLSession sessionWithConfiguration:configura delegate:self delegateQueue:nil]; NSMutableURLRequest *request = self.request; NSURLSessionDataTask *dataTask = [session dataTaskWithRequest:request]; [dataTask resume]; [session finishTasksAndInvalidate]; }因為實現了 NSURLSessionDataDelegate 協議,可自定義一些操作:
//最先調用,在這裡做一些數據的初始化。 -(void)URLSession:(NSURLSession *)session dataTask:(NSURLSessionDataTask *)dataTask didReceiveResponse:(NSURLResponse *)response completionHandler:(void (^)(NSURLSessionResponseDisposition))completionHandler{ NSLog(@"開始"); self.imageData = [[NSMutableData alloc] init]; self.expectedContentLength = response.expectedContentLength; if (self.progressBlock) { self.progressBlock(0,self.expectedContentLength); } completionHandler(NSURLSessionResponseAllow); } //下載響應 - (void)URLSession:(NSURLSession *)session dataTask:(NSURLSessionDataTask *)dataTask didReceiveData:(NSData *)data{ [self.imageData appendData:data]; if (self.progressBlock) { self.progressBlock(self.imageData.length,self.expectedContentLength); } } //下載完成後調用 -(void)URLSession:(NSURLSession *)session task:(NSURLSessionTask *)task didCompleteWithError:(NSError *)error{ self.completedBlock(self.imageData,nil,error,YES); [self cancel]; }最後強調,request 用 NSURLRequestReloadIgnoringLocalCacheData 策略,是為了避免與自定義緩存方案重複緩存,主動禁用系統緩存。基本可以測試了,我寫了個簡單 UI 展示下載部分:
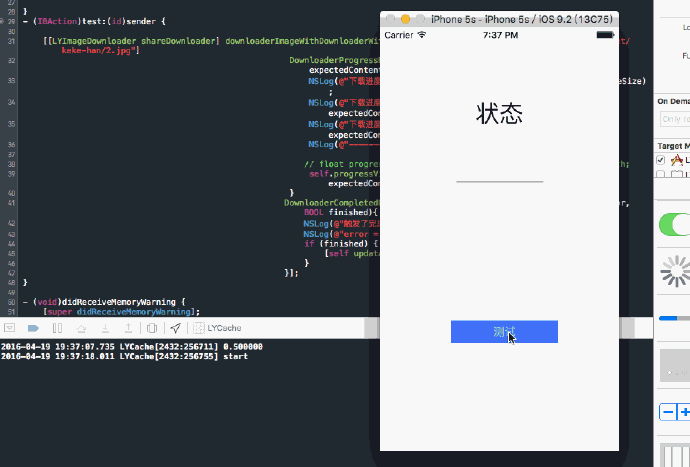
緩存
緩存需要考慮的問題很多,會針對以下幾點設計:緩存在內存/磁盤/內存+磁盤、緩存是否成功、緩存容器、存儲方式、查詢、清理(完全清理、部分清理,部分清理又按時間或空間大小)。直接上代碼:
-(void)saveImageWithMemoryCache:(NSCache *)memoryCache image:(UIImage *)image imageData:(NSData *)imageData urlKey:(NSString *)urlKey isSaveToDisk:(BOOL)isSaveToDisk{ //內存緩存 if ([memoryCache isEqual:nil]) { [self.memoryCache setObject:image forKey:urlKey]; }else{ [memoryCache setObject:image forKey:urlKey]; } //磁盤緩存 if (isSaveToDisk) { dispatch_sync(self.ioSerialQueue, ^{ if (![_fileMange fileExistsAtPath:_diskCachePath]) { [_fileMange createDirectoryAtPath:_diskCachePath withIntermediateDirectories:YES attributes:nil error:nil]; } NSString *pathForKey = [self defaultCachePathForKey:urlKey]; [_fileMange createFileAtPath:pathForKey contents:imageData attributes:nil]; }); } }內存緩存用 NSCache 處理——它本質是一個維護 key-value 的集合類型,當某些對象銷毀或重建代價高於常駐內存時,把它緩存下來就很值得,既能複用避免二次計算,又能在內存告警時自動丟棄。磁盤緩存則用 NSFileManager 實現,存放在沙箱的 Cache 文件夾,並根據 isSaveToDisk 判斷是否需要磁盤緩存(有些內容不必落盤)。這裡用 dispatch_sync 串行處理文件讀寫,文件名則是將 URL 轉為 MD5 值以保證唯一性。
既然能存就要能查:
//查詢圖片 -(void)selectImageWithKey:(NSString *)urlKey completedBlock:(CompletedBlock)completed{ UIImage *image = [self.memoryCache objectForKey:urlKey]; if ([image isEqual:nil]) { completed(image,nil,ImageCacheTypeMemory); }else{ NSString *pathForKey = [self defaultCachePathForKey:urlKey]; NSData *imageData = [NSData dataWithContentsOfFile:pathForKey]; UIImage *diskImage = [UIImage imageWithData:imageData]; completed(diskImage,nil,ImageCacheTypeDisk); } }查詢有兩種路徑:內存命中直接讀取;內存未命中則按 MD5 索引從磁盤讀取,再通過 block 回調給上層。
最後是刪除操作。當磁盤達到上限或想清空所有緩存時該怎麼辦?下面兩段代碼分別實現「清空全部」與「按條件清理」:
//清空全部 - (void)clearDiskOnCompletion:(NoParamsBlock)completion { dispatch_async(self.ioSerialQueue, ^{ [_fileMange removeItemAtPath:self.diskCachePath error:nil]; [_fileMange createDirectoryAtPath:self.diskCachePath withIntermediateDirectories:YES attributes:nil error:NULL]; if (completion) { dispatch_async(dispatch_get_main_queue(), ^{ completion(); }); } }); }按條件清理(主要按時間,借鑑了 SDWebImage 的設計):枚舉緩存目錄,跳過文件夾,對比修改時間與有效期(默認 7 天),刪除過期文件;同時統計所有文件總大小,若超過 maxCacheSize,則按最後修改時間排序,每次遞歸移除一半最舊的文件,直到實際大小低於上限:
-(void)clearDiskWithNoParamsBlock:(NoParamsBlock)noParamsBlock{ dispatch_async(self.ioSerialQueue, ^{ NSURL *diskCache = [NSURL fileURLWithPath:self.diskCachePath isDirectory:YES]; NSArray *resourcKeys = @[NSURLIsDirectoryKey,NSURLContentModificationDateKey,NSURLTotalFileAllocatedSizeKey]; NSDirectoryEnumerator *fileEnumerator = [_fileMange enumeratorAtURL:diskCache includingPropertiesForKeys:resourcKeys options:NSDirectoryEnumerationSkipsHiddenFiles errorHandler:NULL]; NSDate *expirationDate = [NSDate dateWithTimeIntervalSinceNow:-60 * 60 * 24 * 7]; NSMutableDictionary *cacheFiles = [NSMutableDictionary dictionary]; NSInteger currentCacheSize = 0; NSMutableArray *urlsToDelete = [[NSMutableArray alloc] init]; for (NSURL *fileURL in fileEnumerator) { NSDictionary *resourceValues = [fileURL resourceValuesForKeys:resourcKeys error:NULL]; if ([resourceValues[NSURLIsDirectoryKey] boolValue]) { continue; } NSDate *modificationDate = resourceValues[NSURLContentModificationDateKey]; if ([[modificationDate laterDate:expirationDate] isEqualToDate:expirationDate]) { [urlsToDelete addObject:fileURL]; continue; } NSNumber *totalAllocatedSize = resourceValues[NSURLTotalFileAllocatedSizeKey]; currentCacheSize += [totalAllocatedSize unsignedIntegerValue]; [cacheFiles setObject:resourceValues forKey:fileURL]; } for (NSURL *fileURL in urlsToDelete) { [self.fileMange removeItemAtURL:fileURL error:NULL]; } if (self.maxCacheSize > 0 && currentCacheSize > self.maxCacheSize) { const NSUInteger desiredCacheSize = self.maxCacheSize / 2; NSArray *sortedFiles = [cacheFiles keysSortedByValueWithOptions:NSSortConcurrent usingComparator:^NSComparisonResult(id obj1, id obj2){ return [obj1[NSURLContentModificationDateKey] compare:obj2[NSURLContentModificationDateKey]]; }]; for (NSURL *fileURL in sortedFiles) { if ([_fileMange removeItemAtURL:fileURL error:nil]) { NSDictionary *resourceValues = cacheFiles[fileURL]; NSNumber *totalAllocatedSize = resourceValues[NSURLTotalFileAllocatedSizeKey]; currentCacheSize -= [totalAllocatedSize unsignedIntegerValue]; if (currentCacheSize < desiredCacheSize) { break; } } } } if (noParamsBlock) { dispatch_async(dispatch_get_main_queue(), ^{ noParamsBlock(); }); } }); }緩存方案基本完成,做個小測試:從本地讀取一個文件緩存到 Cache 目錄再加載,看效果:
- (IBAction)read:(id)sender { LDImageCache *l = [LDImageCache shareLDImageCache]; UIImage *myImage = [UIImage imageNamed:@"author.jpg"]; NSData *data = UIImagePNGRepresentation(myImage); [l saveImageWithMemoryCache:nil image:myImage imageData:data urlKey:@"lastdays.cn" isSaveToDisk:YES]; [l selectImageWithKey:@"lastdays.cn" completedBlock:^(UIImage *image,NSError *error,ImageCacheType type){ NSLog(@"%ld",(long)type); [self.image setImage:image]; }]; }先從本地讀圖片,調用 saveImageWithMemoryCache 緩存到內存與磁盤,再按 key 調用 selectImageWithKey 查詢,輸出的 ImageCacheType 能看出數據來源——優先從內存讀取。
管理器
實務中不會直接分開調用下載與緩存,而是提供一個管理器把兩者綁定,方便上層使用。這裡設計 LDSCacheManage:
-(void)downImageWithURL:(NSString *)urlString DownloaderProgressBlock:(DownloaderProgressBlock)progressBlock DownloaderCompletedBlock:(DownloaderCompletedBlock)completedBlock{ NSURL *url = [NSURL URLWithString:urlString]; [[LDSImageCache shareLDImageCache] selectImageWithKey:urlString completedBlock:^(UIImage *image,NSError *error,ImageCacheType type){ if (image) { dispatch_async(dispatch_get_main_queue(), ^{ completedBlock(UIImagePNGRepresentation(image),image,error,YES); }); }else{ [[LYImageDownloader shareDownloader] downloaderImageWithDownloaderWithURL:url DownloaderProgressBlock:^(NSInteger alreadyReceiveSize,NSInteger expectedContentLength){ dispatch_async(dispatch_get_main_queue(), ^{ progressBlock(alreadyReceiveSize,expectedContentLength); }); } DownloaderCompletedBlock:^(NSData *data,UIImage *image,NSError *error,BOOL finished){ dispatch_async(dispatch_get_global_queue(DISPATCH_QUEUE_PRIORITY_HIGH, 0), ^{ [[LDSImageCache shareLDImageCache] saveImageWithMemoryCache:nil image:image imageData:data urlKey:urlString isSaveToDisk:YES]; }); dispatch_async(dispatch_get_main_queue(), ^{ completedBlock(data,image,error,YES); }); }]; } }]; }可見流程是:先校驗 URL,再從緩存讀取,命中則直接回調 image,未命中則進入下載,下載完成後在高優先級全局隊列並行寫入緩存,最後回調數據。管理器同樣提供單例:
+(LDSCacheManage *)shareLDCacheManage{ static LDSCacheManage *lDSCacheManage; static dispatch_once_t onceToken; dispatch_once(&onceToken, ^{ lDSCacheManage = [[LDSCacheManage alloc] init]; }); return lDSCacheManage; }視圖擴展
最後對 UIImageView 做擴展,使其具備異步下載並緩存遠程圖片的能力:
- (void)lds_setImageWithURL:(NSString *)url progressBlock:(DownloaderProgressBlock)progressBlock completed:(DownloaderCompletedBlock)completedBlock{ __weak __typeof(self)wself = self; [[LDSCacheManage shareLDCacheManage] downImageWithURL:url DownloaderProgressBlock:^(NSInteger aleradyReceiveSize,NSInteger expectedContentLength){ if (progressBlock) { progressBlock(aleradyReceiveSize,expectedContentLength); } }DownloaderCompletedBlock:^(NSData *data,UIImage *image,NSError *error,BOOL finished){ dispatch_async(dispatch_get_main_queue(), ^{ wself.image = image; [wself setNeedsLayout]; if (completedBlock) { completedBlock(data, image, error, YES); } }); }]; }調用 LDSCacheManage 讀取圖片,至於走緩存還是下載就交給它處理,我們只需在回調裡用 [wself setNeedsLayout] 刷新視圖。
使用
- (IBAction)test:(id)sender { [self.image lds_setImageWithURL:@"https://sinacloud.net/keke-han/1.jpg" progressBlock:^(NSInteger alreadyReceiveSize,NSInteger expectedContentLength){ self.progressView.progress = alreadyReceiveSize/(double)expectedContentLength; } completed:^(NSData *data,UIImage *image,NSError *error,BOOL finished){ dispatch_async(dispatch_get_main_queue(), ^{ self.status.text = @"成功"; }); }]; }效果如下:
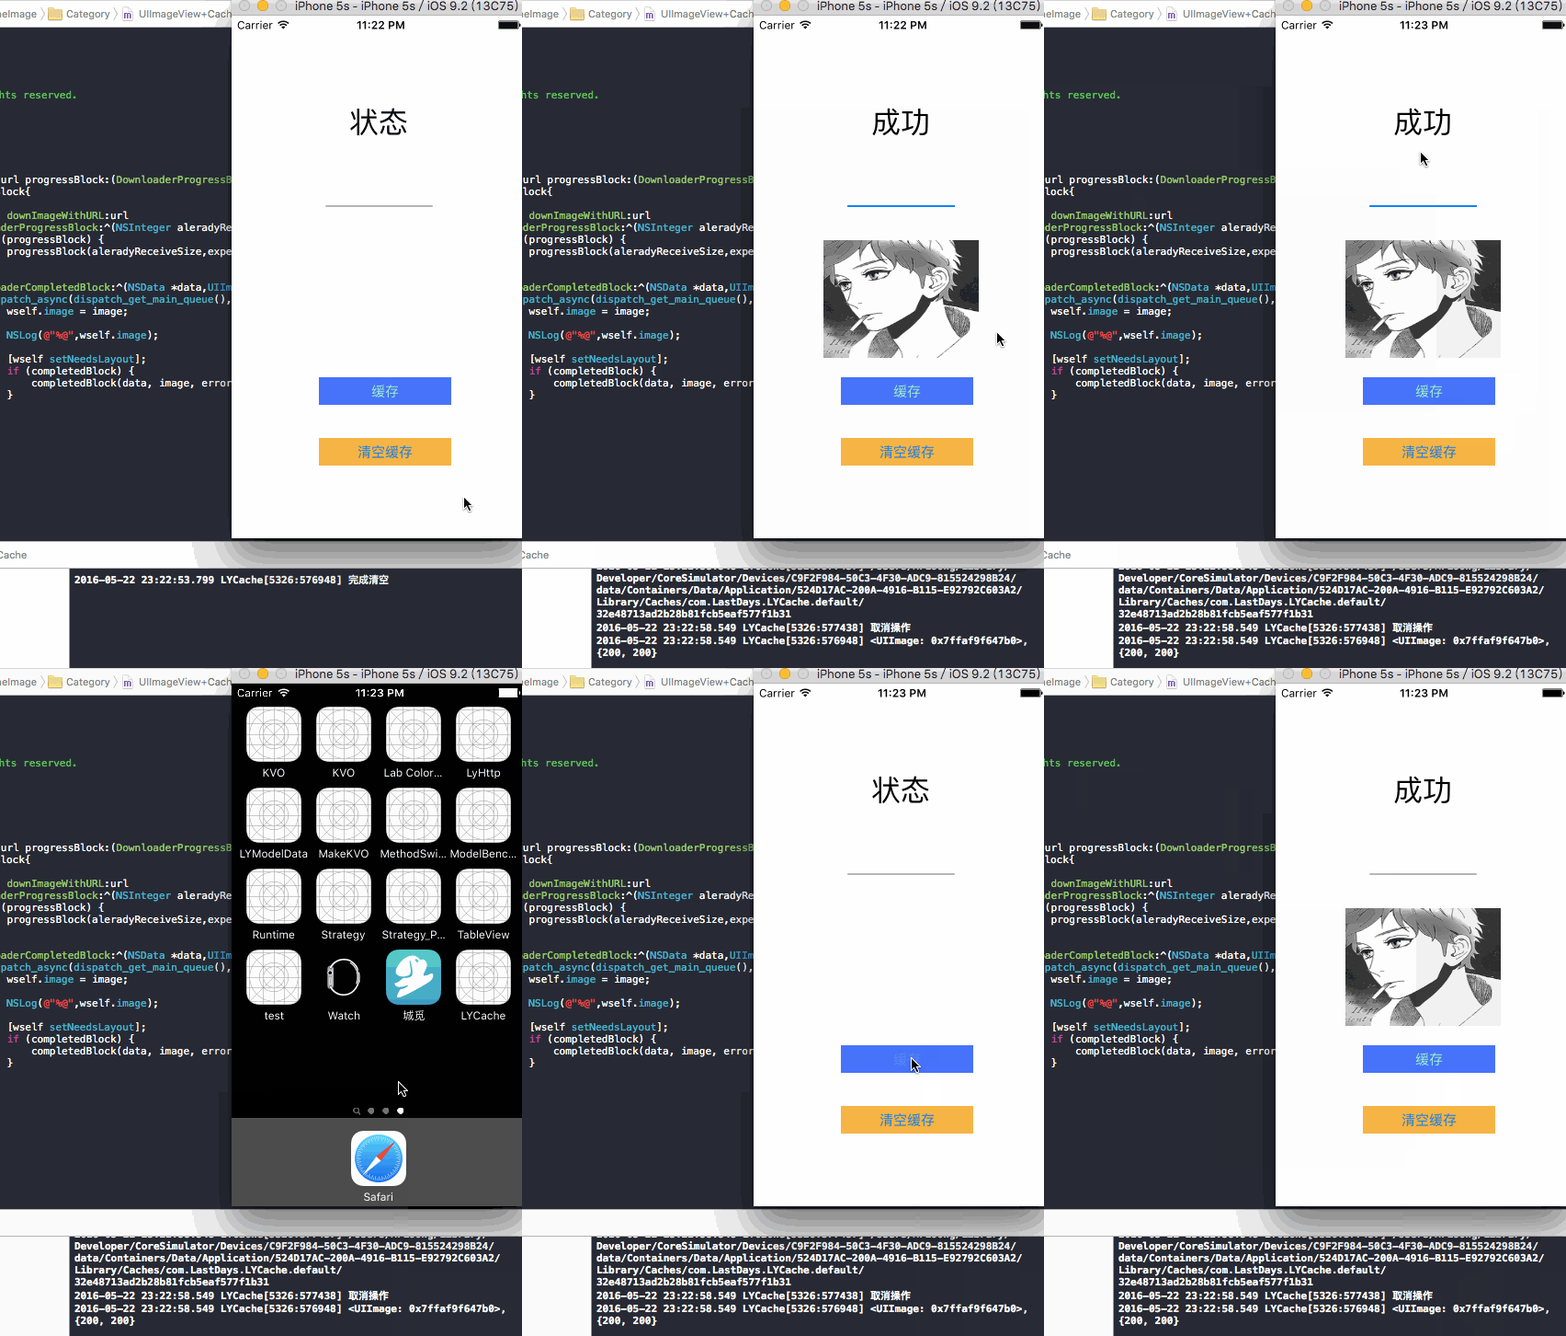
總結
緩存主要注意清空策略;
下載主要還是對操作(NSOperation)的管理;
網絡請求採用 NSURLSession。
還有許多不足與待改進之處,歡迎大家指正。
本文作者:伯樂在線 - Lastdays