
「零行代碼」搞定鍵盤遮擋:IQKeyboardManager 源碼剖析
授權轉載,作者:Draveness,關注倉庫,及時獲得更新:iOS-Source-Code-Analyze

本文將剖析 IQKeyboardManager 自動解決鍵盤遮擋問題的背後原理。
近期項目中我使用 IQKeyboardManager 來處理 UITextField 被鍵盤遮擋的困擾,這個框架的接入方式可謂極致精簡——只需把它加入 Podfile 再執行 pod install 即可。
pod 'IQKeyboardManager'
本文標題《零行代碼解決鍵盤遮擋問題》正源自其開源介紹:一個免代碼、免配置的通用庫,能防止鍵盤彈起時遮擋 UITextField/UITextView,且功能遠不止於此。正因為項目中用了它,我便想透過研讀源碼來看清這個「黑箱」究竟如何運作。雖說實現思路並不算複雜,但由於摻雜了大量與 UI 相關的細節,代碼讀起來並不輕鬆。
架構分析
先對項目中的類與文件做個粗略了解,看看整體層級。
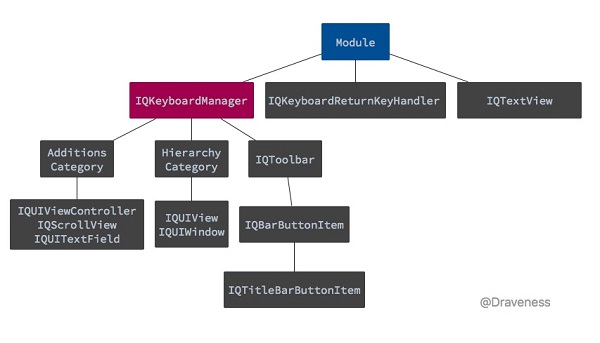
整個項目最核心的部分是 IQKeyboardManager 類,它負責管理鍵盤出現或隱藏時視圖移動的距離,堪稱框架的心臟。此外還有一些支撐用的分類,以及顯示在鍵盤上方的 IQToolBar。

上圖紅色標記處即 IQToolBar:左側按鈕可在不同 UITextField 間切換,中間文字為 UITextField 的 placeholderText,右側的 Done 想必不需多言。本文將聚焦框架如何解決遮擋問題,並小篇幅介紹含占位符的 IQTextView。
IQTextView 的實現
先分析最簡單的一塊——IQTextView 如何為 UITextView 添加占位符。
@interface IQTextView : UITextView @end
IQTextView 繼承自 UITextView,只是額外掛了一個 placeHolderLabel。初始化時,它會為 UITextViewTextDidChangeNotification 註冊通知:
- (void)initialize { [[NSNotificationCenter defaultCenter] addObserver:self selector:@selector(refreshPlaceholder) name:UITextViewTextDidChangeNotification object:self]; }每次文本變化時,refreshPlaceholder 便依內容更新 placeHolderLabel 的 alpha 值來顯示或隱藏:
-(void)refreshPlaceholder { if ([[self text] length]) { [placeHolderLabel setAlpha:0]; }else{ [placeHolderLabel setAlpha:1]; } [self setNeedsLayout]; [self layoutIfNeeded]; }IQKeyboardManager
接下來進入正題。若你對 iOS 開發較為熟悉,可能會發現凡是名字帶 manager 的類,往往遵循單例模式,IQKeyboardManager 也不例外。
IQKeyboardManager 的初始化
初始化時,它主要做了這幾件事:
監聽鍵盤相關通知:
[[NSNotificationCenter defaultCenter] addObserver:self selector:@selector(keyboardWillShow:) name:UIKeyboardWillShowNotification object:nil]; [[NSNotificationCenter defaultCenter] addObserver:self selector:@selector(keyboardWillHide:) name:UIKeyboardWillHideNotification object:nil]; [[NSNotificationCenter defaultCenter] addObserver:self selector:@selector(keyboardDidHide:) name:UIKeyboardDidHideNotification object:nil];
註冊與 UITextField、UITextView 相關的通知:
[self registerTextFieldViewClass:[UITextField class] didBeginEditingNotificationName:UITextFieldTextDidBeginEditingNotification didEndEditingNotificationName:UITextFieldTextDidEndEditingNotification]; [self registerTextFieldViewClass:[UITextView class] didBeginEditingNotificationName:UITextViewTextDidBeginEditingNotification didEndEditingNotificationName:UITextViewTextDidEndEditingNotification];
上述方法把通知綁定到 textFieldViewDidBeginEditing: 與 textFieldViewDidEndEditing:
- (void)registerTextFieldViewClass:(nonnull Class)aClass didBeginEditingNotificationName:(nonnull NSString *)didBeginEditingNotificationName didEndEditingNotificationName:(nonnull NSString *)didEndEditingNotificationName { [[NSNotificationCenter defaultCenter] addObserver:self selector:@selector(textFieldViewDidBeginEditing:) name:didBeginEditingNotificationName object:nil]; [[NSNotificationCenter defaultCenter] addObserver:self selector:@selector(textFieldViewDidEndEditing:) name:didEndEditingNotificationName object:nil]; }初始化一個 UITapGestureRecognizer,點擊 UITextField 所處的 UIWindow 時收起鍵盤:
strongSelf.tapGesture = [[UITapGestureRecognizer alloc] initWithTarget:self action:@selector(tapRecognized:)]; - (void)tapRecognized:(UITapGestureRecognizer*)gesture { if (gesture.state == UIGestureRecognizerStateEnded) [self resignFirstResponder]; }初始化一批默認屬性,如鍵盤間距、動畫時長等:
strongSelf.animationDuration = 0.25; strongSelf.animationCurve = UIViewAnimationCurveEaseInOut; [self setKeyboardDistanceFromTextField:10.0]; [self setShouldPlayInputClicks:YES]; [self setShouldResignOnTouchOutside:NO]; [self setOverrideKeyboardAppearance:NO]; [self setKeyboardAppearance:UIKeyboardAppearanceDefault]; [self setEnableAutoToolbar:YES]; [self setPreventShowingBottomBlankSpace:YES]; [self setShouldShowTextFieldPlaceholder:YES]; [self setToolbarManageBehaviour:IQAutoToolbarBySubviews]; [self setLayoutIfNeededOnUpdate:NO];
並設置不需要處理遮擋的類:
strongSelf.disabledDistanceHandlingClasses = [[NSMutableSet alloc] initWithObjects:[UITableViewController class], nil]; strongSelf.enabledDistanceHandlingClasses = [[NSMutableSet alloc] init]; strongSelf.disabledToolbarClasses = [[NSMutableSet alloc] init]; strongSelf.enabledToolbarClasses = [[NSMutableSet alloc] init]; strongSelf.toolbarPreviousNextAllowedClasses = [[NSMutableSet alloc] initWithObjects:[UITableView class],[UICollectionView class],[IQPreviousNextView class], nil]; strongSelf.disabledTouchResignedClasses = [[NSMutableSet alloc] init]; strongSelf.enabledTouchResignedClasses = [[NSMutableSet alloc] init];
整個初始化方法約數十行代碼,此處不再全數展示。
基於通知的解決方案
以 UITextField 為例,初始化中註冊了鍵盤出現/隱藏、UITextField 開始/結束編輯等一系列通知:
UIKeyboardWillShowNotification UIKeyboardWillHideNotification UIKeyboardDidHideNotification UITextFieldTextDidBeginEditingNotification UITextFieldTextDidEndEditingNotification
對應的方法映射為:UIKeyboardWillShowNotification → keyboardWillShow:、UIKeyboardWillHideNotification → keyboardWillHide:、UIKeyboardDidHideNotification → keyboardDidHide:、UITextFieldTextDidBeginEditingNotification → textFieldViewDidBeginEditing:、UITextFieldTextDidEndEditingNotification → textFieldViewDidEndEditing:。整個方案其實都建立在 iOS 的通知機制之上——事件發生時,調用對應方法作出響應。
開啟 Debug 模式
閱讀源碼時我發現,IQKeyboardManager 提供了 enableDebugging 屬性,開啟後即可追蹤方法調用。在 Demo 中加入下面一行即可:
[IQKeyboardManager sharedManager].enableDebugging = YES;
鍵盤的出現
運行工程並點擊一個 UITextField:
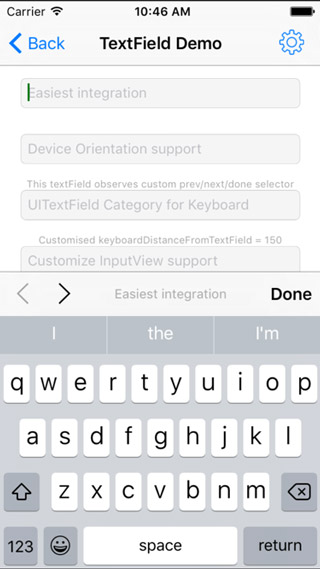
會打印出如下日志:
IQKeyboardManager: ****** textFieldViewDidBeginEditing: started ****** IQKeyboardManager: adding UIToolbars if required IQKeyboardManager: Saving beginning Frame: {{0, 0}, {320, 568}} IQKeyboardManager: ****** adjustFrame started ****** IQKeyboardManager: Need to move: -451.00 IQKeyboardManager: ****** adjustFrame ended ****** IQKeyboardManager: ****** textFieldViewDidBeginEditing: ended ****** IQKeyboardManager: ****** keyboardWillShow: started ****** IQKeyboardManager: ****** adjustFrame started ****** IQKeyboardManager: Need to move: -154.00 IQKeyboardManager: ****** adjustFrame ended ****** IQKeyboardManager: ****** keyboardWillShow: ended ******分析 textFieldViewDidBeginEditing: 與 keyboardWillShow: 即可理解其原理。
textFieldViewDidBeginEditing:
當 UITextField 被點擊時(注意這並非代理方法,只是同名方法),它做了三件事:為 UITextField 添加 IQToolBar;在調整 frame 前保存當前 frame 以備鍵盤隱藏後恢復;調用 adjustFrame 將視圖移到合適位置。
添加 ToolBar 由 addToolbarIfRequired 實現,會先判斷是否需要添加,再依根視圖上 UITextField 的數量執行對應代碼:
- (void)addToolbarIfRequired { NSArray *siblings = [self responderViews]; for (UITextField *textField in siblings) { [textField addPreviousNextDoneOnKeyboardWithTarget:self previousAction:@selector(previousAction:) nextAction:@selector(nextAction:) doneAction:@selector(doneAction:) shouldShowPlaceholder:_shouldShowTextFieldPlaceholder]; textField.inputAccessoryView.tag = kIQPreviousNextButtonToolbarTag; IQToolbar *toolbar = (IQToolbar*)[textField inputAccessoryView]; toolbar.tintColor = [UIColor blackColor]; [toolbar setTitle:textField.drawingPlaceholderText]; [textField setEnablePrevious:NO next:YES]; } }鍵盤上的 IQToolBar 一般由三部分組成:切換 UITextField 的箭頭按鈕、指示當前 UITextField 的 placeholder、以及 Done 按鈕。這些 item 都是 IQBarButtonItem 的子類,透過如下方法添加:

- (void)addPreviousNextDoneOnKeyboardWithTarget:(id)target previousAction:(SEL)previousAction nextAction:(SEL)nextAction doneAction:(SEL)doneAction titleText:(NSString*)titleText { IQBarButtonItem *prev = [[IQBarButtonItem alloc] initWithImage:imageLeftArrow style:UIBarButtonItemStylePlain target:target action:previousAction]; IQBarButtonItem *next = [[IQBarButtonItem alloc] initWithImage:imageRightArrow style:UIBarButtonItemStylePlain target:target action:nextAction]; IQTitleBarButtonItem *title = [[IQTitleBarButtonItem alloc] initWithTitle:self.shouldHideTitle?nil:titleText]; IQBarButtonItem *doneButton =[[IQBarButtonItem alloc] initWithBarButtonSystemItem:UIBarButtonSystemItemDone target:target action:doneAction]; IQToolbar *toolbar = [[IQToolbar alloc] init]; toolbar.barStyle = UIBarStyleDefault; toolbar.items = @[prev, next, title, doneButton]; toolbar.titleInvocation = self.titleInvocation; [(UITextField*)self setInputAccessoryView:toolbar]; }簡化後可見:初始化各 IQBarButtonItem,加入 IQToolBar,最後設為 UITextField 的 accessoryView。
保存 frame 這一步旨在鍵盤隱藏時恢復原狀,實現很簡單:
_rootViewController = [_textFieldView topMostController]; _topViewBeginRect = _rootViewController.view.frame;
adjustFrame 則負責調整根視圖控制器的 frame。由於該方法約有 400 行代碼,需兼顧 lastScrollView、含 superScrollView 等多種情況,此處僅呈現一般情形的實現:
- (void)adjustFrame { UIWindow *keyWindow = [self keyWindow]; UIViewController *rootController = [_textFieldView topMostController]; CGRect textFieldViewRect = [[_textFieldView superview] convertRect:_textFieldView.frame toView:keyWindow]; CGRect rootViewRect = [[rootController view] frame]; CGSize kbSize = _kbSize; kbSize.height += keyboardDistanceFromTextField; CGFloat topLayoutGuide = CGRectGetHeight(statusBarFrame); CGFloat move = MIN(CGRectGetMinY(textFieldViewRect)-(topLayoutGuide+5), CGRectGetMaxY(textFieldViewRect)-(CGRectGetHeight(keyWindow.frame)-kbSize.height)); if (move >= 0) { rootViewRect.origin.y -= move; [self setRootViewFrame:rootViewRect]; }else{ CGFloat disturbDistance = CGRectGetMinY(rootViewRect)-CGRectGetMinY(_topViewBeginRect); if (disturbDistance < 0) { rootViewRect.origin.y -= MAX(move, disturbDistance); [self setRootViewFrame:rootViewRect]; } } }它分兩部分:計算 move 距離,並調用 setRootViewFrame: 設置 rootView 大小:
- (void)setRootViewFrame:(CGRect)frame { UIViewController *controller = [_textFieldView topMostController]; frame.size = controller.view.frame.size; [UIView animateWithDuration:_animationDuration delay:0 options:(_animationCurve|UIViewAnimationOptionBeginFromCurrentState) animations:^{ [controller.view setFrame:frame]; } completion:NULL]; }值得注意的是,在 textFieldViewDidBeginEditing: 的調用棧中並未執行 setRootViewFrame: 更新視圖——因為點擊最上方的 UITextField 時,無需移動視圖鍵盤便不會遮擋它。
keyboardWillShow:
上述代碼都在鍵盤出現前執行,而 keyboardWillShow: 則是為了保證鍵盤出現後依然不遮擋 UITextField。由於每個 UITextField 對應的鍵盤尺寸可能不同,這裡透過檢測鍵盤大小是否變化來決定是否調用 adjustFrame:
- (void)keyboardWillShow:(NSNotification*)aNotification { _kbShowNotification = aNotification; _animationCurve = [[aNotification userInfo][UIKeyboardAnimationCurveUserInfoKey] integerValue]; _animationCurve = _animationCurve<<16; CGFloat duration = [[aNotification userInfo][UIKeyboardAnimationDurationUserInfoKey] floatValue]; if (duration != 0.0) _animationDuration = duration; CGSize oldKBSize = _kbSize; CGRect kbFrame = [[aNotification userInfo][UIKeyboardFrameEndUserInfoKey] CGRectValue]; CGRect screenSize = [[UIScreen mainScreen] bounds]; CGRect intersectRect = CGRectIntersection(kbFrame, screenSize); if (CGRectIsNull(intersectRect)) { _kbSize = CGSizeMake(screenSize.size.width, 0); }else{ _kbSize = intersectRect.size; } if (!CGSizeEqualToSize(_kbSize, oldKBSize)) { [self adjustFrame]; } }調用 adjustFrame 前的諸多代碼都是為了保存通知對象、動畫曲線、動畫時長等關鍵信息,其中最關鍵的是更新鍵盤尺寸,再透過 CGSizeEqualToSize(_kbSize, oldKBSize) 判斷是否需要調整。由於 adjustFrame 的結果依賴於鍵盤大小,這一步既有意義也必不可少。
鍵盤的隱藏
點擊 IQToolBar 上的 Done 按鈕,鍵盤便會隱藏:
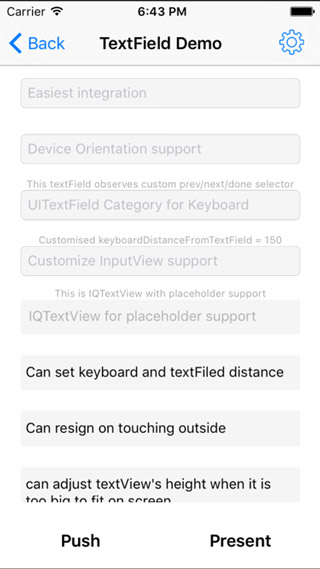
隱藏過程依次調用 keyboardWillHide:、textFieldViewDidEndEditing:、keyboardDidHide: 三個方法:
IQKeyboardManager: ****** keyboardWillHide: started ****** IQKeyboardManager: Restoring frame to : {{0, 0}, {320, 568}} IQKeyboardManager: ****** keyboardWillHide: ended ****** IQKeyboardManager: ****** textFieldViewDidEndEditing: started ****** IQKeyboardManager: ****** textFieldViewDidEndEditing: ended ****** IQKeyboardManager: ****** keyboardDidHide: started ****** IQKeyboardManager: ****** keyboardDidHide: ended ******鍵盤收起時需將視圖恢復原位,這正是 keyboardWillHide: 的職責,關鍵代碼為:
[strongSelf.rootViewController.view setFrame:strongSelf.topViewBeginRect]
重設視圖大小與位置後,會清理此前保存的屬性:
_lastScrollView = nil; _kbSize = CGSizeZero; _startingContentInsets = UIEdgeInsetsZero; _startingScrollIndicatorInsets = UIEdgeInsetsZero; _startingContentOffset = CGPointZero;
隨後調用的 textFieldViewDidEndEditing: 與 keyboardDidHide: 也只做一些簡單清理,如移除添加到 window 上的手勢、重置保存的 UITextField 與視圖大小:
- (void)textFieldViewDidEndEditing:(NSNotification*)notification{ [_textFieldView.window removeGestureRecognizer:_tapGesture]; _textFieldView = nil; } - (void)keyboardDidHide:(NSNotification*)aNotification { _topViewBeginRect = CGRectZero; }UITextField 與 UITextView 的通知機制
由於框架功能基於通知實現,通知的時序至關重要。在 IQKeyboardManagerConstants.h 中詳細描述了編輯 UITextField 時通知觸發的先後順序(下圖中透明度 50% 的部分表示該框架未監聽此通知)。
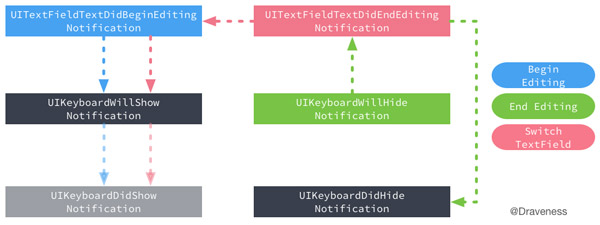
而 UITextView 的通知機制與 UITextField 略有不同:
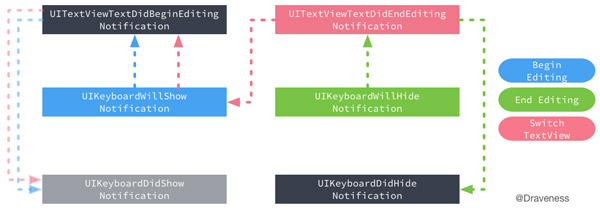
當 Begin Editing 事件發生時,UITextView 會先發出 UIKeyboardWillShowNotification,而 UITextField 則先發出 UITextFieldTextDidBeginEditingNotification。由於兩處通知的方法都調用了 adjustFrame 來更新視圖大小,起初我頗感困惑,直到寫信請教作者,他解釋道:在 IQKeyboardManagerConstants.h 中可找到 iOS 通知機制結構——UITextField 是先觸發 textField 通知、後觸發 UIKeyboard 通知;UITextView 則相反,先觸發 UIKeyboard 通知、後觸發 UITextView 通知。正因如此,才需要在兩處都調用 adjustFrame 以兼顧兩種情形,而他未來或許會加入校驗、確保只調用一次以提升效能。
小結
IQKeyboardManager 以通知機制化解鍵盤遮擋輸入框的難題,並透過分類在 +load 方法中激活框架,從而達到「零行代碼」即可生效的效果。儘管它涉及 UI 層級、需權衡大量邊界與特殊條件,代碼可讀性不算友好,但這並不妨礙它成為一個非常優秀的開源項目。