
用 CoreText 打造順滑不卡頓的高效能 UITableView:朋友圈 Demo 實戰解析
UITableView 出現掉幀的原因通常不難歸納:cell 的檢視層級堆得太深、cell 內部出現觸發離屏渲染的寫法(例如同時使用 cornerRadius 與 masksToBounds)、圖片與文字沒有對齊到像素邊界,以及直接使用系統自動計算 cell 高度的方式等。本文以一個仿朋友圈的 Demo 為載體,從 cell 層級這一切入點出發,示範如何把列表滑動體驗打磨到順滑。完整專案原始碼可在文末取得。話雖如此,還是得提醒一句:過早最佳化是萬惡之源,請等到專案真正出現效能瓶頸時再動手。
先來看看 Reveal 呈現的頁面層級結構:
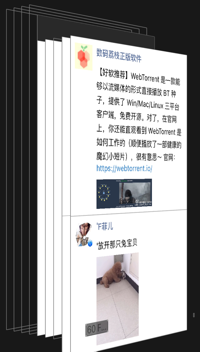
接著是 iOS 9.3 系統、iPhone 5 真機上的實際運行效果:

一、文字繪製:把 UILabel 換成一張圖
CoreText 的強項在於能把文字直接繪製到一個 CGContextRef 上,最後透過 UIGraphicsGetImageFromCurrentImageContext() 取回圖片,再將圖片交給 cell.contentView.layer.contents。這樣一來,原本層層嵌套的 UILabel 就被壓平成一個 CALayer,cell 的層級自然大幅收斂。
先處理最簡單的場景——暱稱這類普通文字:
- (void)drawInContext:(CGContextRef)context withPosition:(CGPoint)p andFont:(UIFont *)font andTextColor:(UIColor *)color andHeight:(float)height andWidth:(float)width lineBreakMode:(CTLineBreakMode)lineBreakMode {
    CGSize size = CGSizeMake(width, height);
    // 翻轉座標系
    CGContextSetTextMatrix(context, CGAffineTransformIdentity);
    CGContextTranslateCTM(context, 0, height);
    CGContextScaleCTM(context, 1.0, -1.0);

    NSMutableDictionary *attributes = [StringAttributes attributeFont:font andTextColor:color lineBreakMode:lineBreakMode];
    // 建立繪製區域(路徑)
    CGMutablePathRef path = CGPathCreateMutable();
    CGPathAddRect(path, NULL, CGRectMake(p.x, height - p.y - size.height, (size.width), (size.height)));
    // 建立 AttributedString
    NSMutableAttributedString *attributedStr = [[NSMutableAttributedString alloc] initWithString:self attributes:attributes];
    CFAttributedStringRef attributedString = (__bridge CFAttributedStringRef)attributedStr;
    // 繪製 frame
    CTFramesetterRef framesetter = CTFramesetterCreateWithAttributedString((CFAttributedStringRef)attributedString);
    CTFrameRef ctframe = CTFramesetterCreateFrame(framesetter, CFRangeMake(0, 0), path, NULL);
    CTFrameDraw(ctframe, context);

    CGPathRelease(path);
    CFRelease(framesetter);
    CFRelease(ctframe);
    [[attributedStr mutableString] setString:@""];
    CGContextSetTextMatrix(context, CGAffineTransformIdentity);
    CGContextTranslateCTM(context, 0, height);
    CGContextScaleCTM(context, 1.0, -1.0);
}
更複雜一點的是朋友圈正文——裡面夾著可點擊的連結。這裡有兩個關鍵差異:一是要用 NSDataDetector 找出連結區間並寫入帶顏色的屬性,二是必須取得 CTFrame 後逐行取出 CTLine 繪製,同時記錄每一段 CTRun 對應的矩形,供後續點擊命中判斷使用。順帶一提,程式碼中尚未實作文字過長時的折疊處理。
- (NSMutableAttributedString *)highlightText:(NSMutableAttributedString *)coloredString {
    // 建立帶高亮的 AttributedString
    NSString* string = coloredString.string;
    NSRange range = NSMakeRange(0, [string length]);
    NSDataDetector *linkDetector = [NSDataDetector dataDetectorWithTypes:NSTextCheckingTypeLink error:nil];
    NSArray *matches = [linkDetector matchesInString:string options:0 range:range];
    for (NSTextCheckingResult *match in matches) {
        [self.ranges addObject:NSStringFromRange(match.range)];
        UIColor *highlightColor = UIColorFromRGB(0x297bc1);
        [coloredString addAttribute:(NSString *)kCTForegroundColorAttributeName
                             value:(id)highlightColor.CGColor
                             range:match.range];
    }
    return coloredString;
}

- (void)drawFramesetter:(CTFramesetterRef)framesetter
      attributedString:(NSAttributedString *)attributedString
             textRange:(CFRange)textRange
                inRect:(CGRect)rect
               context:(CGContextRef)c {
    CGMutablePathRef path = CGPathCreateMutable();
    CGPathAddRect(path, NULL, rect);
    CTFrameRef frame = CTFramesetterCreateFrame(framesetter, textRange, path, NULL);
    CGFloat ContentHeight = CGRectGetHeight(rect);
    CFArrayRef lines = CTFrameGetLines(frame);
    NSInteger numberOfLines = CFArrayGetCount(lines);
    CGPoint lineOrigins[numberOfLines];
    CTFrameGetLineOrigins(frame, CFRangeMake(0, numberOfLines), lineOrigins);

    // 遍歷每一行
    for (CFIndex lineIndex = 0; lineIndex < numberOfLines; lineIndex++) {
        CGPoint lineOrigin = lineOrigins[lineIndex];
        CTLineRef line = CFArrayGetValueAtIndex(lines, lineIndex);
        CGFloat descent = 0.0f, ascent = 0.0f, lineLeading = 0.0f;
        CTLineGetTypographicBounds((CTLineRef)line, &ascent, &descent, &lineLeading);
        CGFloat penOffset = (CGFloat)CTLineGetPenOffsetForFlush(line, NSTextAlignmentLeft, rect.size.width);
        CGFloat y = lineOrigin.y - descent - self.font.descender;

        // 設定每一行的位置
        CGContextSetTextPosition(c, penOffset + self.xOffset, y - self.yOffset);
        CTLineDraw(line, c);

        // CTRun 代表同一行中文本的不同樣式(顏色、字型等),此處用於處理連結高亮
        CFArrayRef runs = CTLineGetGlyphRuns(line);
        for (int j = 0; j < CFArrayGetCount(runs); j++) {
            CGFloat runAscent, runDescent, lineLeading1;
            CTRunRef run = CFArrayGetValueAtIndex(runs, j);
            NSDictionary *attributes = (__bridge NSDictionary *)CTRunGetAttributes(run);

            // 判斷是否為連結
            if (!CGColorEqualToColor((__bridge CGColorRef)([attributes valueForKey:@"CTForegroundColor"]), self.textColor.CGColor)) {
                CFRange range = CTRunGetStringRange(run);
                float offset = CTLineGetOffsetForStringIndex(line, range.location, NULL);

                // 取得連結的 CGRect
                CGRect runRect;
                runRect.size.width = CTRunGetTypographicBounds(run, CFRangeMake(0, 0), &runAscent, &runDescent, &lineLeading1);
                runRect.size.height = self.font.lineHeight;
                runRect.origin.x = lineOrigin.x + offset + self.xOffset;
                runRect.origin.y = lineOrigin.y;
                runRect.origin.y -= descent + self.yOffset;

                // 由於座標系已被翻轉,連結的正常座標需透過 CGAffineTransform 換算
                CGAffineTransform transform = CGAffineTransformMakeTranslation(0, ContentHeight);
                transform = CGAffineTransformScale(transform, 1.f, -1.f);
                CGRect flipRect = CGRectApplyAffineTransform(runRect, transform);

                // 保存是連結的 CGRect
                NSRange nRange = NSMakeRange(range.location, range.length);
                self.framesDict[NSStringFromRange(nRange)] = [NSValue valueWithCGRect:flipRect];

                // 保存同一條連結被斷行後產生的多個 CGRect,用於點擊時的背景色處理
                for (NSString *rangeString in self.ranges) {
                    NSRange range = NSRangeFromString(rangeString);
                    if (NSLocationInRange(nRange.location, range)) {
                        NSMutableArray *array = self.relationDict[rangeString];
                        if (array) {
                            [array addObject:NSStringFromCGRect(flipRect)];
                            self.relationDict[rangeString] = array;
                        } else {
                            self.relationDict[rangeString] = [NSMutableArray arrayWithObject:NSStringFromCGRect(flipRect)];
                        }
                    }
                }
            }
        }
    }
    CFRelease(frame);
    CFRelease(path);
}
把上述兩個方法組裝起來,就得到完整的填充流程:
- (void)fillData:(CGContextRef)context {
    [self.nickname drawInContext:context withPosition:(CGPoint){kTextXOffset, kSpec} andFont:kNicknameFont
                   andTextColor:UIColorFromRGB(0x556c95) andHeight:self.nicknameSize.height
                       andWidth:self.nicknameSize.width lineBreakMode:kCTLineBreakByTruncatingTail];
    [self.drawer setText:self.contentString context:context contentSize:self.contentSize
           backgroundColor:[UIColor whiteColor] font:kContentTextFont textColor:[UIColor blackColor]
                     block:nil xOffset:kTextXOffset yOffset:kSpec * 2 + self.nicknameSize.height];
}

- (void)fillContents:(NSArray *)array {
    UIGraphicsBeginImageContextWithOptions(CGSizeMake(self.size.width, self.size.height), YES, 0);
    CGContextRef context = UIGraphicsGetCurrentContext();
    [UIColorFromRGB(0xffffff) set];
    CGContextFillRect(context, CGRectMake(0, 0, self.size.width, self.size.height));

    // 取得需要高亮的連結 CGRect,並填充背景色
    if (array) {
        for (NSString *string in array) {
            CGRect rect = CGRectFromString(string);
            [UIColorFromRGB(0xe5e5e5) set];
            CGContextFillRect(context, rect);
        }
    }

    [self fillData:context];
    UIImage *temp = UIGraphicsGetImageFromCurrentImageContext();
    UIGraphicsEndImageContext();
    self.contentView.layer.contents = (__bridge id _Nullable)(temp.CGImage);
}
走到這一步,文字顯示的部分就完成了。
二、圖片顯示:直接操作 CALayer
這裡的圖片包含使用者頭像與朋友圈配圖。做法很直接:繼承 CALayer 並補上必要功能,然後把這些 layer 掛到 contentView.layer 上,完全繞開 UIImageView。
網路圖片的載入與設定如下:
- (void)setContentsWithURLString:(NSString *)urlString {
    self.contents = (__bridge id _Nullable)([UIImage imageNamed:@"placeholder"].CGImage);
    @weakify(self)
    SDWebImageManager *manager = [SDWebImageManager sharedManager];
    [manager downloadImageWithURL:[NSURL URLWithString:urlString]
                          options:SDWebImageCacheMemoryOnly
                         progress:nil
                      completed:^(UIImage *image, NSError *error, SDImageCacheType cacheType, BOOL finished, NSURL *imageURL) {
                          if (image) {
                              @strongify(self)
                              dispatch_async(dispatch_get_global_queue(DISPATCH_QUEUE_PRIORITY_DEFAULT, 0), ^{
                                  if (!_observer) {
                                      _observer = CFRunLoopObserverCreateWithHandler(kCFAllocatorDefault,
                                          kCFRunLoopBeforeWaiting | kCFRunLoopExit, false, POPAnimationApplyRunLoopOrder,
                                          ^(CFRunLoopObserverRef observer, CFRunLoopActivity activity) {
                                              self.contents = (__bridge id _Nullable)(image.CGImage);
                                          });
                                  }
                                  if (_observer) {
                                      CFRunLoopAddObserver(CFRunLoopGetMain(), _observer, kCFRunLoopCommonModes);
                                  }
                              });
                              self.originImage = image;
                          }
                      }];
}
這裡有個容易被忽略的細節:圖片下載回來後先在子執行緒完成處理,但真正把 CGImage 寫進 layer.contents 這一步,是透過 RunLoop Observer 等到主執行緒即將進入休眠時才執行。這樣安排可以避免大量赋值集中在同一個渲染週期,讓滑動過程更平順。其餘部分相對簡單,此處不再展開。
三、小影片播放:自備解碼管線
先前文章曾介紹過如何自己動手做一個播放器,這裡正好派上用場。顯示小影片封面圖的那個 CALayer,在播放時也能直接複用。
為了不讓解碼拖慢主執行緒,這裡用 NSOperationQueue 排程,實際的解碼工作由繼承 NSOperation 的 VideoDecodeOperation 承擔:
- (void)main {
    @autoreleasepool {
        if (self.isCancelled) {
            _newVideoFrameBlock = nil;
            _decodeFinishedBlock = nil;
            return;
        }

        AVURLAsset *asset = [AVURLAsset URLAssetWithURL:[[NSURL alloc] initFileURLWithPath:self.filePath] options:nil];
        NSError *error;
        AVAssetReader *reader = [[AVAssetReader alloc] initWithAsset:asset error:&error];
        if (error) {
            return;
        }

        NSArray *videoTracks = [asset tracksWithMediaType:AVMediaTypeVideo];
        AVAssetTrack *videoTrack = [videoTracks objectAtIndex:0];
        // 影片播放時 m_pixelFormatType = kCVPixelFormatType_32BGRA
        // 其他用途(如影片壓縮)則為 kCVPixelFormatType_420YpCbCr8BiPlanarVideoRange
        int m_pixelFormatType = kCVPixelFormatType_32BGRA;
        NSDictionary *options = [NSDictionary dictionaryWithObject:[NSNumber numberWithInt:(int)m_pixelFormatType]
                                                            forKey:(id)kCVPixelBufferPixelFormatTypeKey];
        AVAssetReaderTrackOutput *videoReaderOutput = [[AVAssetReaderTrackOutput alloc]
                                                       initWithTrack:videoTrack outputSettings:options];
        [reader addOutput:videoReaderOutput];
        [reader startReading];

        // 需確保 nominalFrameRate > 0,先前遇過 Android 拍出的 0 幀影片
        if (self.isCancelled) {
            _newVideoFrameBlock = nil;
            _decodeFinishedBlock = nil;
            return;
        }

        while ([reader status] == AVAssetReaderStatusReading && videoTrack.nominalFrameRate > 0) {
            if (self.isCancelled) {
                _newVideoFrameBlock = nil;
                _decodeFinishedBlock = nil;
                return;
            }

            CMSampleBufferRef sampleBuffer = [videoReaderOutput copyNextSampleBuffer];
            CVImageBufferRef imageBuffer = CMSampleBufferGetImageBuffer(sampleBuffer);

            // Lock the base address of the pixel buffer
            CVPixelBufferLockBaseAddress(imageBuffer, 0);
            // Get the number of bytes per row for the pixel buffer
            size_t bytesPerRow = CVPixelBufferGetBytesPerRow(imageBuffer);
            // Get the pixel buffer width and height
            size_t width = CVPixelBufferGetWidth(imageBuffer);
            size_t height = CVPixelBufferGetHeight(imageBuffer);
            // Generate image to edit
            unsigned char *pixel = (unsigned char *)CVPixelBufferGetBaseAddress(imageBuffer);
            CGColorSpaceRef colorSpace = CGColorSpaceCreateDeviceRGB();
            CGContextRef context = CGBitmapContextCreate(pixel, width, height, 8, bytesPerRow, colorSpace,
                                                        kCGBitmapByteOrder32Little | kCGImageAlphaPremultipliedFirst);
            if (context != NULL) {
                CGImageRef imageRef = CGBitmapContextCreateImage(context);
                CVPixelBufferUnlockBaseAddress(imageBuffer, 0);
                CGColorSpaceRelease(colorSpace);
                CGContextRelease(context);

                // 解碼圖片
                size_t width = CGImageGetWidth(imageRef);
                size_t height = CGImageGetHeight(imageRef);
                size_t bitsPerComponent = CGImageGetBitsPerComponent(imageRef);
                // CGImageGetBytesPerRow() 在 iOS 5.0 上計算有誤,因此改由 CGBitmapContextCreate 決定
                size_t bytesPerRow = 0;
                CGColorSpaceRef colorSpace = CGColorSpaceCreateDeviceRGB();
                CGColorSpaceModel colorSpaceModel = CGColorSpaceGetModel(colorSpace);
                CGBitmapInfo bitmapInfo = CGImageGetBitmapInfo(imageRef);
                if (colorSpaceModel == kCGColorSpaceModelRGB) {
                    uint32_t alpha = (bitmapInfo & kCGBitmapAlphaInfoMask);
#pragma clang diagnostic push
#pragma clang diagnostic ignored "-Wassign-enum"
                    if (alpha == kCGImageAlphaNone) {
                        bitmapInfo = ~kCGBitmapAlphaInfoMask;
                        bitmapInfo |= kCGImageAlphaNoneSkipFirst;
                    } else if (!(alpha == kCGImageAlphaNoneSkipFirst || alpha == kCGImageAlphaNoneSkipLast)) {
                        bitmapInfo = ~kCGBitmapAlphaInfoMask;
                        bitmapInfo |= kCGImageAlphaPremultipliedFirst;
                    }
#pragma clang diagnostic pop
                }

                CGContextRef context = CGBitmapContextCreate(NULL, width, height, bitsPerComponent,
                                                             bytesPerRow, colorSpace, bitmapInfo);
                CGColorSpaceRelease(colorSpace);

                if (!context) {
                    if (self.newVideoFrameBlock) {
                        dispatch_async(dispatch_get_main_queue(), ^{
                            if (self.isCancelled) {
                                _newVideoFrameBlock = nil;
                                _decodeFinishedBlock = nil;
                                return;
                            }
                            self.newVideoFrameBlock(imageRef, self.filePath);
                            CGImageRelease(imageRef);
                        });
                    }
                } else {
                    CGContextDrawImage(context, CGRectMake(0.0f, 0.0f, width, height), imageRef);
                    CGImageRef inflatedImageRef = CGBitmapContextCreateImage(context);
                    CGContextRelease(context);
                    if (self.newVideoFrameBlock) {
                        dispatch_async(dispatch_get_main_queue(), ^{
                            if (self.isCancelled) {
                                _newVideoFrameBlock = nil;
                                _decodeFinishedBlock = nil;
                                return;
                            }
                            self.newVideoFrameBlock(inflatedImageRef, self.filePath);
                            CGImageRelease(inflatedImageRef);
                        });
                    }
                    CGImageRelease(imageRef);
                }
            }

            if (sampleBuffer) {
                CMSampleBufferInvalidate(sampleBuffer);
                CFRelease(sampleBuffer);
                sampleBuffer = NULL;
            } else {
                break;
            }
        }
        [NSThread sleepForTimeInterval:CMTimeGetSeconds(videoTrack.minFrameDuration)];

        if (self.isCancelled) {
            _newVideoFrameBlock = nil;
            _decodeFinishedBlock = nil;
            return;
        }
        if (self.decodeFinishedBlock) {
            self.decodeFinishedBlock(self.filePath);
        }
    }
}
為什麼要多繞這一圈做解壓縮?因為 UIImage 是懶惰的——它要等到真正被送進畫面時才會解碼,而這個解碼動作發生在主執行緒上,正是滑動卡頓的隱形兇手。把它提前丟到子執行緒完成,主執行緒就能省下這筆開銷。
呼叫方式如下:
- (void)playVideoWithFilePath:(NSString *)filePath_ type:(NSString *)type {
    @weakify(self)
    [[VideoPlayerManager shareInstance] decodeVideo:filePath_
                              withVideoPerDataBlock:^(CGImageRef imageData, NSString *filePath) {
                                  @strongify(self)
                                  if ([type isEqualToString:@"video"]) {
                                      if ([filePath isEqualToString:self.filePath]) {
                                          [self.sources.firstObject setContents:(__bridge id _Nullable)(imageData)];
                                      }
                                  }
                              } decodeFinishBlock:^(NSString *filePath) {
                                  [self playVideoWithFilePath:filePath type:type];
                              }];
}
四、其他實作細節
觸控互動方面,是透過覆寫以下幾個方法來完成命中判斷與回饋:
- (void)touchesBegan:(NSSet*)touches withEvent:(UIEvent *)event - (void)touchesCancelled:(NSSet *)touches withEvent:(UIEvent *)event - (void)touchesEnded:(NSSet *)touches withEvent:(UIEvent *)event
頁面 FPS 的監測則直接採用 YYKit 專案中的 YYFPSLabel,方便實時觀察滑動時的幀率變化。測試資料取自微博,其中的小影片來自 Gif 快手。
整體來說,這套做法的核心思路只有一句:把 cell 內容從「一堆 UIView」壓縮成「一個 CALayer + 一張預先繪製好的圖」,同時把解碼、排版這些耗時工作全部前移到非主執行緒。層級淺了、離屏渲染少了、主執行緒閒下來了,列表自然就順了。
完整程式碼:https://github.com/hawk0620/PYQFeedDemo
本文作者:伯樂在線 - Hawk0620
- 上一篇文章: React Native 源碼筆記:這些技巧你知道幾個?
- 下一篇文章: iOS 開發實戰:WiFi 連線判斷與網路資訊取得完整整理