
iOS 圖像處理入門:Core Image 核心概念與實踐

本文為授權轉載,作者:吳白
一、Core Image 初見
Core Image 是 OS X 與 iOS 上的圖像處理框架,能力不止於濾鏡,還覆蓋人臉識別等分析任務。它有兩個基礎概念:濾鏡與濾鏡圖表。濾鏡是一個具備多組輸入輸出的對象,執行特定變換——比如模糊濾鏡需要輸入圖像與模糊半徑,輸出模糊後的結果。濾鏡圖表則是把多個濾鏡串接成網絡,讓前一環的輸出成為後一環的輸入,從而用組合的方式做出精緻效果。
Core Image 採用插件架構,允許開發者自定義濾鏡並與系統濾鏡混用。它針對基於像素的圖像操作與分析提供了高效能力,並會最大化利用所在硬件:每個濾鏡的內核實現實際上以 GLSL(OpenGL 著色語言)的子集編寫,當多個濾鏡組成圖表時,Core Image 會把內核拼接成一個可在 GPU 上高效運行的程序。
只要條件允許,Core Image 都會儘量延遲計算——通常直到請求濾鏡圖表最後一個濾鏡的輸出之前,都不會真正發生內存分配或處理。完成這些工作需要一個稱為 context(上下文)的對象,它才是框架真正幹活的地方:分配內存、編譯並運行濾鏡內核。建立上下文成本很高,實踐中應複用同一個實例。
二、框架中的核心對象
1. CIImage
CIImage 是 Core Image 中最基礎的圖像表示,它不仅承載圖像數據,還記錄了作用其上的濾鏡鏈。在被 CIContext 渲染之前,CIImage 只是「依賴於濾鏡鏈的懶加載」狀態,濾鏡不會真正改動其中的像素。另外要注意,CIImage 不能由 UIImage 直接轉換得到,常用創建方式有:
CIImage *image = [CIImage imageWithContentsOfURL:myURL];
CIImage *image = [CIImage imageWithData:myData];
CIImage *image = [CIImage imageWithCGImage:myCGImage];
CIImage *image = [CIImage imageWithCVPixelBuffer:pixelBuffer];
2. CIFilter
CIFilter 代表 Core Image 提供的各類濾鏡,通過鍵值方式設置輸入參數,設置完成後即可生成新的 CIImage 輸出。這裡的「輸出」同樣不做實際渲染,只包含對輸入圖像的引用與待應用的濾鏡鏈,系統會在最恰當的時機才真正渲染。
// 查詢內建濾鏡
[CIFilter filterNamesInCategory:kCICategoryBuiltIn];
// 查詢所有可用濾鏡
[CIFilter filterNamesInCategories];
// 獲取某個濾鏡的詳細屬性
[CIFilter attributes];
以 CISepiaTone(棕褐色調)為例,其屬性信息如下:
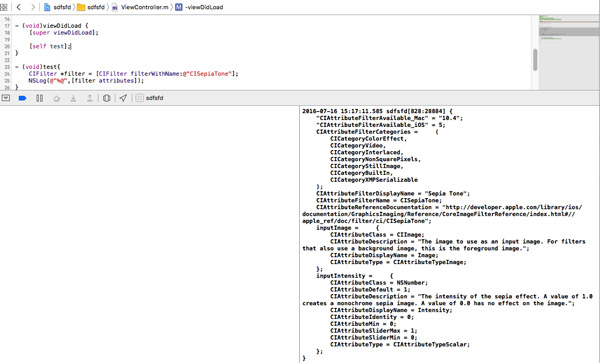
CIAttributeFilterCategories = (   // 所屬分類,一個濾鏡可同時屬於多類
    CICategoryColorEffect,        // 按效果分類的總類
    CICategoryVideo,              // 可用分類名搜索 Filter
    CICategoryInterlaced,
    CICategoryNonSquarePixels,
    CICategoryStillImage,
    CICategoryBuiltIn
);
CIAttributeFilterDisplayName = "Sepia Tone";
CIAttributeFilterName = CISepiaTone;   // 濾鏡名稱,代碼中通過它引用
inputImage = {                        // 必需的輸入參數
    CIAttributeClass = CIImage;       // 參數類型
    CIAttributeType  = CIAttributeTypeImage;
};
inputIntensity = {                    // 輸入強度
    CIAttributeClass      = NSNumber;
    CIAttributeDefault    = 1;        // 默認值
    CIAttributeIdentity   = 0;
    CIAttributeMax        = 1;
    CIAttributeMin        = 0;
    CIAttributeSliderMax  = 1;
    CIAttributeSliderMin  = 0;
    CIAttributeType       = CIAttributeTypeScalar;
};
實際調用非常直白:
CIFilter *filter = [CIFilter filterWithName:@"CISepiaTone"];
[filter setValue:inputImage forKey:@"inputImage"];
[filter setValue:[NSNumber numberWithFloat:0.8] forKey:@"inputIntensity"];
第一行指定使用哪個濾鏡(可通過 filterNamesInCategory: 拿到完整清單);第二行指定待處理圖像;第三行設置濾鏡參數,每個濾鏡的參數各異,可查閱官方文檔 Core Image Filter Reference。
3. CIContext
CIContext 負責渲染 CIImage,把濾鏡鏈真正作用到原始像素上。它可以基於 CPU,也可以基於 GPU,兩者取捨如下:
CPU 渲染借助 GCD 完成,因此在多數情況下更可靠、更易用,且可以在後台執行;GPU 渲染走 OpenGL ES 2.0,幾乎不佔用 CPU,不影響主運行循環,速度也更快,但無法在後台運行。
結論是:複雜濾鏡優先用 GPU;但若在處理視頻並保存文件、或保存照片到相冊,為了避免 App 退到後台導致保存失敗,應改用 CPU 渲染。默認即為 CPU。
// CPU 渲染
CIContext *context = [CIContext contextWithOptions:
    [NSDictionary dictionaryWithObject:[NSNumber numberWithBool:YES]
                                forKey:kCIContextUseSoftwareRenderer]];

// 基於 GPU 的 CIContext
CIContext *context = [CIContext contextWithOptions:nil];

EAGLContext *glContext = [[EAGLContext alloc] initWithAPI:kEAGLRenderingAPIOpenGLES2];
CIContext *context = [CIContext contextWithEAGLContext:glContext];
GPU 受硬件紋理尺寸限制,且 App 切到後台時 GPU 處理會被中斷,所以涉及後台處理與保存時必須走 CPU。另外,基於 GPU 的 CIContext 無法跨應用訪問:如果你在 UIImagePickerController 的代理方法裡直接用它處理照片,系統會自動降級為 CPU 渲染,速度明顯變慢。正確做法是先在代理方法裡把照片存下來,回到主類再處理。
4. 渲染結果的使用
(1)直接展示在 imageView 上
NSString *filePath = [[NSBundle mainBundle] pathForResource:@"image" ofType:@"png"];
NSURL *url = [NSURL fileURLWithPath:filePath];
CIImage *beginImage = [CIImage imageWithContentsOfURL:url];

CIFilter *filter = [CIFilter filterWithName:@"CISepiaTone"
                                keysAndValues:kCIInputImageKey, beginImage,
                                              @"inputIntensity", @0.8, nil];
CIImage *outputImage = [filter outputImage];
self.imageView.image = [UIImage imageWithCIImage:outputImage];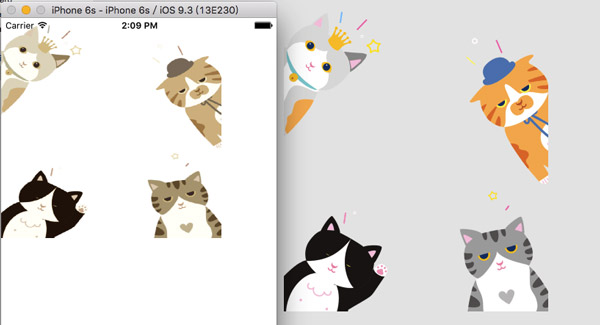
(2)保存到相冊(需引入 AssetsLibrary)
CIImage *saveImage = [filter outputImage];
CIContext *softwareContext = [CIContext contextWithOptions:
    @{kCIContextUseSoftwareRenderer : @(YES)}];
CGImageRef cgImg = [softwareContext createCGImage:saveImage fromRect:[saveImage extent]];

ALAssetsLibrary *library = [[ALAssetsLibrary alloc] init];
[library writeImageToSavedPhotosAlbum:cgImg
                             metadata:[saveImage properties]
                      completionBlock:^(NSURL *assetURL, NSError *error) {
    CGImageRelease(cgImg);
}];
5. CIDetector 與 CIFeature
CIDetector 用於分析 CIImage 並產出 CIFeature。初始化時需指定探測類型,即告訴它要在圖像中尋找什麼特徵。分析完成後返回 CIFeature 數組;若初始化為人臉探測,數組元素即為 CIFaceFeature,每個對象包含面部的 CGRect(基於圖像坐標系)以及左右眼、嘴部的 CGPoint。
CIContext *context = [CIContext contextWithOptions:nil];
CIImage *image = [CIImage imageWithCGImage:_inputImageView.image.CGImage];

NSDictionary *param = [NSDictionary dictionaryWithObject:CIDetectorAccuracyHigh
                                                forKey:CIDetectorAccuracy];
CIDetector *faceDetector = [CIDetector detectorOfType:CIDetectorTypeFace
                                              context:context
                                              options:param];
NSArray *detectResult = [faceDetector featuresInImage:image];

UIView *resultView = [[UIView alloc] initWithFrame:_inputImageView.frame];
[self.view addSubview:resultView];

for (CIFaceFeature *faceFeature in detectResult) {
    // 臉部框
    UIView *faceView = [[UIView alloc] initWithFrame:faceFeature.bounds];
    faceView.layer.borderWidth = 1;
    faceView.layer.borderColor = [UIColor orangeColor].CGColor;
    [resultView addSubview:faceView];

    if (faceFeature.hasLeftEyePosition)  { /* 左眼位置 */ }
    if (faceFeature.hasRightEyePosition) { /* 右眼位置 */ }
    if (faceFeature.hasMouthPosition)    { /* 嘴部位置 */ }
}
[resultView setTransform:CGAffineTransformMakeScale(1, -1)];
三、實踐中的關鍵注意事項
(1)渲染要放到後台線程。Core Image 效率雖高,但濾鏡與渲染仍可能拖累主線程,應異步執行、完成後回主線程更新界面。
dispatch_async(dispatch_get_global_queue(DISPATCH_QUEUE_PRIORITY_BACKGROUND, 0), ^{
    CGImageRef cgImg = self.imageView.image.CGImage;
    CIImage *coreImage = [CIImage imageWithCGImage:cgImg];

    // 依次疊加濾鏡
    for (CIFilter *filter in filters) {
        [filter setValue:coreImage forKey:kCIInputImageKey];
        coreImage = filter.outputImage;
    }

    CGImageRef newImg = [self.imageContext createCGImage:coreImage
                                                fromRect:[coreImage extent]];

    dispatch_async(dispatch_get_main_queue(), ^{
        self.imageView.image = [UIImage imageWithCGImage:newImg];
        [self.adjustSpinner stopAnimating];
        [sender setEnabled:YES];
    });
});(2)不要重複疊加同一個濾鏡。輸出圖像攜帶着完整濾鏡鏈,渲染時會把鏈條效果疊加到原始數據上。例如某 CIImage 已配置強度 0.5 的棕色濾鏡,當滑塊把強度改為 0.6 時,必須應用到新的 CIImage 上;否則原圖像上會同時存在 0.5 與 0.6 兩層效果,結果必然出錯。
(3)滑塊類高頻事件要做節流判斷。使用前先確認上一次濾鏡渲染是否已結束,若仍在生成新圖像,則應跳過本次更新。處理不當極易導致崩潰與內存洩露。
總之要牢記:CIImage 在渲染之前並不真正操作像素,真正的處理發生在 CIContext 渲染時刻。把圖像處理放在後台,把界面更新放回主線程。
四、處理流程小結
1. 創建 CIImage;
2. 創建 CIFilter,通過鍵值設置各項輸入(部分有默認值,部分需手動指定);
3. 從 CIFilter 取得輸出圖像;若存在濾鏡鏈,則把輸出作為下一個濾鏡的輸入,回到第 2 步;抵達鏈尾後調用 CIContext 渲染。CPU 上下文產出 CGImageRef,GPU 上下文則通過 OpenGL ES 直接繪製到屏幕,默認為 CPU。
最後提醒一句:代碼量才是提升開發水平的唯一路徑,知識點是為開發服務的,不要本末倒置。
深入學習可參考官方文檔 Core Image Filter Reference。
- 上一篇文章: 用 NSOperation 打造動畫隊列:復刻映客刷禮物效果
- 下一篇文章: iOS 開發中的 10 個實用技巧與冷知識