
認識 CoreData(四):FRC 資料驅動 UI 與三種版本遷移方案

投稿文章,作者:劉小壯
本系列前三篇分別是《初識 CoreData》《基礎使用》《使用進階》。這一篇收尾,只處理兩個主題:NSFetchedResultsController 與 版本遷移。
標題掛著「高級」二字,內容其實不玄。只是上一篇要講的東西實在太多,把這兩塊相對獨立、篇幅又偏大的主題拆出來,閱讀節奏會舒服不少。文中若有疏漏或錯誤,還請各位及時指出,謝謝。
一、NSFetchedResultsController:讓資料變化帶動畫面
做 iOS 開發,UITableView、UICollectionView 這類列表檢視幾乎繞不開。它們需要開發者自己扛起資料源:資料從網路來、從本地讀,增刪改查、去重排序,全都得自己寫程式碼維護。
CoreData 提供了一個現成的答案——NSFetchedResultsController(簡稱 FRC)。它可以勝任 UITableView 或 UICollectionView 的資料源管理者,管理的主要是本地持久化資料;若業務需要,也可以把網路請求的結果一起揉進來。下文以 UITableView 為例說明,UICollectionView 的用法基本同理,不再重複。
它是怎麼運作的
把 FRC 想成列表檢視的「資料管家」:它會盯住一個 MOC 的變化。一旦這個 MOC 對托管物件做了新增、刪除、修改,本地持久化資料隨之改變,FRC 便會回呼對應的代理方法,並在參數中帶上操作類型、操作前後的值、indexPath 等資訊。
實作上的思路是:讓 FRC「綁定」一個 MOC,再把 UITableView 嵌進 FRC 的執行流程。此後無論在程式哪個角落改動這個 MOC 的資料區,都會觸發 FRC 的回呼;我們只需在回呼裡寫上對應的列表更新邏輯。
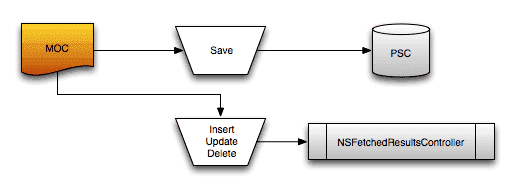
由此可見 FRC 最大的價值:它始終與本地持久化資料保持一致。資料一變,回呼就來,接著更新上層資料源與 UI。說得直白些,這就叫資料帶動 UI。
一個必須牢記的限制
FRC 初始化時要傳入一個 MOC,而它只會監聽這個 MOC 的變化。如果換成另一個 MOC 去改同一個儲存區,FRC 完全感知不到,也不會有任何反應。
所以設計持久化層時,盡量讓一個儲存區只對應一個 MOC,或者明確指定一個專門負責 UI 的 MOC。這部分在多執行緒章節還會細談。
先調整一下模型檔
寫程式碼之前,先改動一下既有的模型檔結構。
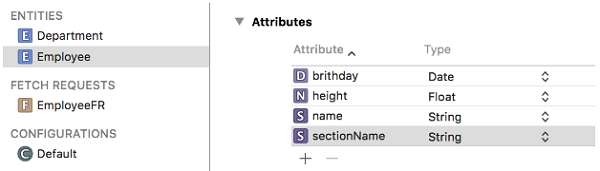
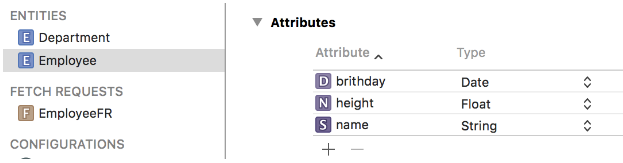
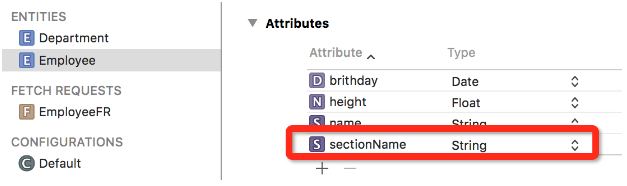
講 FRC 只需要 Employee 這張表,其他實體與設定暫時忽略。請在 Employee 原有欄位之外,新增一個 String 型別的 sectionName 欄位,專門用來存放分組標題,稍後會說明它的用途。
初始化 FRC
下面是一個常見的初始化寫法。MOC 與 UITableView 的建立程式碼沿用前文,這裡省略,只保留 FRC 相關部分。
// 建立請求物件,指定操作 Employee 表
NSFetchRequest *request = [NSFetchRequest fetchRequestWithEntityName:@"Employee"];

// 設定排序規則:依 height 欄位升序
NSSortDescriptor *heightSort = [NSSortDescriptor sortDescriptorWithKey:@"height" ascending:YES];
request.sortDescriptors = @[heightSort];

// 建立 FRC 實例並綁定 MOC
NSError *error = nil;
fetchedResultController = [[NSFetchedResultsController alloc] initWithFetchRequest:request
                                                             managedObjectContext:context
                                                               sectionNameKeyPath:@"sectionName"
                                                                        cacheName:nil];

// 設定代理並遵守協議
fetchedResultController.delegate = self;

// 執行抓取,此時 FRC 才會真正從儲存區載入資料
[fetchedResultController performFetch:&error];

if (error) {
    NSLog(@"NSFetchedResultsController init error : %@", error);
}

// 刷新 UI
[tableView reloadData];
幾個參數值得留意:
sectionNameKeyPath: 用來指定「哪個屬性充當分組標題」。本文傳入的是 Employee 的 sectionName 欄位,之後可透過 NSFetchedResultsSectionInfo 協議的 indexTitle 屬性取值。設定之後,標題相同的托管物件會被歸入同一個 section。
managedObjectContext: 就是前面提到的綁定對象,FRC 只認它。
cacheName: 我這裡給的是 nil。這個參數的作用是開啟 FRC 的抓取快取,並為快取命名,需要時可呼叫 deleteCacheWithName: 手動清除。但實務上這層快取幫助有限:它是依 NSFetchRequest 物件來比對的,而每次抓取的條件往往略有差異,命中率不高,卻仍然佔著記憶體。
初始化完成後呼叫 performFetch: 同步抓取資料,FRC 用來保存結果的屬性才會有值。抓取完成再呼叫 reloadData,即可在 tableView 的代理方法中透過 FRC 取資料。第一次 performFetch: 不會觸發 FRC 的代理方法。
代理方法與串接方式
FRC 內部已經備好了 UITableView 所需的各項資訊。透過 sections 屬性可取得一組遵守 NSFetchedResultsSectionInfo 協議的物件,每個物件代表一個 section:
@protocol NSFetchedResultsSectionInfo

@property (nonatomic, readonly) NSString *name;              // section 名稱
@property (nullable, nonatomic, readonly) NSString *indexTitle; // 顯示於索引列的標題
@property (nonatomic, readonly) NSUInteger numberOfObjects;  // 該 section 的物件數量
@property (nullable, nonatomic, readonly) NSArray *objects;  // 該 section 的物件陣列

@end
使用時的關鍵觀念是互相嵌套:在 FRC 的回呼裡寫 UI 的變化邏輯,在 UITableView 的回呼裡寫資料讀取邏輯。這樣資料與畫面永遠同步。
Table View Delegate
// section 數量取自 FRC
- (NSInteger)numberOfSectionsInTableView:(UITableView *)tableView {
    return fetchedResultController.sections.count;
}

// 每個 section 的列數
- (NSInteger)tableView:(UITableView *)tableView numberOfRowsInSection:(NSInteger)section {
    return fetchedResultController.sections[section].numberOfObjects;
}

// 依 indexPath 取出托管物件並賦值
- (UITableViewCell *)tableView:(UITableView *)tableView cellForRowAtIndexPath:(NSIndexPath *)indexPath {
    Employee *emp = [fetchedResultController objectAtIndexPath:indexPath];
    UITableViewCell *cell = [tableView dequeueReusableCellWithIdentifier:@"identifier" forIndexPath:indexPath];
    cell.textLabel.text = emp.name;
    return cell;
}

// section 標題,就是初始化時傳入的 sectionNameKeyPath 對應值
- (NSString *)tableView:(UITableView *)tableView titleForHeaderInSection:(NSInteger)section {
    return fetchedResultController.sections[section].indexTitle;
}

- (BOOL)tableView:(UITableView *)tableView canEditRowAtIndexPath:(NSIndexPath *)indexPath {
    return YES;
}

// 模擬刪除:改動 MOC 後存檔,FRC 隨即回呼並更新 UI
- (void)tableView:(UITableView *)tableView commitEditingStyle:(UITableViewCellEditingStyle)editingStyle
forRowAtIndexPath:(NSIndexPath *)indexPath {
    if (editingStyle == UITableViewCellEditingStyleDelete) {
        Employee *emp = [fetchedResultController objectAtIndexPath:indexPath];
        [context deleteObject:emp];

        NSError *error = nil;
        if (![context save:&error]) {
            NSLog(@"tableView delete cell error : %@", error);
        }
    }
}
這裡順帶示範了「UI 刪除 → 持久化同步」的完整鏈路。另外,FRC 還提供了兩個在實戰中極好用的轉換方法,也是它與列表檢視深度融合的體現:
- (id)objectAtIndexPath:(NSIndexPath *)indexPath;
- (nullable NSIndexPath *)indexPathForObject:(id)object;
Fetched Results Controller Delegate
// 單一物件(列)發生變化
- (void)controller:(NSFetchedResultsController *)controller didChangeObject:(id)anObject
       atIndexPath:(nullable NSIndexPath *)indexPath forChangeType:(NSFetchedResultsChangeType)type
      newIndexPath:(nullable NSIndexPath *)newIndexPath {
    switch (type) {
        case NSFetchedResultsChangeInsert:
            [tableView insertRowsAtIndexPaths:@[newIndexPath] withRowAnimation:UITableViewRowAnimationAutomatic];
            break;
        case NSFetchedResultsChangeDelete:
            [tableView deleteRowsAtIndexPaths:@[indexPath] withRowAnimation:UITableViewRowAnimationAutomatic];
            break;
        case NSFetchedResultsChangeMove:
            [tableView deleteRowsAtIndexPaths:@[indexPath] withRowAnimation:UITableViewRowAnimationAutomatic];
            [tableView insertRowsAtIndexPaths:@[newIndexPath] withRowAnimation:UITableViewRowAnimationAutomatic];
            break;
        case NSFetchedResultsChangeUpdate: {
            UITableViewCell *cell = [tableView cellForRowAtIndexPath:indexPath];
            Employee *emp = [fetchedResultController objectAtIndexPath:indexPath];
            cell.textLabel.text = emp.name;
            break;
        }
    }
}

// section 發生變化,例如標題被修改
- (void)controller:(NSFetchedResultsController *)controller didChangeSection:(id)sectionInfo
           atIndex:(NSUInteger)sectionIndex forChangeType:(NSFetchedResultsChangeType)type {
    switch (type) {
        case NSFetchedResultsChangeInsert:
            [tableView insertSections:[NSIndexSet indexSetWithIndex:sectionIndex]
                     withRowAnimation:UITableViewRowAnimationAutomatic];
            break;
        case NSFetchedResultsChangeDelete:
            [tableView deleteSections:[NSIndexSet indexSetWithIndex:sectionIndex]
                     withRowAnimation:UITableViewRowAnimationAutomatic];
            break;
        default:
            break;
    }
}

// 一批回呼即將開始
- (void)controllerWillChangeContent:(NSFetchedResultsController *)controller {
    [tableView beginUpdates];
}

// 一批回呼結束
- (void)controllerDidChangeContent:(NSFetchedResultsController *)controller {
    [tableView endUpdates];
}

// 自訂 section 索引標題;此處修改後,對應 section 的 indexTitle 會一併更新
- (nullable NSString *)controller:(NSFetchedResultsController *)controller
       sectionIndexTitleForSectionName:(NSString *)sectionName {
    return [NSString stringWithFormat:@"sectionName %@", sectionName];
}
把前面的刪除流程串起來看:使用者在 UI 上刪除一列 → tableView 代理中呼叫 MOC 刪除並存檔 → FRC 回呼 didChangeObject → 代理中執行列表刪除動畫。一次由 UI 觸發、最終又回到 UI 的閉環就此完成,資料與畫面達成雙向同步。
可以用下面的新增程式碼驗證效果:
- (void)addMoreData {
    Employee *employee = [NSEntityDescription insertNewObjectForEntityForName:@"Employee"
                                                     inManagedObjectContext:context];
    employee.name = [NSString stringWithFormat:@"lxz 15"];
    employee.height = @15;
    employee.brithday = [NSDate date];
    employee.sectionName = [NSString stringWithFormat:@"3"];

    NSError *error = nil;
    if (![context save:&error]) {
        NSLog(@"MOC save error : %@", error);
    }
}
二、版本遷移:讓舊資料平滑升到新結構
CoreData 的版本遷移手段不少,通用起手式是:先在 Xcode 中為既有模型檔建立一個新版本,再在新版本上動手,最後選擇一種遷移方式把舊資料搬過來。下文介紹三種由淺入深的方案,都不算複雜,足以覆蓋多數需求。
為什麼需要遷移
程式已經上線、資料庫已經依模型檔建好之後,如果只是調整既有屬性的預設值、最大最小值、Fetch Request 這類「屬性自身的參數」,通常不會出問題。但一旦改動了模型檔的結構——新增或刪除實體、更換屬性名或實體名——再次啟動就會崩潰。
開發自測階段,把 App 刪掉重裝即可繞過,代價是本地舊資料全沒。線上版本沒有這個選項,否則使用者一升級就閃退,並拋出類似下面的錯誤:
CoreData: error: Illegal attempt to save to a file that was never opened.
"This NSPersistentStoreCoordinator has no persistent stores (unknown).
It cannot perform a save operation.". No last error recorded.
需求恆變,模型檔遲早要改,遷移 therefore 是必備技能。
建立新版本模型檔
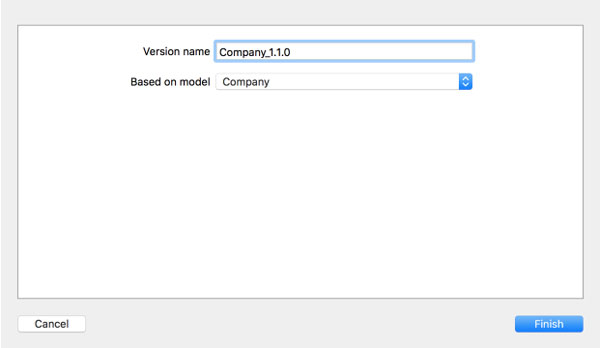
三種方案的共同前提,都是先為原模型檔開一個新版本:選中 .xcdatamodeld → 選單 Editor → Add Model Version → 選擇基準版本(一般選當前最新版)→ 完成。
命名上我習慣把當前工程版本號當後綴,這樣模型檔版本一多,也能快速和 App 版本對應起來。
完成後你會發現,原本的模型檔變成了一個資料夾,裡頭裝著多個版本檔。
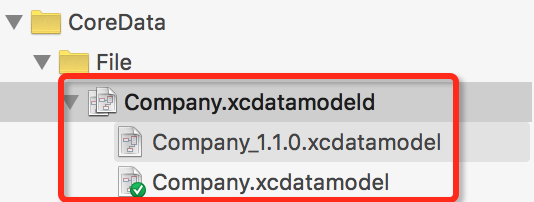
新版本檔的內部結構與舊版一致。此後所有修改都只在新版本上進行,舊版本不要再動;改完別忘了同步更新對應的模型類別檔。
本文以 Employee 為例:在新版本中新增一個 String 型別、名稱為 sectionName 的屬性。
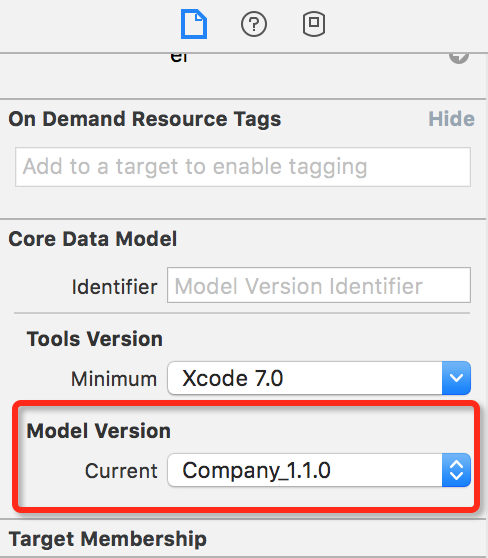
接著選中模型檔,把當前版本指向剛建立的新版本:Show The File Inspector → Model Version → Current。
模型檔的設定到此完成。至於「要怎麼搬」,蘋果把彈性留給了我們,接下來就是寫遷移方案的程式碼。
方案一:輕量級遷移
輕量級遷移最省事,絕大部分工作交給系統,我們只需表明遷移方式。做法是在 PSC 初始化 NSPersistentStore 時,透過 options 字典下達兩個開關:
NSMigratePersistentStoresAutomaticallyOption設為 YES:CoreData 會嘗試把低版本的儲存區自動遷移到最新模型版本。NSInferMappingModelAutomaticallyOption設為 YES:CoreData 會盡力推斷來源實體的每個屬性對應到目標實體的哪個屬性。
設定位置在建立 MOC、掛上 PSC 的那一步。下面只列出變動片段:
// 版本遷移方案
NSDictionary *options = @{
    NSMigratePersistentStoresAutomaticallyOption : @YES,
    NSInferMappingModelAutomaticallyOption : @YES
};

// 建立 PSC 時把遷移字典作為參數傳入
[coordinator addPersistentStoreWithType:NSSQLiteStoreType
                          configuration:nil
                                    URL:[NSURL fileURLWithPath:dataPath]
                                options:options
                                  error:nil];
順帶一提:實體改名
如果需要為既有實體改名,要把新實體的 Renaming ID 設為舊實體名,系統才知道兩者是同一個東西。以 Employee 為例:
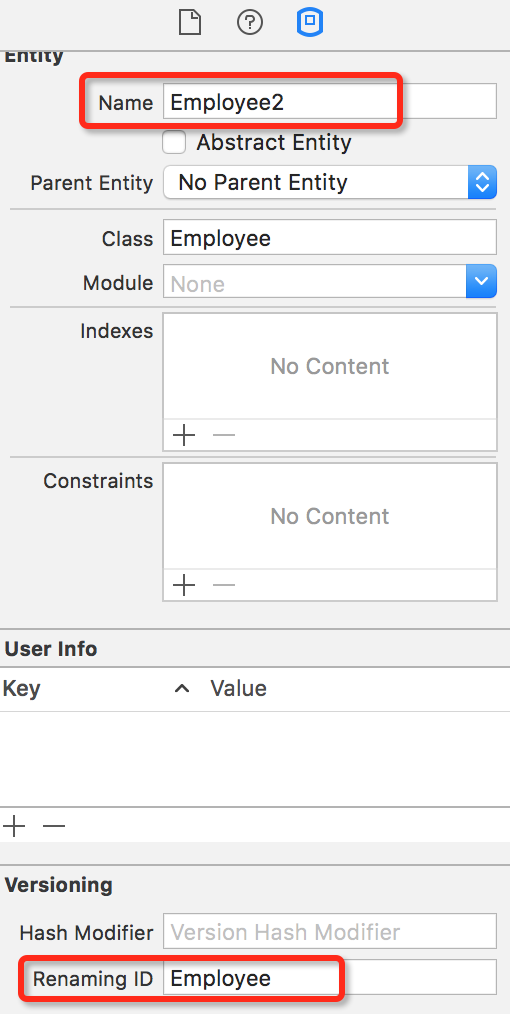
改完之後,程式裡一律使用新實體名 Employee2,資料庫中的舊資料也會被搬到 Employee2 表:
Employee2 *emp = [NSEntityDescription insertNewObjectForEntityForName:@"Employee2"
                                              inManagedObjectContext:context];
emp.name = @"lxz";
emp.brithday = [NSDate date];
emp.height = @1.9;
[context save:nil];
方案二:Mapping Model 遷移
輕量級遷移只應付得了新增實體、增減屬性這類簡單場景。需求更複雜時,就该請出 Xcode 的遷移模板——Mapping Model。它會產生一個副檔名為 .xcmappingmodel 的檔案,把來源與目標之間的對應關係視覺化呈現,改起來一目了然。
仍以上面的實體改名兼資料搬遷為例:先把 Employee 改名為 Employee2,再建立 Mapping Model。
Command + N → 選擇 Mapping Model → 選 Source Model → 選 Target Model → 命名 → Create。

建立完成後,檔案中以 EntityToEntity 的形式列出各組對應,實體內的屬性與關聯關係也會自動帶入(Entity Mapping、Attribute Mapping、Relationship Mapping)。檔案下半部則是來源與目標模型的關係圖。
仔細看會發現:改名後的 Employee2 並沒有遷移來源。因為它是新名字,系統無從判斷該從哪裡取資料。此時選中 Employee2 Mappings,右側 Source 會顯示 invalid value,把它改選為 Employee 即可。
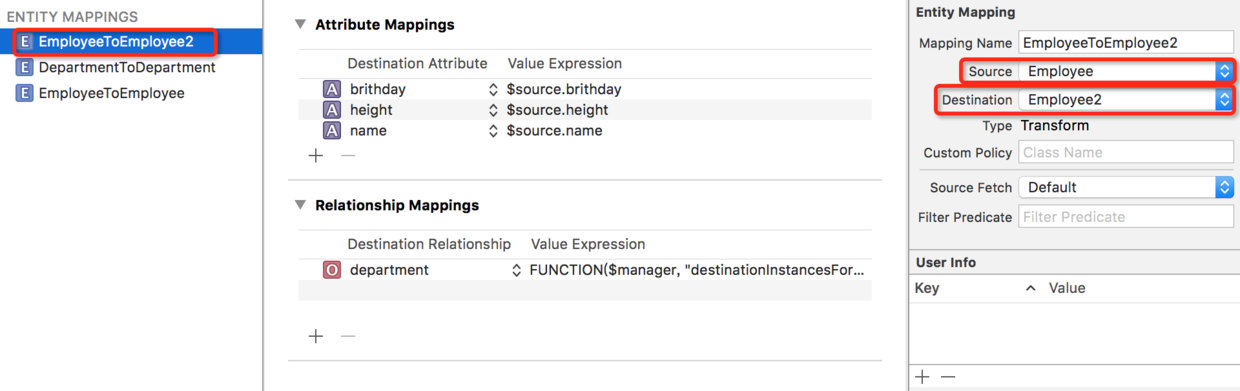
設定好之後,別忘了把原本殘留的 EmployeeToEmployee Mapping 刪掉——這個實體已被 Employee2 取代,留著會報錯。
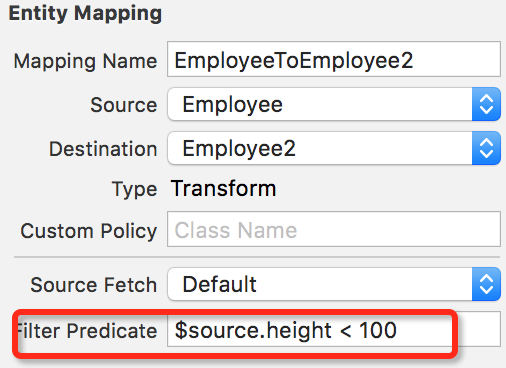
實體層級的遷移還可以掛上 Predicate,用來篩選要搬的資料。直接在右側 Filter Predicate 填條件即可,格式如 $source.height < 100,其中 $source 代表來源實體。
方案三:自訂遷移策略
若需求更進一步——例如希望在搬遷過程中順手改寫資料內容——上面兩種方案就不夠用了。此時可在 Mapping Model 中選中實體,找到 Custom Policy 欄位,它對應 NSEntityMigrationPolicy 的子類。建立並指定一個自訂子類,覆寫下面這個方法,即可完全掌控遷移細節:
- (BOOL)createDestinationInstancesForSourceInstance:(NSManagedObject *)sInstance
                                     entityMapping:(NSEntityMapping *)mapping
                                           manager:(NSMigrationManager *)manager
                                             error:(NSError **)error;
小結
需求演進的過程中,版本遷移幾乎一定會遇到,但我們應該盡量降低它的發生頻率。最開始設計模型結構時,就該把擴展性納入考量:一個足夠清晰、易於演進的結構,能讓後續變動只停留在邊緣,而不動到主體。
- 上一篇文章: 動手打造類似 MJRefresh 的 Swift 下拉刷新元件
- 下一篇文章: 用 StackView 幾行程式碼做出表情菜單的酷炫動畫