
5 分鐘搞懂 UIButton 圖文排版:Edge Insets 與自訂子類別兩種解法
UIButton 內部 imageView 與 titleLabel 的排列,是日常開發中很常遇到的需求。預設是「左圖右文」,那如果要「左文右圖」呢?如果要「上圖下文」呢?這篇把兩種做法都整理清楚。
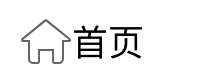
先來看預設狀態:
做法一:繼承 UIButton 並覆寫 layoutSubviews
這種方式最直觀——既然要改子視圖的位置,那就自己算好 frame 設上去。
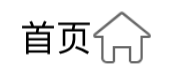
左文右圖
- (void)layoutSubviews {
    [super layoutSubviews];

    CGRect imageRect = self.imageView.frame;
    imageRect.size = CGSizeMake(30, 30);
    imageRect.origin.x = (self.frame.size.width - 30);
    imageRect.origin.y = (self.frame.size.height - 30) / 2.0f;

    CGRect titleRect = self.titleLabel.frame;
    titleRect.origin.x = (self.frame.size.width - imageRect.size.width - titleRect.size.width);
    titleRect.origin.y = (self.frame.size.height - titleRect.size.height) / 2.0f;

    self.imageView.frame = imageRect;
    self.titleLabel.frame = titleRect;
}
上圖下文
- (void)layoutSubviews {
    [super layoutSubviews];

    CGRect imageRect = self.imageView.frame;
    imageRect.size = CGSizeMake(30, 30);
    imageRect.origin.x = (self.frame.size.width - 30) * 0.5;
    imageRect.origin.y = self.frame.size.height * 0.5 - 40;

    CGRect titleRect = self.titleLabel.frame;
    titleRect.origin.x = (self.frame.size.width - titleRect.size.width) * 0.5;
    titleRect.origin.y = self.frame.size.height * 0.5;

    self.imageView.frame = imageRect;
    self.titleLabel.frame = titleRect;
}
这种做法的缺點很明顯:每要一種新排法就得寫一個子類別,而且數值全是寫死的魔法數字。如果同一個 App 裡有多種排版,子類別會迅速增殖。
做法二:透過 imageEdgeInsets 與 titleEdgeInsets
這種方式不必繼承,直接對 button 的兩個屬性設值即可。
左文右圖
UIButton *btn = [UIButton buttonWithType:UIButtonTypeCustom];
btn.frame = CGRectMake(50, 50, 80, 40);
[btn setImage:[UIImage imageNamed:@"icon_shouye"] forState:UIControlStateNormal];
[btn setTitle:@"首頁" forState:UIControlStateNormal];
[btn setTitleColor:[UIColor blackColor] forState:UIControlStateNormal];
btn.backgroundColor = [UIColor redColor];

// 順序為:上、左、下、右
btn.imageEdgeInsets = UIEdgeInsetsMake(0,
    btn.frame.size.width - btn.imageView.frame.origin.x - btn.imageView.frame.size.width,
    0, 0);
btn.titleEdgeInsets = UIEdgeInsetsMake(0,
    -(btn.frame.size.width - btn.imageView.frame.size.width),
    0, 0);

[self.view addSubview:btn];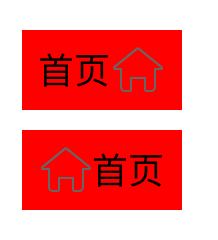
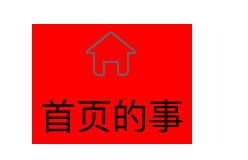
上圖下文
UIButton *btn = [UIButton buttonWithType:UIButtonTypeCustom];
btn.frame = CGRectMake(50, 50, 80, 60);
[btn setImage:[UIImage imageNamed:@"icon_shouye"] forState:UIControlStateNormal];
[btn setTitle:@"首頁的事" forState:UIControlStateNormal];
[btn setTitleColor:[UIColor blackColor] forState:UIControlStateNormal];
btn.backgroundColor = [UIColor redColor];

btn.imageEdgeInsets = UIEdgeInsetsMake(
    -(btn.frame.size.height - btn.titleLabel.frame.size.height - btn.titleLabel.frame.origin.y),
    (btn.frame.size.width - btn.titleLabel.frame.size.width) / 2.0f - btn.imageView.frame.size.width,
    0, 0);
btn.titleEdgeInsets = UIEdgeInsetsMake(
    btn.frame.size.height - btn.imageView.frame.size.height - btn.imageView.frame.origin.y,
    -btn.imageView.frame.size.width,
    0, 0);

[self.view addSubview:btn];
效果圖:
關鍵觀念:Edge Insets 是「位移量」不是「絕對座標」
這是最多人卡住的地方。UIButton 內部有 titleLabel 與 imageView 兩個子視圖(這裡的 image 有別於背景圖片)。設定 title 與 image 之後,系統會預先把兩者排成「圖在左、文在右」,並作為一個整體依 contentHorizontalAlignment 靠左、靠右或居中。
而 imageEdgeInsets/titleEdgeInsets 的作用,是針對子視圖目前所在的位置做位移,並不是指定它距離 button 邊框多遠。這就是為什麼上面的公式看起來那麼繞——因為它們是在「預設位置」上疊加偏移,而預設位置又受 button 尺寸、文字長度、對齊方式共同影響。
也正因如此,這些數值幾乎無法靠推理一次算對,實務上通常還是要搭配 contentHorizontalAlignment 反覆微調:
typedef NS_ENUM(NSInteger, UIControlContentHorizontalAlignment) {
    UIControlContentHorizontalAlignmentCenter = 0,   // 居中
    UIControlContentHorizontalAlignmentLeft   = 1,   // 靠左
    UIControlContentHorizontalAlignmentRight  = 2,   // 靠右
    UIControlContentHorizontalAlignmentFill   = 3,   // 填滿
};
三種寬度情境下的顯示規則
理解這三條規則,能解釋絕大多數「圖文被壓爛」的問題:
- 當
button.width < image.width:只顯示被壓縮的圖片,且圖片以 fillXY 方式縮放(也就是變形)。 - 當
button.width > image.width但小於image.width + text.width:圖片正常顯示,文字被壓縮。 - 當
button.width > image.width + text.width:兩者並列顯示,預設居中,可透過contentHorizontalAlignment改變對齊。
該選哪一種?
如果排版種類少、每種只出現一兩次,用 Edge Insets 就好,不必新增檔案。但如果同一種排版會被大量重複使用,我會建議寫成子類別,並把間距、圖示尺寸抽成可設定的屬性,而不是寫死數字。
另外要提醒:自 iOS 15 起,Apple 提供了 UIButtonConfiguration(以及 setImagePadding(_:) 這類 API)來處理圖文間距,語意比 Edge Insets 清楚得多。如果你的專案部署目標允許,優先採用新 API 會省下大量試錯時間。
本文整理自「Migi000」於簡書發佈的相關文章。