
UIButton 圖文佈局:用子類重寫 layoutSubviews 一次解決
編輯:iOS 開發基礎
上圖下文、上文下圖、左圖右文、右圖左文——這四種佈局幾乎每個專案都會遇到。我也試過寫分類、用 imageEdgeInsets 與 titleEdgeInsets 硬湊,但總有各種不夠順手的地方:間距不好控、文字變長就歪、多行標題直接失控。
最後我換了個更直接的做法:寫一個 UIButton 子類,重寫 layoutSubviews,自己算位置。
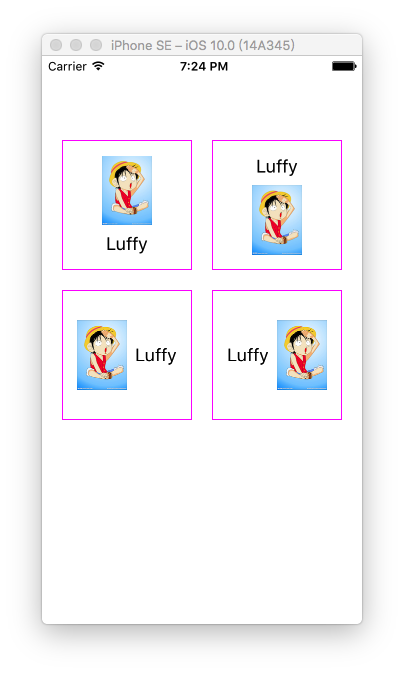
JXLayoutButton.h
typedef NS_ENUM(NSUInteger, JXLayoutButtonStyle) {
    JXLayoutButtonStyleLeftImageRightTitle,
    JXLayoutButtonStyleLeftTitleRightImage,
    JXLayoutButtonStyleUpImageDownTitle,
    JXLayoutButtonStyleUpTitleDownImage
};

/// 重寫 layoutSubviews 實現佈局,忽略 imageEdgeInsets、titleEdgeInsets 和 contentEdgeInsets
@interface JXLayoutButton : UIButton

/// 佈局方式
@property (nonatomic, assign) JXLayoutButtonStyle layoutStyle;

/// 圖片與文字的間距,預設 8
@property (nonatomic, assign) CGFloat midSpacing;

@end
JXLayoutButton.m
#import "JXLayoutButton.h"

@implementation JXLayoutButton

- (instancetype)initWithFrame:(CGRect)frame {
    if (self = [super initWithFrame:frame]) {
        self.midSpacing = 8;
    }
    return self;
}

- (void)layoutSubviews {
    [super layoutSubviews];
    [self.imageView sizeToFit];
    [self.titleLabel sizeToFit];

    switch (self.layoutStyle) {
        case JXLayoutButtonStyleLeftImageRightTitle:
            [self layoutHorizontalWithLeftView:self.imageView rightView:self.titleLabel];
            break;
        case JXLayoutButtonStyleLeftTitleRightImage:
            [self layoutHorizontalWithLeftView:self.titleLabel rightView:self.imageView];
            break;
        case JXLayoutButtonStyleUpImageDownTitle:
            [self layoutVerticalWithUpView:self.imageView downView:self.titleLabel];
            break;
        case JXLayoutButtonStyleUpTitleDownImage:
            [self layoutVerticalWithUpView:self.titleLabel downView:self.imageView];
            break;
        default:
            break;
    }
}

/** 水平排列:整體置中,間距固定 */
- (void)layoutHorizontalWithLeftView:(UIView *)leftView rightView:(UIView *)rightView {
    CGRect leftFrame  = leftView.frame;
    CGRect rightFrame = rightView.frame;

    CGFloat totalWidth = CGRectGetWidth(leftFrame) + self.midSpacing + CGRectGetWidth(rightFrame);

    leftFrame.origin.x = (CGRectGetWidth(self.frame) - totalWidth) / 2.0;
    leftFrame.origin.y = (CGRectGetHeight(self.frame) - CGRectGetHeight(leftFrame)) / 2.0;
    leftView.frame = leftFrame;

    rightFrame.origin.x = CGRectGetMaxX(leftFrame) + self.midSpacing;
    rightFrame.origin.y = (CGRectGetHeight(self.frame) - CGRectGetHeight(rightFrame)) / 2.0;
    rightView.frame = rightFrame;
}

/** 垂直排列:整體置中,間距固定 */
- (void)layoutVerticalWithUpView:(UIView *)upView downView:(UIView *)downView {
    CGRect upFrame   = upView.frame;
    CGRect downFrame = downView.frame;

    CGFloat totalHeight = CGRectGetHeight(upFrame) + self.midSpacing + CGRectGetHeight(downFrame);

    upFrame.origin.y = (CGRectGetHeight(self.frame) - totalHeight) / 2.0;
    upFrame.origin.x = (CGRectGetWidth(self.frame) - CGRectGetWidth(upFrame)) / 2.0;
    upView.frame = upFrame;

    downFrame.origin.y = CGRectGetMaxY(upFrame) + self.midSpacing;
    downFrame.origin.x = (CGRectGetWidth(self.frame) - CGRectGetWidth(downFrame)) / 2.0;
    downView.frame = downFrame;
}

#pragma mark - 觸發重新佈局

- (void)setImage:(UIImage *)image forState:(UIControlState)state {
    [super setImage:image forState:state];
    [self setNeedsLayout];
}

- (void)setTitle:(NSString *)title forState:(UIControlState)state {
    [super setTitle:title forState:state];
    [self setNeedsLayout];
}

@end
使用方式
#import "JXLayoutButton.h"

- (void)viewDidLoad {
    [super viewDidLoad];

    CGFloat margin = 20;
    CGFloat buttonWidth  = (CGRectGetWidth(self.view.frame) - 20 * 3) / 2.0;
    CGFloat buttonHeight = buttonWidth;

    [self addButton:[self generateButtonWithStyle:JXLayoutButtonStyleUpImageDownTitle]
           withFrame:CGRectMake(margin, 64 + margin, buttonWidth, buttonHeight)];

    [self addButton:[self generateButtonWithStyle:JXLayoutButtonStyleUpTitleDownImage]
           withFrame:CGRectMake(margin + buttonWidth + margin, 64 + margin, buttonWidth, buttonHeight)];

    [self addButton:[self generateButtonWithStyle:JXLayoutButtonStyleLeftImageRightTitle]
           withFrame:CGRectMake(margin, 64 + margin + buttonHeight + margin, buttonWidth, buttonHeight)];

    [self addButton:[self generateButtonWithStyle:JXLayoutButtonStyleLeftTitleRightImage]
           withFrame:CGRectMake(margin + buttonWidth + margin, 64 + margin + buttonHeight + margin, buttonWidth, buttonHeight)];
}

- (JXLayoutButton *)generateButtonWithStyle:(JXLayoutButtonStyle)style {
    JXLayoutButton *button = [JXLayoutButton buttonWithType:UIButtonTypeCustom];
    [button setImage:[UIImage imageNamed:@"luffy"] forState:UIControlStateNormal];
    [button setTitle:@"Luffy" forState:UIControlStateNormal];
    [button setTitleColor:[UIColor darkTextColor] forState:UIControlStateNormal];
    button.layoutStyle = style;
    button.layer.borderWidth  = 1;
    button.layer.borderColor  = [UIColor magentaColor].CGColor;
    return button;
}

- (void)addButton:(JXLayoutButton *)button withFrame:(CGRect)frame {
    button.frame = frame;
    [self.view addSubview:button];
}
為什麼這樣比 EdgeInsets 更省心
EdgeInsets 的本質是「相對預設位置的偏移」,而預設位置由系統決定,一旦文字長度、語言、字型或是否多行發生變化,偏移量就得跟著重算,稍不留神就會歪掉。重寫 layoutSubviews 則是直接告訴系統「圖片和文字各放哪裡」:先 sizeToFit 取得兩者的真實尺寸,算出總寬(或總高),再整體置中分配座標。邏輯直白,也不受系統預設佈局變動影響。
實作時有兩個細節值得注意:一是必須在 setImage:forState: 與 setTitle:forState: 中呼叫 setNeedsLayout,否則內容變了佈局不會跟著更新;二是 layoutSubviews 可能被頻繁呼叫,裡面不要放昂貴運算。
專案原始碼:https://github.com/JiongXing
本文整理自梁炯幸的簡書。
- 上一篇文章: iOS 城市選擇器實作:UIPickerView 兩列聯動
- 下一篇文章: 如何自己寫一套下拉刷新:MJRefresh 原理拆解