
iOS 實現顏色漸變的三種方法:CAGradientLayer、Core Graphics 與 mask 裁剪
demo 地址:https://github.com/xiaochaofeiyu/YSCAnimation
覺得有幫助的話求個 star,歡迎交流討論。
一、CAGradientLayer 實現漸變
CAGradientLayer 是 CALayer 的一個特殊子類,專門用於生成顏色漸變圖層,使用起來相當方便。先來看它的幾個關鍵屬性:
colors—— 漸變的顏色組;locations—— 漸變顏色的分割點;startPoint與endPoint—— 顏色漸變的方向與範圍,取值介於 (0, 0) 與 (1.0, 1.0) 之間。例如 (0,0)→(1.0,0) 代表水平方向漸變,(0,0)→(0,1.0) 代表垂直方向漸變。
CAGradientLayer *gradientLayer = [CAGradientLayer layer];
gradientLayer.colors = @[(__bridge id)[UIColor redColor].CGColor,
                         (__bridge id)[UIColor yellowColor].CGColor,
                         (__bridge id)[UIColor blueColor].CGColor];
gradientLayer.locations = @[@0.3, @0.5, @1.0];
gradientLayer.startPoint = CGPointMake(0, 0);
gradientLayer.endPoint   = CGPointMake(1.0, 0);
gradientLayer.frame = CGRectMake(0, 100, 300, 100);
[self.view.layer addSublayer:gradientLayer];
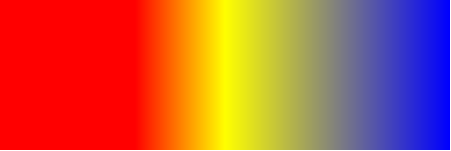
CAGradientLayer 實現漸變簡單直觀,但存在明顯的局限性:它始終是一個矩形圖層,無法自定義整個漸變區域的形狀,例如環形、曲線形或其他不規則輪廓的漸變。這時候就需要換用下面的方案。
二、Core Graphics 相關方法實現漸變
iOS 的 Core Graphics 中有兩個函數可用於繪製漸變:CGContextDrawLinearGradient 生成線性漸變,CGContextDrawRadialGradient 生成沿圓半徑方向的漸變。這兩個函數可以自定義 path,無論是什麼形狀都能處理,原理是先做 Clip——因此需要在呼叫 CGContextClip 之前,先用 CGContextAddPath 把 CGPathRef 加入到 Context 中。
另一個需要注意的地方是漸變的方向。方向由兩個點控制,單位就是座標。因此需要從 CGPathRef 中找出合適的起訖點,方法有很多種,端看具體需求。本例中我採取最簡單的做法:呼叫 CGPathGetBoundingBox 取得該 path 的矩形包圍盒,再依這個矩形取兩個點,讀者可以自行替換成更精細的算法。
1 → 線性漸變
- (void)drawLinearGradient:(CGContextRef)context
                      path:(CGPathRef)path
                startColor:(CGColorRef)startColor
                  endColor:(CGColorRef)endColor {
    CGColorSpaceRef colorSpace = CGColorSpaceCreateDeviceRGB();
    CGFloat locations[] = {0.0, 1.0};
    NSArray *colors = @[(__bridge id)startColor, (__bridge id)endColor];
    CGGradientRef gradient = CGGradientCreateWithColors(colorSpace, (__bridge CFArrayRef)colors, locations);

    CGRect pathRect = CGPathGetBoundingBox(path);
    // 具體方向可依需求修改
    CGPoint startPoint = CGPointMake(CGRectGetMinX(pathRect), CGRectGetMidY(pathRect));
    CGPoint endPoint   = CGPointMake(CGRectGetMaxX(pathRect), CGRectGetMidY(pathRect));

    CGContextSaveGState(context);
    CGContextAddPath(context, path);
    CGContextClip(context);
    CGContextDrawLinearGradient(context, gradient, startPoint, endPoint, 0);
    CGContextRestoreGState(context);

    CGGradientRelease(gradient);
    CGColorSpaceRelease(colorSpace);
}

- (void)viewDidLoad {
    [super viewDidLoad];

    // 建立 CGContextRef
    UIGraphicsBeginImageContext(self.view.bounds.size);
    CGContextRef gc = UIGraphicsGetCurrentContext();

    // 建立 CGMutablePathRef
    CGMutablePathRef path = CGPathCreateMutable();

    // 繪製 Path
    CGRect rect = CGRectMake(0, 100, 300, 200);
    CGPathMoveToPoint(path, NULL, CGRectGetMinX(rect), CGRectGetMinY(rect));
    CGPathAddLineToPoint(path, NULL, CGRectGetMidX(rect), CGRectGetMaxY(rect));
    CGPathAddLineToPoint(path, NULL, CGRectGetWidth(rect), CGRectGetMaxY(rect));
    CGPathCloseSubpath(path);

    // 繪製漸變
    [self drawLinearGradient:gc path:path startColor:[UIColor greenColor].CGColor endColor:[UIColor redColor].CGColor];

    // 注意釋放 CGMutablePathRef
    CGPathRelease(path);

    // 從 Context 中取得圖像並顯示
    UIImage *img = UIGraphicsGetImageFromCurrentImageContext();
    UIGraphicsEndImageContext();

    UIImageView *imgView = [[UIImageView alloc] initWithImage:img];
    [self.view addSubview:imgView];
}

2 → 圓半徑方向漸變
- (void)drawRadialGradient:(CGContextRef)context
                      path:(CGPathRef)path
                startColor:(CGColorRef)startColor
                  endColor:(CGColorRef)endColor {
    CGColorSpaceRef colorSpace = CGColorSpaceCreateDeviceRGB();
    CGFloat locations[] = {0.0, 1.0};
    NSArray *colors = @[(__bridge id)startColor, (__bridge id)endColor];
    CGGradientRef gradient = CGGradientCreateWithColors(colorSpace, (__bridge CFArrayRef)colors, locations);

    CGRect pathRect = CGPathGetBoundingBox(path);
    CGPoint center = CGPointMake(CGRectGetMidX(pathRect), CGRectGetMidY(pathRect));
    CGFloat radius = MAX(pathRect.size.width / 2.0, pathRect.size.height / 2.0) * sqrt(2);

    CGContextSaveGState(context);
    CGContextAddPath(context, path);
    CGContextEOClip(context);
    CGContextDrawRadialGradient(context, gradient, center, 0, center, radius, 0);
    CGContextRestoreGState(context);

    CGGradientRelease(gradient);
    CGColorSpaceRelease(colorSpace);
}

- (void)viewDidLoad {
    [super viewDidLoad];

    UIGraphicsBeginImageContext(self.view.bounds.size);
    CGContextRef gc = UIGraphicsGetCurrentContext();

    CGMutablePathRef path = CGPathCreateMutable();

    CGRect rect = CGRectMake(0, 100, 300, 200);
    CGPathMoveToPoint(path, NULL, CGRectGetMinX(rect), CGRectGetMinY(rect));
    CGPathAddLineToPoint(path, NULL, CGRectGetMidX(rect), CGRectGetMaxY(rect));
    CGPathAddLineToPoint(path, NULL, CGRectGetWidth(rect), CGRectGetMaxY(rect));
    CGPathAddLineToPoint(path, NULL, CGRectGetWidth(rect), CGRectGetMinY(rect));
    CGPathCloseSubpath(path);

    [self drawRadialGradient:gc path:path startColor:[UIColor greenColor].CGColor endColor:[UIColor redColor].CGColor];

    CGPathRelease(path);

    UIImage *img = UIGraphicsGetImageFromCurrentImageContext();
    UIGraphicsEndImageContext();

    UIImageView *imgView = [[UIImageView alloc] initWithImage:img];
    [self.view addSubview:imgView];
}

使用 Core Graphics 有一個容易忘記的細節:CGGradientRef、CGColorSpaceRef、CGMutablePathRef 這些 C 物件不在 ARC 管理範圍內,必須手動 Release,否則會洩漏。另外 CGContextSaveGState 與 CGContextRestoreGState 必須成對出現,Clip 設定的作用域才不會污染後續繪製。
三、以 CAShapeLayer 作為 layer 的 mask 屬性
CALayer 的 mask 屬性可以作為遮罩,讓該 layer 只顯示被 mask 遮住(非透明)的部分。CAShapeLayer 是 CALayer 的子類,透過 path 屬性可以生成任意形狀;把它用作 layer 的 mask,就能得到任意形狀的圖層。因此生成顏色漸變可以分成三步:
- 建立一個 imageView(也可以是 layer),其 image 屬性設為顏色漸變的圖片;
- 建立一個 CAShapeLayer 物件,透過 path 屬性指定所需形狀;
- 把該 CAShapeLayer 物件賦值給 imageView 的
mask屬性。
- (void)viewDidLoad {
    [super viewDidLoad];

    [self.view addSubview:self.firstCircle];
    _firstCircle.frame  = CGRectMake(0, 0, 200, 200);
    _firstCircle.center = CGPointMake(CGRectGetWidth(self.view.bounds)  / 2.0,
                                      CGRectGetHeight(self.view.bounds) / 2.0);

    CGFloat firsCircleWidth = 5;
    self.firstCircleShapeLayer = [self generateShapeLayerWithLineWidth:firsCircleWidth];
    _firstCircleShapeLayer.path = [self generateBezierPathWithCenter:CGPointMake(100, 100) radius:100].CGPath;
    _firstCircle.layer.mask = _firstCircleShapeLayer;
}

- (CAShapeLayer *)generateShapeLayerWithLineWidth:(CGFloat)lineWidth {
    CAShapeLayer *waveline = [CAShapeLayer layer];
    waveline.lineCap      = kCALineCapButt;
    waveline.lineJoin     = kCALineJoinRound;
    waveline.strokeColor  = [UIColor redColor].CGColor;
    waveline.fillColor    = [[UIColor clearColor] CGColor];
    waveline.lineWidth    = lineWidth;
    waveline.backgroundColor = [UIColor clearColor].CGColor;
    return waveline;
}

- (UIBezierPath *)generateBezierPathWithCenter:(CGPoint)center radius:(CGFloat)radius {
    UIBezierPath *circlePath = [UIBezierPath bezierPathWithArcCenter:center
                                                              radius:radius
                                                          startAngle:0
                                                            endAngle:2 * M_PI
                                                           clockwise:NO];
    return circlePath;
}

- (UIImageView *)firstCircle {
    if (!_firstCircle) {
        self.firstCircle = [[UIImageView alloc] initWithImage:[UIImage imageNamed:@"circleBackground"]];
        _firstCircle.layer.masksToBounds = YES;
        _firstCircle.alpha = 1.0;
    }
    return _firstCircle;
}

三種方案的取捨:如果只是要一個矩形區域的線性或角度漸變,CAGradientLayer 最省事;如果需要任意形狀的漸變,Core Graphics 的 Clip 方案最靈活,也最能展現自繪能力;而如果漸變圖片已經現成、只是想裁出特定形狀,那麼 mask + CAShapeLayer 的組合程式碼量最少、也最容易做動畫(直接改 path 即可)。
demo 地址:https://github.com/xiaochaofeiyu/YSCAnimation
在 YSCNewVoiceWaveView 與 YSCVoiceLoadingCircleView 中。
文章轉自 小超飛魚 的簡書
- 上一篇文章: iOS 干貨:探探風格卡片視圖切換效果的實現
- 下一篇文章: iOS 原生二維碼實戰:生成與掃描的完整梳理