
UITableView 多層級展開與收起:仿檔案目錄樹的實現方案
編輯:iOS 開發基礎
規則要求
- tableview 需要呈現多層結構,類似 Xcode 檔案目錄那樣的層級關係。最開始展示的層姑且稱為「根目錄」,而每個根目錄下的層數並不固定。
- 與檔案目錄類似,不同層次可以同時各展開一個;但同一層次中只能有一層處於展開狀態——要展開 B 層次的某一項,就必須收起 B 層次其餘所有已展開的項。
- 最底層是一個個「檔案」,不能再展開(業務上的用途是跳轉到不同頁面)。
實現思路
- 整個介面就是一個 tableview,層級關係透過 cell 內 label 的橫向偏移量來展現;資料源是一個一維陣列
_resultArray。展開就是「在特定位置插入資料」,收起就是「在特定位置刪除資料」。 - 每一層的節點都持有下一層的引用(即包含下一層的全部資料)。展開該節點時,把下一層資料插入 _resultArray;收起時,把該節點底下所有層級的資料從 _resultArray 中移除。
資料結構
// 每個目錄節點的資料結構
@interface OpenTest : NSObject
@property (copy, nonatomic) NSString *title;         // 展示的標題
@property (assign, nonatomic) NSInteger level;       // 決定偏移量大小
@property (copy, nonatomic) NSString *openUrl;       // 最後一層的跳轉規則
@property (copy, nonatomic) NSMutableArray *detailArray; // 下一層的資料
@property (assign, nonatomic) BOOL isOpen;           // 是否已展開
@property (copy, nonatomic) NSString *imageName;     // 首層的圖片
@end
由於 detailArray 中存放的物件同樣應該是 OpenTest,需要在 .m 中借助 MJExtension 做顯式轉化:
#import "OpenTest.h"

@implementation OpenTest

- (instancetype)init {
    self = [super init];
    if (self) {
        [OpenTest mj_setupObjectClassInArray:^NSDictionary *{
            return @{
                @"detailArray" : [OpenTest class]
            };
        }];
    }
    return self;
}

@end
資料處理
先建立源資料 _dataArray(能明確表達層級關係),再由此得出展示用的 _resultArray。建構過程如下:
- (void)initData {
    _dataArray    = [NSMutableArray new];
    _resultArray  = [NSMutableArray new];

    NSMutableArray *secondArray1 = [NSMutableArray new];
    NSMutableArray *threeArray1  = [NSMutableArray new];
    NSMutableArray *fourArray1   = [NSMutableArray new];

    NSArray *FirstTitleArray  = @[@"FirstTitle1", @"FirstTitle2", @"FirstTitle3", @"FirstTitle4", @"FirstTitle5",
                                  @"FirstTitle6", @"FirstTitle7", @"FirstTitle8", @"FirstTitle9", @"FirstTitle10"];
    NSArray *SecondTitleArray = @[@"SecondTitle1", @"SecondTitle2", @"SecondTitle3"];
    NSArray *ThreeTitleArray  = @[@"ThreeTitle1", @"ThreeTitle2", @"ThreeTitle3", @"ThreeTitle4"];
    NSArray *FourTitleArray   = @[@"FourTitle1", @"FourTitle2", @"FourTitle3"];
    NSArray *imageArray = @[@"scroller1", @"scroller2", @"scroller3", @"scroller4", @"scroller5",
                            @"scroller6", @"scroller7", @"scroller8", @"scroller9", @"scroller10"];

    // 第四層資料
    for (int i = 0; i < FourTitleArray.count; i++) {
        OpenTest *model = [[OpenTest alloc] init];
        model.title  = FourTitleArray[i];
        model.level  = 3;
        model.isOpen = NO;
        [fourArray1 addObject:model];
    }

    // 第三層資料
    for (int i = 0; i < ThreeTitleArray.count; i++) {
        OpenTest *model = [[OpenTest alloc] init];
        model.title  = ThreeTitleArray[i];
        model.level  = 2;
        model.isOpen = NO;
        model.detailArray = fourArray1;
        [threeArray1 addObject:model];
    }

    // 第二層資料
    for (int i = 0; i < SecondTitleArray.count; i++) {
        OpenTest *model = [[OpenTest alloc] init];
        model.title  = SecondTitleArray[i];
        model.level  = 1;
        model.isOpen = NO;
        model.detailArray = [threeArray1 mutableCopy];
        [secondArray1 addObject:model];
    }

    // 第一層資料
    for (int i = 0; i < FirstTitleArray.count; i++) {
        OpenTest *model = [[OpenTest alloc] init];
        model.title  = FirstTitleArray[i];
        model.level  = 0;
        model.isOpen = NO;
        model.detailArray = [secondArray1 mutableCopy];
        model.imageName = imageArray[i];
        [_dataArray addObject:model];
    }

    // 處理源資料,獲得展示數組
    [self dealWithDataArray:_dataArray];
}

/**
 將源資料陣列處理成要展示的一維陣列,最開始只展示首層的所有資料
 @param dataArray 源資料陣列
 */
- (void)dealWithDataArray:(NSMutableArray *)dataArray {
    for (OpenTest *model in dataArray) {
        [_resultArray addObject:model];
        if (model.isOpen && model.detailArray.count > 0) {
            [self dealWithDataArray:model.detailArray];
        }
    }
}
首層尚未展開時,點擊首層展開第二層相對簡單,就是在 _resultArray 的指定位置插入下一層資料:
/**
 在指定位置插入要展示的資料
 @param dataArray 資料陣列
 @param row       需要插入的陣列下標
 */
- (void)addObjectWithDataArray:(NSMutableArray *)dataArray row:(NSInteger)row {
    for (int i = 0; i < dataArray.count; i++) {
        OpenTest *model = dataArray[i];
        model.isOpen = NO;
        [_resultArray insertObject:model atIndex:row];
        row += 1;
    }
}
收起方法的實作,順便回傳刪除的數量以便後續修正索引:
/**
 刪除要收起的資料
 @param dataArray 資料
 @param count     統計刪除資料的個數
 @return 刪除資料的個數
 */
- (CGFloat)deleteObjectWithDataArray:(NSMutableArray *)dataArray count:(NSInteger)count {
    for (OpenTest *model in dataArray) {
        count += 1;
        if (model.isOpen && model.detailArray.count > 0) {
            count = [self deleteObjectWithDataArray:model.detailArray count:count];
        }
        model.isOpen = NO;
        [_resultArray removeObject:model];
    }
    return count;
}
如果某層已經有展開項,此時點擊同層的另一個目錄,必須先收起再展開。由於每層只有一個展開項,收起時只需與同層的節點比較,若它是已打開狀態,就刪除其所有子層:
/**
 與點擊同一層的資料比較,然後刪除要收起的資料並插入要展開的資料
 @param model 點擊的 cell 對應的 model
 @param row   點擊的 indexPath.row,同時對應 _resultArray 的下標
 */
- (void)compareSameLevelWithModel:(OpenTest *)model row:(NSInteger)row {
    NSInteger count = 0;
    NSInteger index = 0;   // 需要收起的起始位置

    // 如果直接遍歷 _resultArray,在 for 迴圈結束之前 _resultArray 會被修改,導致程式崩潰,
    // 所以這裡先做一份副本。
    NSMutableArray *copyArray = [_resultArray mutableCopy];

    for (int i = 0; i < copyArray.count; i++) {
        OpenTest *openModel = copyArray[i];
        if (openModel.level == model.level) {
            // 同一個層次的比較
            if (openModel.isOpen) {
                // 刪除 openModel 所有的下一層
                count = [self deleteObjectWithDataArray:openModel.detailArray count:count];
                index = i;
                openModel.isOpen = NO;
                break;
            }
        }
    }

    // 插入位置在刪除位置之後時,需要減去已刪除的數量
    if (row > index && row > count) {
        row -= count;
    }

    [self addObjectWithDataArray:model.detailArray row:row + 1];
}
介面呈現
系統的 UITableViewCell 無法直接修改 textLabel 的位置,要實現橫向偏移有兩種做法:
1、繼承 UITableViewCell,重寫父類的 - layoutSubviews,在其中調整 textLabel 的 frame。
2、直接在 cell.contentView 上添加一個自訂的 label。
這裡採用第二種:
UITableViewCell *cell = [tableView dequeueReusableCellWithIdentifier:@"Cell"];
if (cell == nil) {
    cell = [[UITableViewCell alloc] initWithStyle:UITableViewCellStyleDefault reuseIdentifier:@"Cell"];
    cell.selectionStyle = UITableViewCellSelectionStyleNone;

    UILabel *label = [[UILabel alloc] initWithFrame:CGRectMake(15, 0, UI_SCREEN_WIDTH / 2, 32)];
    label.font = [UIFont systemFontOfSize:14];
    label.tag  = LabelTag;
    [cell.contentView addSubview:label];
}

for (UIView *view in cell.contentView.subviews) {
    if (view.tag == LabelTag) {
        ((UILabel *)view).text  = model.title;
        ((UILabel *)view).frame = CGRectMake(15 + (model.level - 1) * SpaceWidth, 0, UI_SCREEN_WIDTH / 2, 32);
    }
}
最後在 didSelectRowAtIndexPath 中串起展開與收起的邏輯:
- (void)tableView:(UITableView *)tableView didSelectRowAtIndexPath:(NSIndexPath *)indexPath {
    NSInteger row = indexPath.row;
    OpenTest *model = _resultArray[row];

    if (model.isOpen) {
        // 原來是展開的,現在要收起,則刪除 model.detailArray 中存儲的資料
        [self deleteObjectWithDataArray:model.detailArray count:0];
    } else {
        if (model.detailArray.count > 0) {
            // 原來是收起的,現在要展開,需要先把同層次已展開的收起,再展開自己
            [self compareSameLevelWithModel:model row:row];
        } else {
            // 點擊的是最後一層資料,跳轉到別的介面
            NSLog(@"最後一層");
        }
    }

    model.isOpen = !model.isOpen;

    // 滑動到螢幕頂部
    for (int i = 0; i < _resultArray.count; i++) {
        OpenTest *openModel = _resultArray[i];
        if (openModel.isOpen && openModel.level == 0) {
            // 把點擊的 cell 滑動到螢幕頂部
            NSIndexPath *selectedPath = [NSIndexPath indexPathForRow:i inSection:0];
            [tableView scrollToRowAtIndexPath:selectedPath
                            atScrollPosition:UITableViewScrollPositionTop
                                    animated:YES];
        }
    }

    [tableView reloadData];
}
效果
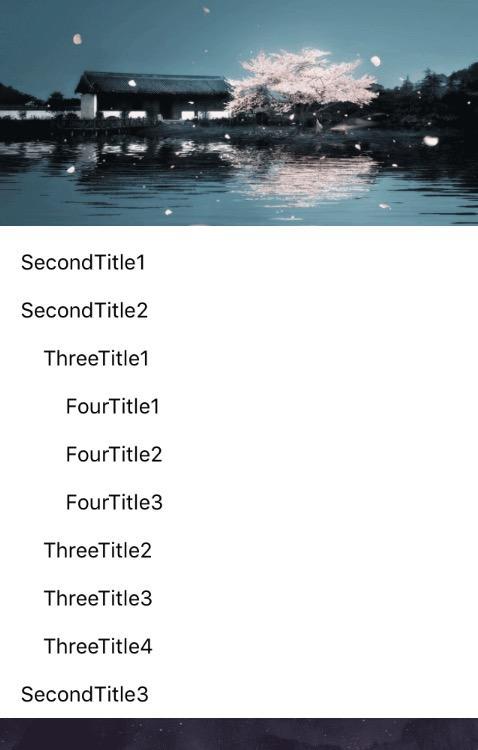
整個方案的關鍵在於:用一維陣列承載樹狀結構的「當前可見快照」,展開即插入、收起即刪除;再透過 level 欄位控制 label 的橫向偏移來表達層級。同時注意兩個實作細節——遍歷時要基於陣列副本操作以免崩潰,以及插入位置在刪除位置之後時必須補回刪除的位移量。
文章轉自 34碼的小孩子的簡書
- 上一篇文章: iOS 開發:用蘋果原生 API 實現二維碼掃描
- 下一篇文章: iOS 10 CallKit 入門:來電辨識與黑名單的簡單應用