
神奇的 load 方法:iOS 初始化的瑞士軍刀
load 方法說明
在 Objective-C 裡,絕大多數類都繼承自根類 NSObject,而它有一個 load 方法,可用於實現初始化操作,原型如下:
+ (void)load
對於加入運行期系統中的每個類(class)及分類(category)來說,此方法必定會被調用,而且只調用一次。當包含類或分類的程序庫載入系統時,它就會執行(通常指應用程序啟動)。若程序是為 iOS 平台設計的,那麼此時必定執行;Mac OS X 應用程序則更自由一些,可以借助「動態加載」(dynamic loading)等特性,等應用啟動後再去加載程序庫。如果分類與其所屬的類都定義了 load,則先調用類裡的,再調用分類裡的。
執行 load 時,運行期系統處於「脆弱狀態」。在執行子類的 load 之前,必定先執行所有超類的 load;若代碼還依賴了其他程序庫,那麼程序庫裡相關類的 load 也必定先執行。
load 方法的妙用
簡化 AppDelegate 類
隨著項目功能的不斷膨脹,越來越多的功能或第三方庫需要在啟動時加載,AppDelegate 便越來越臃腫,結構既不清晰,耦合性也偏強。
改進前:
// 設置 NUI 配置
 [self setNUIConfig];
 // 開啟統計
 [[KSStatisticalMgr sharedInstance] start];
 // 初始化數據庫
 [KSDBUtils startInitDB];
 // 注冊統計平台
 if (!TARGET_IPHONE_SIMULATOR) {
 [[SocialService sharedInstance] registerPlatforms];
 }
 // 檢測服務器狀態
 [[KSServerMgr sharedInstance] doGetServerStatus];
 // 獲取用戶數據
 [USER_MGR updateUserAssets];
 // 啟動圖界面
 KSLaunchVC *splashVC = [[KSLaunchVC alloc] initWithNibName:@"KSLaunchVC" bundle:nil];
 UIWindow *keywindow = [UIApplication sharedApplication].keyWindow;
 [keywindow addSubview:splashVC.view];
 [keywindow bringSubviewToFront:splashVC.view];
 [self.window makeKeyAndVisible];
 // 自適應屏幕鍵盤控件
 IQKeyboardManager * manager = [IQKeyboardManager sharedManager];
 manager.enable = YES;
 manager.shouldResignOnTouchOutside = YES;
 manager.shouldToolbarUsesTextFieldTintColor = YES;
 manager.enableAutoToolbar = YES;
 // 設置首頁
 BYCircleListViewController *homePageVC = [[BYCircleListViewController alloc] init];
 BYNavigationViewController *navVC = [[BYNavigationViewController alloc] initWithRootViewController:homePageVC];
 self.window = [[UIWindow alloc] initWithFrame:[[UIScreen mainScreen] bounds]];
 self.window.backgroundColor = [UIColor whiteColor];
 self.window.rootViewController = navVC;
 [self.window makeKeyAndVisible];
改進後
目錄結構如下:
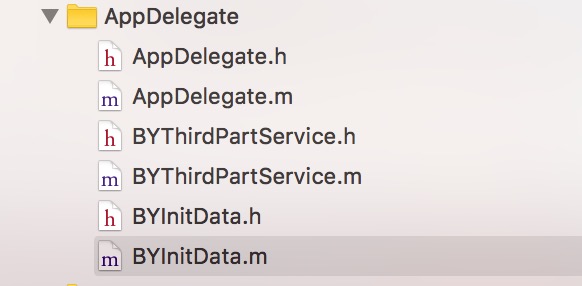
改進後 AppDelegate 目錄
初始化第三方庫 BYThirdPartService.m 的代碼如下:
#import "BYThirdPartService.h"

@implementation BYThirdPartService
+ (void)load{
 static dispatch_once_t onceToken;
 dispatch_once(&onceToken, ^{
 // 設置 NUI 配置
 [self setNUIConfig];
 // 開啟統計
 [self startStatistics];
 // 鍵盤初始化
 [self initKeyboard];
 });
}
// 設置 NUI 配置
- (void)setNUIConfig{
 // 判斷屏幕尺寸
 CGFloat scale = [UIScreen mainScreen].scale;
 int scaleInt = (int)scale;
 NSString *nuiStyleStartName = @"KSDefault";
 NSString *nuiStyleName = @"KSDefault.NUI";
 [NUISettings initWithStylesheet:nuiStyleName];
 if([NUISettings hasProperty:@"translucent" withClass:@"NavigationBar"]) {
 [[UINavigationBar appearance] setTranslucent:[NUISettings getBoolean:@"translucent" withClass:@"NavigationBar"]];
 }
 if ([NUISettings hasProperty:@"tint-color" withClass:@"NavigationBar"]) {
 [[UINavigationBar appearance] setTintColor:[NUISettings getColor:@"tint-color" withClass:@"NavigationBar"]];
 }
}
// 鍵盤初始化
- (void)initKeyboard{
 IQKeyboardManager * manager = [IQKeyboardManager sharedManager];
 manager.enable = YES;
 manager.shouldResignOnTouchOutside = YES;
 manager.shouldToolbarUsesTextFieldTintColor = YES;
 manager.enableAutoToolbar = YES;
}
// 開始統計
- (void)startStatistics{
 [MobClick startWithConfigure:UMConfigInstance];
}
初始化數據 BYInitData.m 的代碼(思路,具體依自身項目實際情況調整):
#import "BYInitData.h"

@implementation BYInitData
+ (void)load{
 static dispatch_once_t onceToken;
 dispatch_once(&onceToken, ^{
 // 初始化數據庫
 [self initDB];
 // 檢測網絡狀態
 [self GetServerStatus];
 // 獲取用戶信息
 [self GetUserinfo];
 });
}
// 初始化數據庫
- (void)initDB{
 [[KSDBHelper sharedInstance] startInitOrUpdate];
}
- (void)GetServerStatus{
 // 檢測網絡狀態
 ...........
}
- (void)GetUserinfo{
 // 獲取用戶信息
 ...........
}
@end
簡化後的 AppDelegate 如下:
#import "AppDelegate.h"
#import "BYCircleListViewController.h"
#import "BYNavigationViewController.h"
// 只需增加相應的兩個頭文件
#import "BYThirdPartService.h"
#import "BYInitData.h"

@implementation AppDelegate
- (BOOL)application:(UIApplication *)application didFinishLaunchingWithOptions:(NSDictionary *)launchOptions {
 // Override point for customization after application launch.
 BYCircleListViewController *homePageVC = [[BYCircleListViewController alloc] init];
 BYNavigationViewController *navVC = [[BYNavigationViewController alloc] initWithRootViewController:homePageVC];
 self.window = [[UIWindow alloc] initWithFrame:[[UIScreen mainScreen] bounds]];
 self.window.backgroundColor = [UIColor whiteColor];
 self.window.rootViewController = navVC;
 [self.window makeKeyAndVisible];
 return YES;
}
當類被引入項目時,runtime 會向每一個類對象發送 load 消息。神奇的 load 方法會在每個類甚至分類被引入時僅調用一次,調用順序是父類優先於子類、子類優先於分類。而且 load 不會被類自動繼承,每個類裡的 load 都不像 viewDidLoad 那樣需要調用父類的方法。
埋點統計
在 iOS 裡,可以在運行時替換兩個方法的實現,達到「勾住」某個方法並注入代碼的目的。具體做法是:重載類的「+(void)load」,在程序加載到內存時利用 Runtime 的 method_exchangeImplementations 等接口把兩個方法的實現互相交換。當方法 M 被調用時,就會被勾住(Hook),執行我們的方法。
這項技術稱為 Method Swizzling,屬於面向切面編程(Aspect-Oriented Programming)的一種實現。
替換兩個方法實現的代碼如下:
#import "BYStatistics.h"
#import

@implementation BYStatistics
+ (void)swizzlingClass:(Class)cls originalSelector:(SEL)originalSelector swizzledSelector:(SEL)swizzledSelector{
 Class class = cls;
 Method originalMethod = class_getInstanceMethod(class, originalSelector);
 Method swizzledMethod = class_getInstanceMethod(class, swizzledSelector);
 BOOL isExistMethod = class_addMethod(class, originalSelector, method_getImplementation(swizzledMethod), method_getTypeEncoding(swizzledMethod));
 if (isExistMethod) {
 class_replaceMethod(class, swizzledSelector, method_getImplementation(originalMethod), method_getTypeEncoding(originalMethod));
 }else {
 method_exchangeImplementations(originalMethod, swizzledMethod);
 }
}
@end
利用神奇的 load 方法統計兩個頁面的展示與離開次數:
#import "UIViewController+Stastistics.h"
#import "BYStatistics.h"

@implementation UIViewController (Stastistics)
+ (void)load {
 static dispatch_once_t onceToken;
 dispatch_once(&onceToken, ^{
 SEL originalSelector = @selector(viewWillAppear:);
 SEL swizzledSelector = @selector(swizzling_viewWillAppear:);
 [BYStatistics swizzlingClass:[self class] originalSelector:originalSelector swizzledSelector:swizzledSelector];
 SEL originalSelector2 = @selector(viewWillDisappear:);
 SEL swizzledSelector2 = @selector(swizzling_viewWillDisappear:);
 [BYStatistics swizzlingClass:[self class] originalSelector:originalSelector2 swizzledSelector:swizzledSelector2];
 });
}
#pragma mark - Method Swizzling
- (void)swizzling_viewWillAppear:(BOOL)animated{
 // 插入需要執行的代碼
 [self inject_viewWillAppear];
 [self swizzling_viewWillAppear:animated];
}
// 利用 hook,統計頁面的停留時間
- (void)inject_viewWillAppear{
 NSString *pageName = [self pageEventName:YES];
 if (pageName) {
 // 統計代碼
 }
}
- (void)swizzling_viewWillDisappear:(BOOL)animated{
 [self inject_viewWillDisappear];
 [self swizzling_viewWillDisappear:animated];
}
- (void)inject_viewWillDisappear {
 NSString *pageName = [self pageEventName:YES];
 if (pageName) {
 // 統計代碼
 }
}
@end
load 方法與 initialize 方法
NSObject 的 load 和 initialize 都用來實現初始化操作。
load 方法
對於加入運行期系統中的每個類及分類,它必定被調用,且僅一次;當包含類或分類的程序庫載入系統時執行,這通常就是應用啟動之時,若程序為 iOS 平台設計則必定執行。若分類與所屬類都定義了 load,先調類、再調分類;執行子類 load 前,必定先執行所有超類的 load,若依賴了其他程序庫,其相關類的 load 也必定先執行。整個應用執行 load 的過程都會阻塞。
initialize 方法
它是「惰性」調用的——只有當程序用到相關類時才會調用。因此若某個類一直沒被使用,其 initialize 就一直不會運行,也就等於說應用無須先把每個類的 initialize 都跑一遍。
注意事項
與其他方法不同,load 方法不參與覆寫機制。
load 方法實現得精簡一些,有助於保持應用程序的響應能力。
如有寫得不到位之處,歡迎在評論區指正,謝謝!
- 上一篇文章: SQLite3 性能深度剖析與優化實踐
- 下一篇文章: 源碼精選:自定義時間軸與一款優雅的搜索控制器