
NSTimer 你真的用對了嗎?五個容易踩的坑
看到標題也許你會想:NSTimer 不就是個定時器,誰不會用?那先回答幾個問題——你知道 NSTimer 會 retain 你傳入的 target 嗎?你知道它必須加入 runloop 才會生效嗎?你知道它並不會精確按你指定的時刻觸發嗎?你知道即使加進了 runloop,它也可能不按你想象的方式執行嗎?
如果上面幾條你不是每條都清楚,建議把下面五節看完,每一節都配有可驗證的例子。
一、NSTimer 是什麼
官方定義:計時器提供一種延遲執行或週期性執行的方式,它等待指定的時間間隔過去之後觸發,向指定對象發送指定消息。翻成人話:NSTimer 是一個能在未來某個時刻執行一次、或按週期反覆執行指定方法的對象。
二、NSTimer 與 target 之間發生了什麼
計時器要在未來某個時刻調用你的方法,那就必須保證那個時刻方法接收者仍然有效。系統的解決方式很直接:對 target 做一份 retain。無論一次性還是重複性 timer 都會 retain target,兩者的區別在於——一次性 timer 觸發後會自動 invalidate 自己,而重複性 timer 會一直存活,直到你顯式調用 invalidate。
自定義一個測試對象:
// SvTestObject.m
#import "SvTestObject.h"

@implementation SvTestObject

- (id)init {
    self = [super init];
    if (self) {
        NSLog(@"instance %@ has been created!", self);
    }
    return self;
}

- (void)dealloc {
    NSLog(@"instance %@ has been dealloced!", self);
    [super dealloc];
}

- (void)timerAction:(NSTimer *)timer {
    NSLog(@"Hi, Timer Action for instance %@", self);
}

@end
// SvTestObject.h
#import <Foundation/Foundation.h>

@interface SvTestObject : NSObject
/* @brief timer 響應函數,僅用於測試 */
- (void)timerAction:(NSTimer *)timer;
@end
然後分別測試兩種 timer:
- (void)testNonRepeatTimer {
    NSLog(@"Test retain target for non-repeat timer!");
    SvTestObject *testObject = [[SvTestObject alloc] init];
    [NSTimer scheduledTimerWithTimeInterval:5 target:testObject
                                   selector:@selector(timerAction:) userInfo:nil repeats:NO];
    [testObject release];
    NSLog(@"Invoke release to testObject!");
}

- (void)testRepeatTimer {
    NSLog(@"Test retain target for repeat timer");
    SvTestObject *testObject2 = [[SvTestObject alloc] init];
    [NSTimer scheduledTimerWithTimeInterval:5 target:testObject2
                                   selector:@selector(timerAction:) userInfo:nil repeats:YES];
    [testObject2 release];
    NSLog(@"Invoke release to testObject2!");
}
一次性 timer 的輸出:

可以看到,53:58 就對測試對象執行了 release,但直到 54:03 timer 觸發完方法,對象才真正 dealloc。這說明一次性 timer 同樣 retain 了 target,並保持到自身失效為止。
重複性 timer 的輸出:

它會一直週期性調用指定方法,而測試對象始終沒有被釋放。
結論:timer 對 target 的 retain 保證了調用正確性,但也引入了內存管理問題。對重複性 timer 而言,被引用的對象會一直存活,直接造成洩露。解決手段就是 invalidate——無論哪種 timer,執行完 invalidate 後都會變成無效,因此重複性 timer 必須有對應的 invalidate。
順手說一種自欺欺人的寫法,我以前也這麼寫過:
// 這種在 dealloc 中 invalidate 的做法是自欺欺人:
// timer retain 了 self,只要 timer 有效,self 的引用計數就不會歸零
- (id)init {
    self = [super init];
    if (self) {
        _timer = [NSTimer scheduledTimerWithTimeInterval:1 target:self
                                               selector:@selector(testTimer:)
                                                 userInfo:nil repeats:YES];
    }
    return self;
}

- (void)dealloc {
    [_timer invalidate];   // 永遠執行不到
    [super dealloc];
}
三、NSTimer 會準時觸發嗎
不會。NSTimer 不是實時機制,實際觸發時刻與預期可能有出入,有時差距還不小。原因在于它依賴 runloop 的調度:多線程環境下各線程分時執行,而你的 timer 只掛在某個線程的某個特定 mode 上。
假設設置 2 秒後觸發,但那一刻當前線程正在跑一段連續運算(比如大數據塊處理),timer 就會被推遲到運算結束。對重複性 timer 來說,如果延遲超過了一個週期,多次觸發會被合並為一次;但無論延遲多離譜,後續的觸發時刻始終是初始間隔的整數倍。
原文表述得很清楚:重複性 timer 是按「預定觸發時間」而非「實際觸發時間」來重排下一次的。也就是說,即使實際觸發被推遲,時間表並不會整體平移;若推遲跨過了若干個預定點,那段時間內只會觸發一次,之後仍按原時間表繼續。
// 模擬線程繁忙
- (void)applicationDidBecomeActive:(UIApplication *)application {
    SvTestObject *testObject2 = [[SvTestObject alloc] init];
    [NSTimer scheduledTimerWithTimeInterval:1 target:testObject2
                                   selector:@selector(timerAction:) userInfo:nil repeats:YES];
    [testObject2 release];

    NSLog(@"Simulate busy");
    [self performSelector:@selector(simulateBusy) withObject:nil afterDelay:3];
}

- (void)simulateBusy {
    NSLog(@"start simulate busy!");

    NSUInteger caculateCount = 0x0FFFFFFF;
    CGFloat uselessValue = 0;
    for (NSUInteger i = 0; i < caculateCount; ++i) {
        uselessValue = i / 0.3333;
    }

    NSLog(@"finish simulate busy!");
}
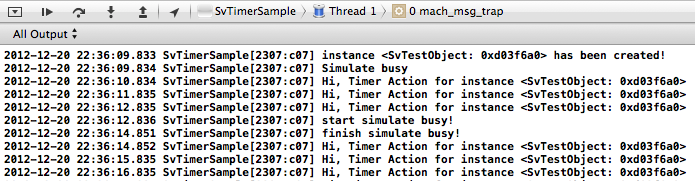
輸出顯示:線程空閒時觸發相當準時;36:12 開始線程忙於大量運算,直到 36:14 才結束,這段時間跨過了一個以上週期,但 timer 並沒有連著補發兩次,只觸發了一次。而線程空閒之後,後續觸發時刻依然落在初始間隔的整數倍上。這從側面證明:觸發延遲不會導致時間表整體偏移。
四、為什麼必須加入 RunLoop
我們常用的便利方法 scheduledTimerWithTimeInterval:... 其實做了兩件事:創建 timer,並把它加入當前 runloop 的 default mode。這正是「創建了就生效」這種錯覺的來源。你完全可以自己創建,再手動加入指定 runloop 的指定 mode。
從多線程的角度理解就很自然:runloop 是事件資源的宿主,任何 source 要起作用都得掛到 runloop 上;timer 也是一種資源,同樣如此。反過來,如果一個 runloop 上不存在任何 source 或 timer,它一啟動就會立刻退出。
那主線程的 runloop 我們從沒添加過資源,為什麼一直健在?我們不加,不代表框架沒加——打印一下主線程的 runloop,你會看到裡面掛著不少東西。
- (void)testTimerWithOutShedule {
    NSLog(@"Test timer without shedult to runloop");

    SvTestObject *testObject3 = [[SvTestObject alloc] init];

    NSTimer *timer = [[NSTimer alloc] initWithFireDate:[NSDate dateWithTimeIntervalSinceNow:1]
                                              interval:1
                                                target:testObject3
                                              selector:@selector(timerAction:)
                                              userInfo:nil
                                               repeats:NO];
    [testObject3 release];
    NSLog(@"invoke release to testObject3");
}
這個 timer 有合法的 target 與 selector,也指定了 1 秒後觸發,但運行後你會發現回調永遠不來——因為它沒有被加入任何 runloop。
五、已加入 RunLoop 卻遲遲不觸發
原因一:runloop 沒有運行。每個線程都有自己的 runloop,主線程的會自動啟動,但你自己新建的線程不會。用到它時必須手動跑起來。
// 測試把 timer 加到不運行的 runloop 上
- (void)testTimerSheduleToRunloop1 {
    NSAutoreleasePool *pool = [[NSAutoreleasePool alloc] init];

    NSLog(@"Test timer shedult to a non-running runloop");

    SvTestObject *testObject4 = [[SvTestObject alloc] init];
    NSTimer *timer = [[NSTimer alloc] initWithFireDate:[NSDate dateWithTimeIntervalSinceNow:1]
                                              interval:1
                                                target:testObject4
                                              selector:@selector(timerAction:)
                                              userInfo:nil
                                               repeats:NO];

    [[NSRunLoop currentRunLoop] addTimer:timer forMode:NSDefaultRunLoopMode];

    // 打開此行可看到 timer 確實已被加入
    // NSLog(@"the thread's runloop: %@", [NSRunLoop currentRunLoop]);

    // 打開此行,該線程的 runloop 才會真正運行,timer 才會生效
    // [[NSRunLoop currentRunLoop] runUntilDate:[NSDate dateWithTimeIntervalSinceNow:3]];

    [testObject4 release];
    NSLog(@"invoke release to testObject4");
    [pool release];
}

示例中 timer 確實添加進了子線程的 runloop,但直到線程退出都沒有觸發;把 runUntilDate: 那行註釋去掉後,它就會正常調用。
原因二:mode 不匹配。添加 timer 時要指定 runloop mode,而同一線程的 runloop 在任意時刻只能處於一種 mode。只有當程序正處於該 mode 時,timer 才有機會被觸發。
這是列表滑動時 timer 突然「卡住」的根本原因:UIScrollView 跟手拖動期間,runloop 切換到 UITrackingRunLoopMode,掛在 NSDefaultRunLoopMode 上的 timer 就暫時停擺。解法是把 timer 同時加入這兩個 mode:
[[NSRunLoop currentRunLoop] addTimer:timer forMode:NSDefaultRunLoopMode];
[[NSRunLoop currentRunLoop] addTimer:timer forMode:UITrackingRunLoopMode];
打個不太嚴肅的比方:兄弟幾個各代表一種 mode,timer 是你手上的水桶,只有一個水龍頭。同一時刻只能有一人在接水——桶給了老二,但還沒輪到它,你就只能等。
補充:block 版本與現代替代方案
從 iOS 10 起,Apple 提供了 scheduledTimerWithTimeInterval:repeats:block:,回調以 block 形式給出,能避免 target-action 帶來的 retain 問題,新項目應優先使用。
另外值得記住兩點:一是 GCD 的 dispatch_source_t 計時器精度更高、也不會 retain target,適合高性能場景;二是 performSelector 系列(如 performSelector:withObject:afterDelay:)本質上也是基於 runloop 的定時器,同樣有 mode 問題,並且會 retain 參數對象。
- 上一篇文章: 上手 Touch Bar:用 Objective-C 寫一個菜單列小工具
- 下一篇文章: NAT64 網路下合成 IPv6 位址的實作思路