
用蘋果自帶地圖實作定位與周邊搜尋(含大頭針下落動畫)
在受限的網路環境下,很多國外服務無法正常存取。若做的應用要兼顧海內外,地圖這一塊往往最麻煩:要麼國外地圖加國內地圖雙軌,要麼就乾脆全用蘋果自帶地圖。本文示範後者:取得使用者當前位置、搜尋周邊資訊,並在拖動地圖時讓中央指針保持不動,放手後播放下落定位動畫並更新內容。部分功能需真機才能看到效果。
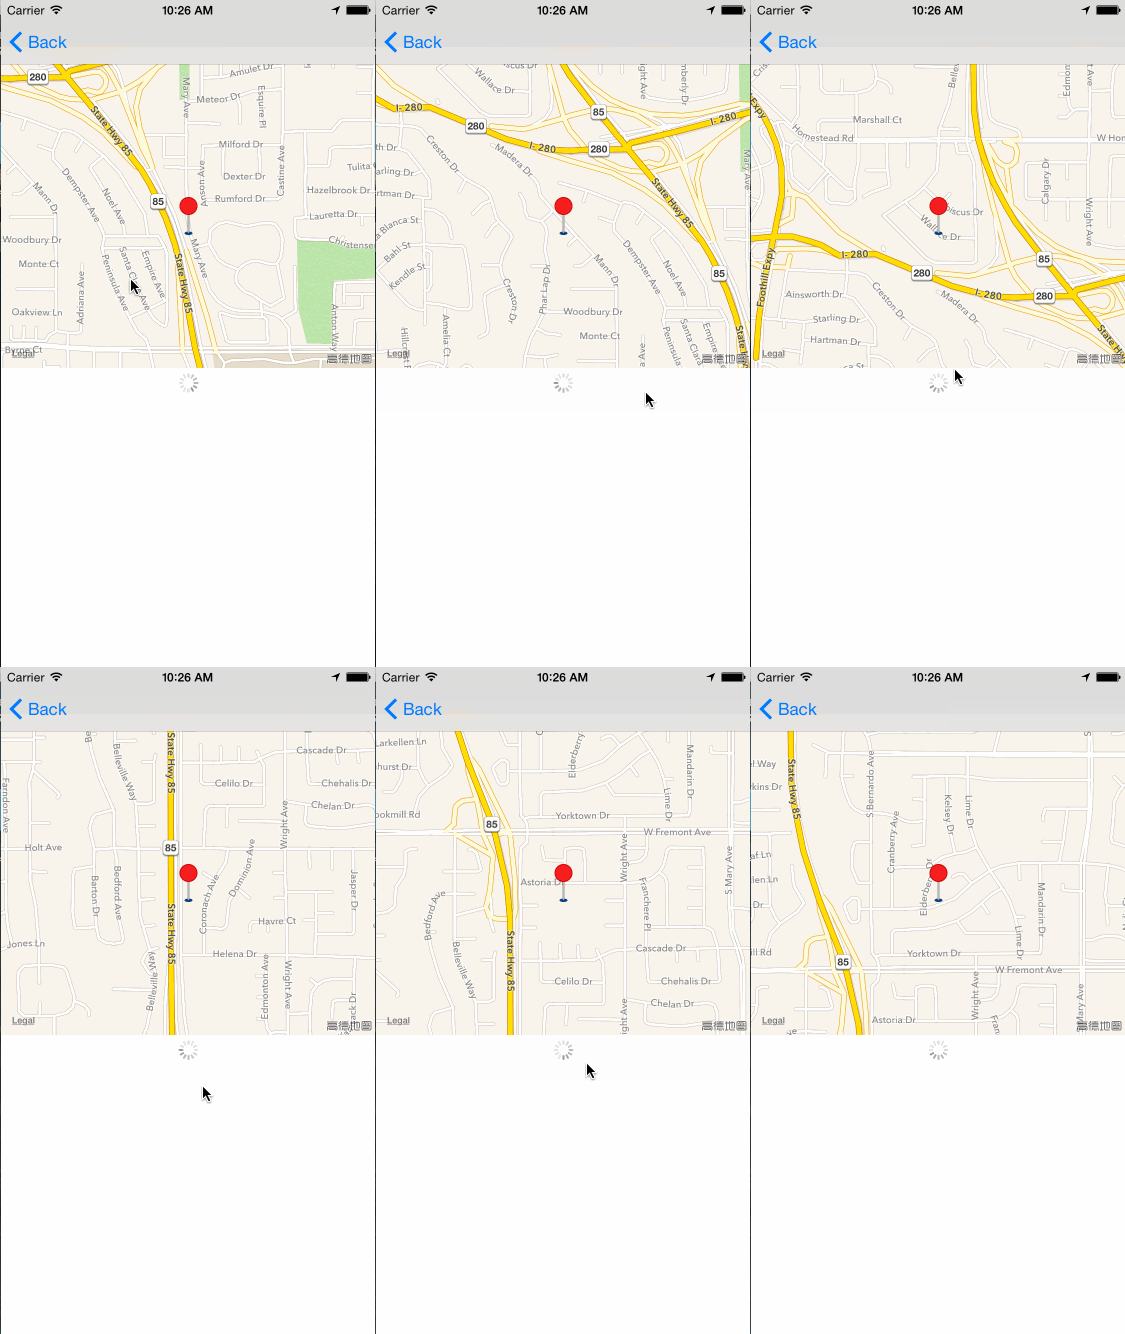
先看成品:下面的 GIF 是在模擬器錄製的,由於模擬器無法取得周邊資訊,所以一直在轉圈;實際效果請用真機確認。
實作步驟
先加入 MapKit.framework,然後打開地圖顯示與使用者定位。

模擬器效果如下。

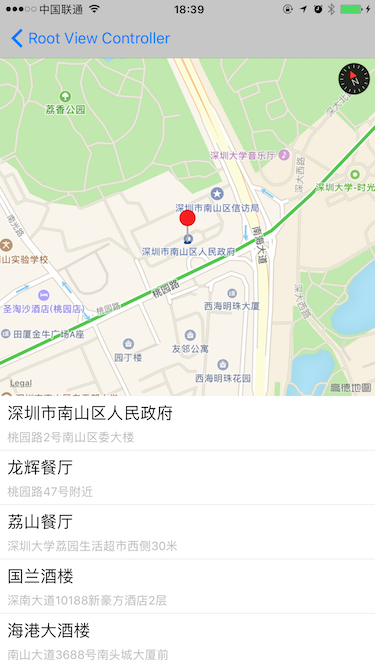
真機截圖如下。
1. 定位完成後,在地圖正中放一個固定指針
- (void)mapView:(MKMapView *)mapView
    didUpdateUserLocation:(MKUserLocation *)userLocation {
    if (!haveGetUserLocation) {
        if (self.mapView.userLocationVisible) {
            haveGetUserLocation = YES;
            [self getAddressByLatitude:userLocation.coordinate.latitude
                             longitude:userLocation.coordinate.longitude];
            [self addCenterLocationViewWithCenterPoint:self.mapView.center];
        }
    }
}

- (void)addCenterLocationViewWithCenterPoint:(CGPoint)point {
    if (!imgView) {
        imgView = [[UIImageView alloc]
            initWithFrame:CGRectMake([UIScreen mainScreen].bounds.size.width / 2,
                                     100, 18, 38)];
        imgView.image = [UIImage imageNamed:@"map_location"];
        imgView.center = self.mapView.center;   // 永遠釘在正中
        [self.view addSubview:imgView];
    }
}
2. 搜尋周邊資訊:MKLocalSearch
官方文件說明得很明白:MKLocalSearch 物件負責發起一次以地圖為基礎的搜尋,並非同步把結果交回;而且每個搜尋物件只設計用來執行一次搜尋,要搜不同類型就得分別建立多個實例。
例如搜尋方圓 100 公尺內的餐廳:
MKCoordinateRegion region =
    MKCoordinateRegionMakeWithDistance(coordinate, 100, 100);

MKLocalSearchRequest *request = [[MKLocalSearchRequest alloc] init];
request.region = region;
request.naturalLanguageQuery = @"Restaurants";

MKLocalSearch *localSearch = [[MKLocalSearch alloc] initWithRequest:request];
[localSearch startWithCompletionHandler:^(MKLocalSearchResponse *response,
                                          NSError *error) {
    if (!error) {
        // 處理 response.mapItems
    } else {
        // 處理錯誤
    }
}];
naturalLanguageQuery 就是搜尋關鍵字。實測可用的關鍵字包括 cafe、supermarket、village、Community、Shop、Restaurant、School、hospital、Company、Street、Convenience store、Shopping Centre、Place names、Hotel、Grocery store 等,每個關鍵字最多回傳 10 筆,若目前範圍內無結果,系統會自動擴大搜尋範圍。
因此若想盡量列出周邊所有相關地點,比較可靠的做法是:把能想到的關鍵字都跑一遍,再用經緯度做距離比較、篩出真正落在範圍內的結果。另外要注意資料本身的覆蓋率問題,很多位置其實查不到——如果只需要支援國內,用百度或騰訊地圖會輕鬆太多。
3. 以經緯度反查地址
CLLocation *location = [[CLLocation alloc] initWithLatitude:latitude
                                                  longitude:longitude];
[geocoder reverseGeocodeLocation:location completionHandler:^(NSArray *placemarks,
                                                             NSError *error) {
    if (!error) {
        dispatch_async(dispatch_get_main_queue(), ^{
            // 更新 UI
        });
    } else {
        // 處理錯誤
    }
}];
4. 大頭針下落動畫
imgView.center = CGPointMake(mapCenter.x, mapCenter.y - 15);

[UIView animateWithDuration:0.2 animations:^{
    imgView.center = mapCenter;
} completion:^(BOOL finished) {
    if (finished) {
        [UIView animateWithDuration:0.05 animations:^{
            imgView.transform = CGAffineTransformMakeScale(1.0, 0.8);
        } completion:^(BOOL finished) {
            if (finished) {
                [UIView animateWithDuration:0.1 animations:^{
                    imgView.transform = CGAffineTransformIdentity;
                }];
            }
        }];
    }
}];
思路是把三段動畫串起來:先落下,再壓扁模擬落地緩衝,最後彈回原狀。
5. 判斷使用者是否真的拖動了地圖
MKMapViewDelegate 提供了滑動結束後的回呼:
- (void)mapView:(MKMapView *)mapView regionDidChangeAnimated:(BOOL)animated
問題是這個回呼在「地圖顯示區域改變後」才觸發,所以首次初始化並定位到使用者位置時,它會被連續呼叫,很難分辨究竟是不是使用者拖動。這裡提供兩種解法。
方法一:攔觸碰事件。思路和處理 UIScrollView 一樣——繼承 MKMapView,重寫一組 touches 方法,並把事件繼續往下傳。
@implementation ZHMapView

- (void)touchesBegan:(NSSet *)touches withEvent:(UIEvent *)event {
    [super touchesBegan:touches withEvent:event];
    [[self nextResponder] touchesBegan:touches withEvent:event];
}

- (void)touchesMoved:(NSSet *)touches withEvent:(UIEvent *)event {
    [super touchesMoved:touches withEvent:event];
    [[self nextResponder] touchesMoved:touches withEvent:event];
}

- (void)touchesEnded:(NSSet *)touches withEvent:(UIEvent *)event {
    [super touchesEnded:touches withEvent:event];
    [[self nextResponder] touchesEnded:touches withEvent:event];
}

- (void)touchesCancelled:(NSSet *)touches withEvent:(UIEvent *)event {
    [super touchesCancelled:touches withEvent:event];
    [[self nextResponder] touchesCancelled:touches withEvent:event];
}
@end方法二:從視圖層級下手。先印出 mapView 的子視圖結構,會發現有個名為 _MKMapContentView 的內部視圖,其 gestureRecognizers 裡藏著平移手勢。
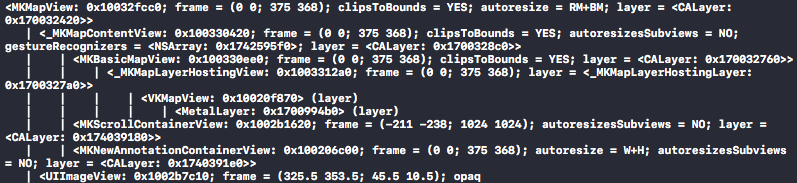
for (UIView *view in self.mapView.subviews) {
    if ([NSStringFromClass([view class]) isEqualToString:@"_MKMapContentView"]) {
        for (UIGestureRecognizer *gesture in view.gestureRecognizers) {
            if ([gesture isKindOfClass:[UIPanGestureRecognizer class]]) {
                [gesture addTarget:self action:@selector(mapViewSpanGesture:)];
            }
        }
    }
}
這種做法依賴私有視圖名稱,好處是精準,風險是系統版本更新後可能失效,上線前務必自行驗證。
6. 載入中的轉圈提示
把 UIActivityIndicatorView 塞進 tableHeaderView,原理和分頁載入時在頂部放菊花一樣。
- (void)resetTableHeadView {
    if (infoArray.count > 0) {
        self.showTableView.tableHeaderView = nil;
    } else {
        UIView *view = [[UIView alloc]
            initWithFrame:CGRectMake(0, 0,
                [UIScreen mainScreen].bounds.size.width, 30.0)];
        view.backgroundColor = self.showTableView.backgroundColor;

        UIActivityIndicatorView *indicator =
            [[UIActivityIndicatorView alloc]
                initWithActivityIndicatorStyle:UIActivityIndicatorViewStyleGray];
        indicator.center = view.center;
        [indicator startAnimating];
        [view addSubview:indicator];

        self.showTableView.tableHeaderView = view;
    }
}
下載
完整專案已放在 GitHub,需要的可以直接取用。