
iOS 10 通知系統大改造:UserNotifications 框架完整解析
iOS 10 把過去散落各處、雜亂無章的電話通知相關 API 一次收攏,開發者現在可以透過獨立的 UserNotifications.framework 集中管理系統通知的各項能力。在此之上,蘋果還一口氣補上了撤回單條通知、更新已展示通知、展示途中修改內容、在通知裡嵌入圖片與影片、自訂通知 UI 等一系列新功能。
對開發者而言,這不只是加了幾個方法,而是 SDK 層級的一次徹底重構——舊有的絕大部分通知 API 都已被標記為 deprecated。本文先回顧通知體系的演進脈絡,再透過實例說明新框架能做些什麼、又該怎麼用。
延伸閱讀建議:WWDC 16 的 Introduction to Notifications 與 Advanced Notifications 兩場 Session、UserNotifications 官方文件,以及範例專案 UserNotificationDemo。
通知的歷史與現狀
行動裝置的使用高度碎片化,用戶期待隨手拿起手機就能吸收資訊、處理事務,而通知正是在關鍵事件發生時把用戶拉回來的手段。做得好的通知能放大應用的價值、提升活躍度,因此不論蘋果還是第三方開發者都對它極為重視。
理想很豐滿,現實卻很骨感。自 iOS 3 引入 Push Notification 之後,幾乎每個版本蘋果都在往這塊加東西:
- iOS 3——引入推送通知:UIApplication 的 registerForRemoteNotificationTypes,以及 UIApplicationDelegate 的 application(_:didRegisterForRemoteNotificationsWithDeviceToken:)、application(_:didReceiveRemoteNotification:)
- iOS 4——引入本地通知:scheduleLocalNotification、presentLocalNotificationNow:、application(_:didReceive:)
- iOS 5——加入通知中心頁面
- iOS 6——通知中心可與 iCloud 同步
- iOS 7——後台靜默推送 application(_:didReceiveRemoteNotification:fetchCompletionHandler:)
- iOS 8——重新設計通知權限請求、Actionable 通知:registerUserNotificationSettings(_:)、UIUserNotificationAction、UIUserNotificationCategory、application(_:handleActionWithIdentifier:forRemoteNotification:completionHandler:) 等
- iOS 9——Text Input action、基於 HTTP/2 的推送請求 UIUserNotificationActionBehavior、全新 Provider API
有點暈,對吧?一個開發者很難在不翻文件的情況下說清 application(_:didReceiveRemoteNotification:) 和 application(_:didReceiveRemoteNotification:fetchCompletionHandler:) 的差別;新人也搞不懂 registerForRemoteNotificationTypes 與 registerUserNotificationSettings(_:) 之間是什麼關係。Remote 與 Local Notification 除了初始化方式之外那些細微差異同樣惱人,更何況大量 API 被隨意塞進 UIApplication 或 UIApplicationDelegate。
此外,應用在前台時遠程推送無法直接顯示,必須先攔下通知、再自己發一則本地通知繞一圈;而應用執行中與未執行時,接收通知的路徑居然還不一致。這些問題固然有歷史包袱,但混亂的組織方式確實讓 iOS 通知開發長期與「愉快」二字無緣,甚至頗有幾分壞味道。
另一方面,當時的通知能力也相對原始:本地或遠程發出、然後展示給用戶,就這麼多。iOS 8、9 雖然加入了按鈕與文字輸入互動,但已發出的通知無法更新,內容在送出那一刻就被鎖死,而且只能承載簡單文字。想在這個盤根錯節的基礎上擴充功能,只會讓 API 更加難以理解。
iOS 10 新增的 UserNotifications 框架,可以說是 iOS SDK 迄今規模最大的一次重構:通知功能被抽到獨立框架,通知不再區分本地與遠程,而擁有了更一致的行為模型。接下來就由淺入深拆解它。
UserNotifications 框架解析
基本流程
iOS 10 中通知相關的操作大致遵循下面的流程:

先向用戶申請推送權限,然後送出通知。若此時應用位於後台或未執行,系統會依用戶允許的形式(彈窗、橫幅或通知中心)呈現;若應用正在前台執行,要不要顯示則由你決定。最後,如果你希望用戶點擊通知後能觸發「打開應用」以外的行為,也得自己攔下處理。
權限申請
通用權限
iOS 8 之前,本地推送(UILocalNotification)與遠程推送是兩套邏輯,只有遠程推送需要征求用戶同意。iOS 8 把這件事統一了——因為在用戶眼中,兩者都是「打斷我」的行為,沒有理由差別待遇。iOS 10 則進一步抹平了本地與遠程通知的界線。申請權限的寫法非常直觀:
UNUserNotificationCenter.current().requestAuthorization(options: [.alert, .sound, .badge]) {
    granted, error in
    if granted {
        // 用戶允許發送通知
    }
}
使用 UN 開頭的 API 時,別忘了先引入框架:
import UserNotifications
第一次呼叫時,系統會跳出授權彈窗:
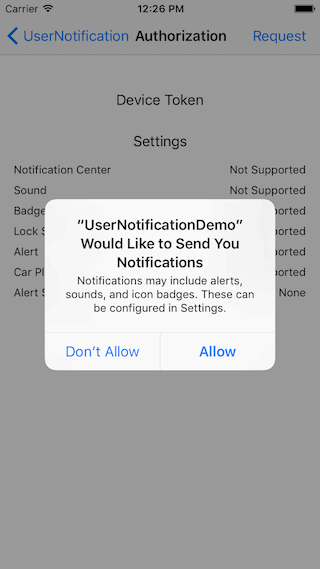
這裡有個殘酷的細節:用戶一旦拒絕,之後再呼叫也「不會」再彈窗,想收到通知就得用戶自己跑進系統設定翻出你的應用打開開關。除非你的應用是殺手級產品,否則別指望用戶會在琳瑯滿目的 app 列表裡把你找出來。因此,在合適的時機彈出請求、並在彈窗前先鋪陳價值,是開發者與產品經理都該修的一門課。比起啟動時就粗暴彈窗,耐心引導明智得多。
遠程推送
拿到授權後就能發送本地通知了。若要走伺服器推送,還要多一步:取得用戶 token。你的伺服器帶著這個 token 向 APNs 提交請求,APNs 再依 token 找到對應的設備與應用,把通知送達。
值得一提的是,請求 token 與接收 token 回呼,是「唯二」還留在舊體系、沒有搬進新框架的 API。我們用 UIApplication 的 registerForRemoteNotifications 註冊,再在 AppDelegate 中收 token:
// 向 APNs 請求 token
UIApplication.shared.registerForRemoteNotifications()

// AppDelegate.swift
func application(_ application: UIApplication,
                 didRegisterForRemoteNotificationsWithDeviceToken deviceToken: Data) {
    let tokenString = deviceToken.hexString
    print("Get Push token: \(tokenString)")
}
取回的 deviceToken 是 Data 型別,為了便於傳遞,實務上通常轉成字串。Swift 3 可以靠這段 Data 擴充完成轉換:
extension Data {
    var hexString: String {
        return withUnsafeBytes { (bytes: UnsafePointer) -> String in
            let buffer = UnsafeBufferPointer(start: bytes, count: count)
            return buffer.map { String(format: "hhx", $0) }.reduce("", { $0 + $1 })
        }
    }
}
查詢目前權限設定
用戶可以在系統設定裡細粒度地調整你的通知權限,例如只允許橫幅、不允許彈窗。一般來說你不該干涉用戶的選擇,但若你的業務確實依賴某種呈現方式,可以主動查一下:
UNUserNotificationCenter.current().getNotificationSettings {
    settings in
    print(settings.authorizationStatus)  // .authorized | .denied | .notDetermined
    print(settings.badgeSetting)         // .enabled | .disabled | .notSupported
    // 其他項目同理
}
這部分的完整示範可參考 Demo 中的 AuthorizationViewController。
發送通知
UserNotifications 把通知統一建模:用通知內容(UNNotificationContent)、送出的時機(UNNotificationTrigger),加上一個字串標識符,組成一張 UNNotificationRequest,再把這張請求交給 UNUserNotificationCenter.current(),剩下的就等通知送達。
// 1. 建立通知內容
let content = UNMutableNotificationContent()
content.title = "Time Interval Notification"
content.body = "My first notification"

// 2. 建立觸發時機
let trigger = UNTimeIntervalNotificationTrigger(timeInterval: 5, repeats: false)

// 3. 請求標識符
let requestIdentifier = "com.onevcat.usernotification.myFirstNotification"

// 4. 組裝請求並送出
let request = UNNotificationRequest(identifier: requestIdentifier, content: content, trigger: trigger)
UNUserNotificationCenter.current().add(request) { error in
    if error == nil {
        print("Time Interval Notification scheduled: \(requestIdentifier)")
    }
}
幾個值得注意的點:
(1)通知可以標題化。iOS 10 的通知不再只有一行文字,你可以加上 title 與 subtitle,用粗體強調重點。iOS 10 之前,純文字推送的 payload 長這樣:
{
  "aps": {
    "alert": "Test",
    "sound": "default",
    "badge": 1
  }
}
若要加上標題與副標題,得把 alert 從字串換成字典:
{
  "aps": {
    "alert": {
      "title": "I am title",
      "subtitle": "I am subtitle",
      "body": "I am body"
    },
    "sound": "default",
    "badge": 1
  }
}
好消息是,字典寫法早在 iOS 8.2 就存在了(當時 title 主要給 Apple Watch 用),因此向 iOS 10 加標題時,前向相容性是有保障的。若要本地化,本地通知可用 String.localizedUserNotificationString(forKey:arguments:) 從 Localizable.strings 取字串;遠程推送則可在 alert 中使用 loc-key 或 title-loc-key 指定。
(2)觸發器只對本地通知有意義。遠程推送預設收到即顯示。新框架提供三種觸發器:延時觸發的 UNTimeIntervalNotificationTrigger、指定日期時間的 UNCalendarNotificationTrigger,以及進入/離開地理區域時觸發的 UNLocationNotificationTrigger。
(3)標識符是通知的「身分證」。有了它,你就能對已送出的請求進行取消或更新,後文會再展開。
(4)蘋果借用了網路請求的概念。我們組裝並送出請求,交給 UNUserNotificationCenter 處理,再於 delegate 中收到對應的 response;同時也有機會在 extension 中攔下 request 做加工。
送出請求後鎖屏或把應用切到背景,時間一到,通知就會出現在通知中心或橫幅上:
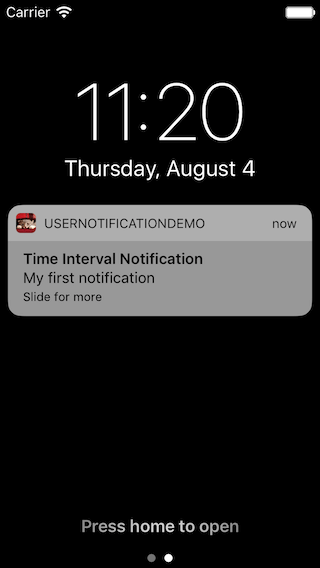
最基礎的發送範例可參考 Demo 中的 TimeIntervalViewController。
取消與更新
iOS 10 之前,我們幾乎無法取消某一則特定通知,也不能主動移除或更新已展示的內容。試想推送帳戶餘額變動:連續幾次增減會讓用戶困惑「到底哪一則才算準」;再想像推送比賽比分,頻繁的通知會讓通知中心爆量,而中途的比數對用戶多半只是噪音。
有了標識符,新框架讓你能做到四件事:
- 取消尚未展示的通知
- 更新尚未展示的通知
- 移除已展示的通知
- 更新已展示的通知
關鍵就在於「沿用同一個標識符」。例如把一則已展示的通知從通知中心移除:
let trigger = UNTimeIntervalNotificationTrigger(timeInterval: 3, repeats: false)
let identifier = "com.onevcat.usernotification.notificationWillBeRemovedAfterDisplayed"
let request = UNNotificationRequest(identifier: identifier, content: content, trigger: trigger)
UNUserNotificationCenter.current().add(request) { error in
    if error != nil {
        print("Notification request added: \(identifier)")
    }
}
delay(4) {
    print("Notification request removed: \(identifier)")
    UNUserNotificationCenter.current().removeDeliveredNotifications(withIdentifiers: [identifier])
}
取消尚未送出的請求則改用 removePendingNotificationRequests。至於更新,無論是否已展示,做法都和最初送出時一樣——用相同標識符再送一次即可:
UNUserNotificationCenter.current().add(request) { error in
    if error != nil { print("Notification request added: \(identifier)") }
}
delay(2) {
    let newTrigger = UNTimeIntervalNotificationTrigger(timeInterval: 1, repeats: false)
    // 用相同 identifier 再送一次,即完成更新
    let newRequest = UNNotificationRequest(identifier: identifier, content: newContent, trigger: newTrigger)
    UNUserNotificationCenter.current().add(newRequest) { error in
        if error != nil { print("Notification request updated: \(identifier)") }
    }
}
遠程推送同樣能更新:使用 Provider API 向 APNs 提交請求時,在 HTTP/2 header 中設定 apns-collapse-id,反覆推送同一 collapse id 的通知即為更新。
對應本地的 removeDeliveredNotifications,目前還無法用類似手法向 APNs 發出帶 collapse id 的 DELETE 請求來刪除已展示的推送——APNs 並不接受 DELETE。技術上蘋果應該沒有障礙,值得期待。現階段若想消掉一則遠程推送,可以走後台靜默推送,在本地發起刪除呼叫。
通知管理的示範可參考 Demo 中的 ManagementViewController。測試遠程推送時,通常會借助第三方工具,Knuff 就是其中一個選擇;作者也為它補上了 apns-collapse-id 支援,有興趣可查閱相關 fork 或 pull request。
處理通知
在應用內展示通知
系統已經能在應用位於背景或已退出時展示通知,但應用在前台時收到的通知預設不顯示。若你希望在 foreground 也呈現,實作 UNUserNotificationCenterDelegate 的對應方法即可:
class NotificationHandler: NSObject, UNUserNotificationCenterDelegate {
    func userNotificationCenter(_ center: UNUserNotificationCenter,
                                willPresent notification: UNNotification,
                                withCompletionHandler completionHandler: @escaping (UNNotificationPresentationOptions) -> Void) {
        completionHandler([.alert, .sound])
        // 若不想顯示某則通知,傳入空選項即可:
        // completionHandler([])
    }
}
實作之後,把它的實例掛到 UNUserNotificationCenter 的 delegate 上。沒有特別理由的話,AppDelegate 的 application(_:didFinishLaunchingWithOptions:) 就是個合適的位置:
class AppDelegate: UIResponder, UIApplicationDelegate {
    let notificationHandler = NotificationHandler()
    func application(_ application: UIApplication,
                     didFinishLaunchingWithOptions launchOptions: [NSObject: AnyObject]?) -> Bool {
        UNUserNotificationCenter.current().delegate = notificationHandler
        return true
    }
}
回應通知互動
同一個 delegate 中還有 userNotificationCenter(_:didReceive:withCompletionHandler:),它會在用戶與通知互動時被呼叫——包括點擊通知打開應用,或觸發某個 action。由於涉及打開應用,設定 delegate 的動作「必須」在 applicationDidFinishLaunching: 返回之前完成,這也是我們建議盡早賦值的原因。
最省事的實作什麼都不做,直接告訴系統你已完成:
func userNotificationCenter(_ center: UNUserNotificationCenter,
                            didReceive response: UNNotificationResponse,
                            withCompletionHandler completionHandler: @escaping () -> Void) {
    completionHandler()
}
想讓它更有料,可以在建立內容時塞入附帶資訊:
let content = UNMutableNotificationContent()
content.title = "Time Interval Notification"
content.body = "My first notification"
content.userInfo = ["name": "onevcat"]
接著在回呼中把 userInfo 取出來:
func userNotificationCenter(_ center: UNUserNotificationCenter,
                            didReceive response: UNNotificationResponse,
                            withCompletionHandler completionHandler: @escaping () -> Void) {
    if let name = response.notification.request.content.userInfo["name"] as? String {
        print("I know it's you! \(name)")
    }
    completionHandler()
}
更棒的是,遠程推送 payload 中的欄位也會一併出現在這個 userInfo 裡,於是本地與遠程的處理路徑被統一了。要根據 userInfo 決定跳哪個頁面、做什麼後續動作,可發揮的空間相當大。
Actionable 通知:發送與處理
註冊 Category
iOS 8、9 引入了可互動的通知,做法是先把一組 action 歸進一個 category,註冊該 category,送通知時再指定要套用哪個 category。
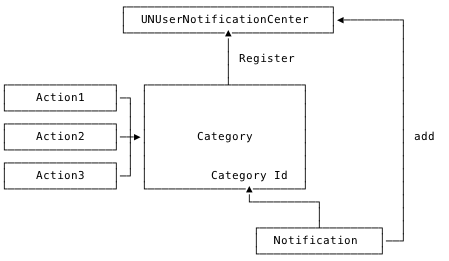
private func registerNotificationCategory() {
    let saySomethingCategory: UNNotificationCategory = {
        // 1. 帶文字輸入的 action
        let inputAction = UNTextInputNotificationAction(
            identifier: "action.input",
            title: "Input",
            options: [.foreground],
            textInputButtonTitle: "Send",
            textInputPlaceholder: "What do you want to say...")
        // 2. 普通按鈕 action
        let goodbyeAction = UNNotificationAction(
            identifier: "action.goodbye",
            title: "Goodbye",
            options: [.foreground])
        let cancelAction = UNNotificationAction(
            identifier: "action.cancel",
            title: "Cancel",
            options: [.destructive])
        // 3. 為 category 指定 identifier
        return UNNotificationCategory(identifier: "saySomethingCategory",
                                      actions: [inputAction, goodbyeAction, cancelAction],
                                      intentIdentifiers: [],
                                      options: [.customDismissAction])
    }()
    UNUserNotificationCenter.current().setNotificationCategories([saySomethingCategory])
}
別忘了在啟動時呼叫它完成註冊:
func application(_ application: UIApplication,
                 didFinishLaunchingWithOptions launchOptions: [NSObject: AnyObject]?) -> Bool {
    registerNotificationCategory()
    UNUserNotificationCenter.current().delegate = notificationHandler
    return true
}
送出一則帶 action 的通知
category 註冊完成後,送出 actionable 通知非常簡單——建立 UNNotificationContent 時把 categoryIdentifier 設為對應的 id:
content.categoryIdentifier = "saySomethingCategory"
展示後下拉或用 3D Touch 展開,就能看到那些 action:
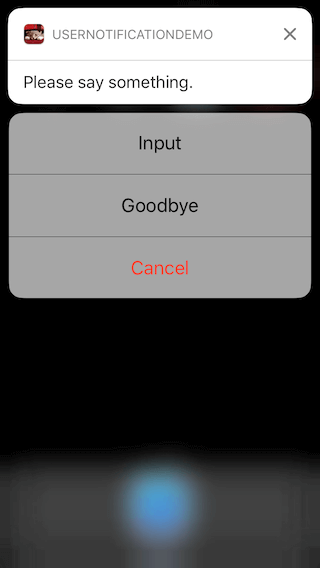
遠程推送也能用 category,只要在 payload 中加上 category 欄位並指定預先定義的 id:
{
  "aps": {
    "alert": "Please say something",
    "category": "saySomething"
  }
}
處理 actionable 通知
它走的路徑與普通通知完全相同,都會進到 didReceive 回呼。我們靠 request 中的 categoryIdentifier 與 response 中的 actionIdentifier,就能判斷「哪則通知的哪個操作」被觸發;若為 UNTextInputNotificationAction,把 response 轉型成 UNTextInputNotificationResponse 就能拿到用戶輸入:
func userNotificationCenter(_ center: UNUserNotificationCenter,
                            didReceive response: UNNotificationResponse,
                            withCompletionHandler completionHandler: @escaping () -> Void) {
    if let category = UserNotificationCategoryType(rawValue: response.notification.request.content.categoryIdentifier) {
        switch category {
        case .saySomething:
            handleSaySomthing(response: response)
        }
    }
    completionHandler()
}

private func handleSaySomthing(response: UNNotificationResponse) {
    let text: String
    if let actionType = SaySomethingCategoryAction(rawValue: response.actionIdentifier) {
        switch actionType {
        case .input:   text = (response as! UNTextInputNotificationResponse).userText
        case .goodbye: text = "Goodbye"
        case .none:    text = ""
        }
    } else {
        // 僅點擊或清除(除非 category 設了 .customDismissAction,否則清除不會回呼)
        text = ""
    }
    if !text.isEmpty {
        UIAlertController.showConfirmAlertFromTopViewController(message: "You just said \(text)")
    }
}
示範程式先判斷是否屬於 saySomething,再從用戶輸入或選項中取出字串並彈出提示。實務上更常見的做法是發一個網路請求,或依操作更新 UI。完整範例可參考 Demo 中的 ActionableViewController。
Notification Extension
iOS 10 新增了多種 extension 作為應用與系統整合的入口,其中與通知相關的有兩個:Service Extension 讓我們有機會在「展示之前」修改遠程推送的內容;Content Extension 則用來客製通知詳情頁的樣式。
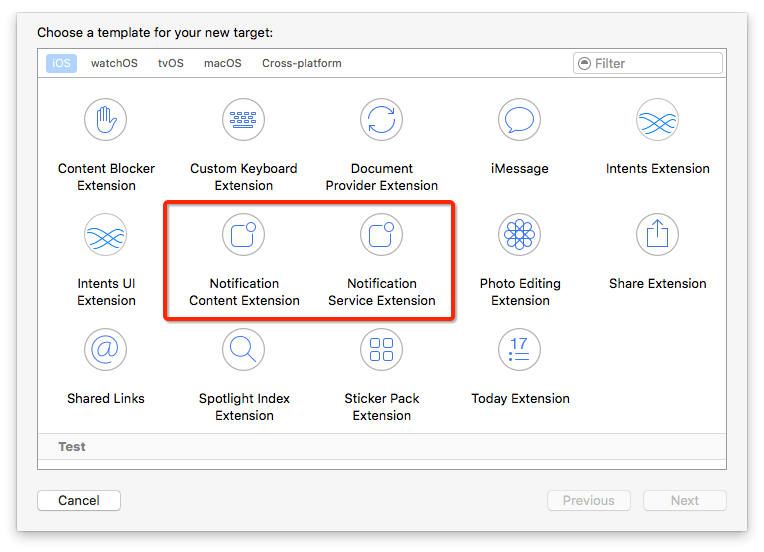
攔截並改寫通知內容
NotificationService 的模板已經給好了基本骨架:
class NotificationService: UNNotificationServiceExtension {
    var contentHandler: ((UNNotificationContent) -> Void)?
    var bestAttemptContent: UNMutableNotificationContent?

    // 1. 收到通知時呼叫
    override func didReceive(_ request: UNNotificationRequest,
                            withContentHandler contentHandler: @escaping (UNNotificationContent) -> Void) {
        self.contentHandler = contentHandler
        bestAttemptContent = (request.content.mutableCopy() as? UNMutableNotificationContent)
        if let bestAttemptContent = bestAttemptContent {
            if request.identifier == "mutableContent" {
                bestAttemptContent.body = "\(bestAttemptContent.body), onevcat"
            }
            contentHandler(bestAttemptContent)
        }
    }

    // 2.  extension 即將被終止前呼叫
    override func serviceExtensionTimeWillExpire() {
        if let contentHandler = contentHandler, let bestAttemptContent = bestAttemptContent {
            contentHandler(bestAttemptContent)
        }
    }
}
兩個關鍵點:
- didReceive: 中的 request 是等待送出的通知,我們改寫它的 content,在時限內透過 contentHandler 交還系統,展示的就是改過後的版本。
- 若你一直沒呼叫 contentHandler,系統會呼叫 serviceExtensionTimeWillExpire() 通知你「大限已到」。你可以什麼都不做,系統便照原樣顯示原始通知;也可以像範例這樣,把已改好大半的內容交出去,呈現一個「改到一半」的版本。
Service Extension 目前只對遠程推送生效,需在 payload 中加入 mutable-content 為 1 的欄位來啟用:
{
  "aps": {
    "alert": {
      "title": "Greetings",
      "body": "Long time no see"
    },
    "mutable-content": 1
  }
}
執行結果如下,可以注意到 body 後面被追加了名字:
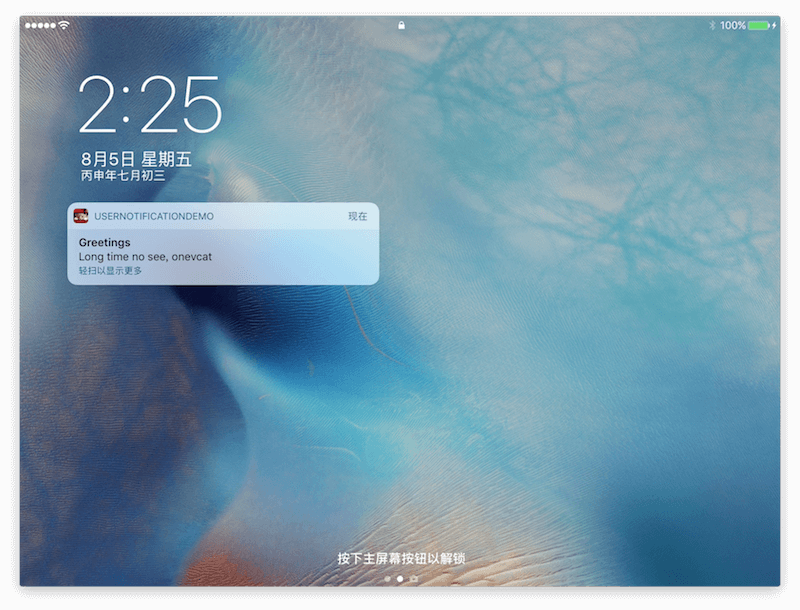
順帶一提,在設備端攔截並替換內容的做法,可以實現端到端(end-to-end)的推送加密:伺服器推送加密過的密文,客戶端收到後用預先約定或已取得的金鑰解密,再立即展示。這樣即使推送通道被第三方截取,內容依然安全。對於金融類應用與聊天應用,這幾乎是必備能力。
在通知中展示圖片/影片
多媒體推送是 iOS 10 的另一大亮點,通知可以嵌入圖片或影片,可讀性與趣味性都大幅提升。
本地通知要加多媒體很簡單:用本機檔案 URL 建立一個 UNNotificationAttachment,塞進 content 的 attachments 陣列即可:
let content = UNMutableNotificationContent()
content.title = "Image Notification"
content.body = "Show me an image!"
if let imageURL = Bundle.main.url(forResource: "image", withExtension: "jpg"),
   let attachment = try? UNNotificationAttachment(identifier: "imageAttachment", url: imageURL, options: nil) {
    content.attachments = [attachment]
}
展示時橫幅或彈窗會帶上縮圖,用 3D Touch pop 或下拉展開詳情時則會放大呈現:
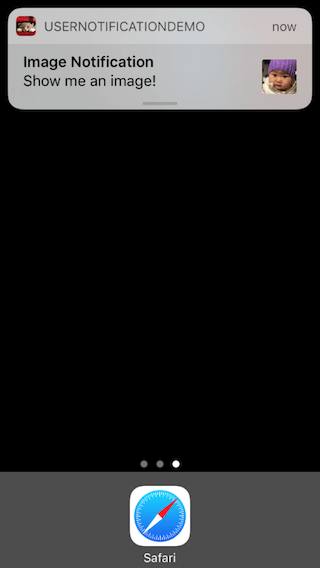
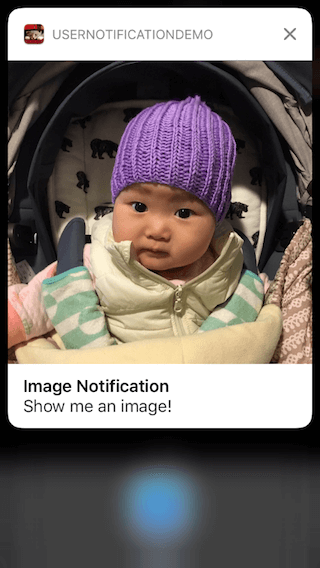
除了圖片,通知也支援音訊與影片,MP3、MP4 這類格式都能播放,但都有大小限制(例如圖片不超過 5MB、影片不超過 50MB),對一般通知場景綽綽有餘。支援的格式與尺寸可查官方文件;建立 UNNotificationAttachment 時若遇到不支援的格式,SDK 會直接拋錯。
遠程推送要顯示多媒體,得搭配前面提到的 Notification Service Extension。常見做法是:在 payload 中給出媒體資源位址(可以是 bundle 內既有資源,也可以是網路資源)。由於建立 UNNotificationAttachment 只能使用「本機」檔案,若媒體還不在本地,必須先下載。下載完成、建立好 attachment 之後,就和本地通知一樣賦值給 attachments,再呼叫 contentHandler。
一個簡短的 payload 範例:
{
  "aps": {
    "alert": {
      "title": "Image Notification",
      "body": "Show me an image from web!"
    },
    "mutable-content": 1
  },
  "image": "https://onevcat.com/assets/images/background-cover.jpg"
}
mutable-content 表示我們會在收到通知時改寫內容,image 則指明目標圖片位址。在 NotificationService 中加入下載並落盤的邏輯:
private func downloadAndSave(url: URL, handler: @escaping (_ localURL: URL?) -> Void) {
    let task = URLSession.shared.dataTask(with: url) { data, res, error in
        var localURL: URL? = nil
        if let data = data {
            let ext = (url.absoluteString as NSString).pathExtension
            let cacheURL = URL(fileURLWithPath: FileManager.default.cachesDirectory)
            let url = cacheURL.appendingPathComponent(url.absoluteString.md5).appendingPathExtension(ext)
            if let _ = try? data.write(to: url) {
                localURL = url
            }
        }
        handler(localURL)
    }
    task.resume()
}
然後在 didReceive: 中取出圖片位址、下載、建立 attachment 並展示:
if let imageURLString = bestAttemptContent.userInfo["image"] as? String,
   let URL = URL(string: imageURLString) {
    downloadAndSave(url: URL) { localURL in
        if let localURL = localURL {
            do {
                let attachment = try UNNotificationAttachment(identifier: "image_downloaded", url: localURL, options: nil)
                bestAttemptContent.attachments = [attachment]
            } catch {
                print(error)
            }
        }
        contentHandler(bestAttemptContent)
    }
}
關於通知中的圖片與影片,還有幾點值得補充:
- attachments 雖是陣列,但系統只會展示「第一個」attachment。不過你仍可送出多個,之後在需要時重排順序以呈現最合適的一張;自訂通知 UI 時也可能用到多個 attachment(下一節會看到例子)。
- 在當時的 beta(iOS 10 beta 4)中,serviceExtensionTimeWillExpire 被呼叫前你有 30 秒處理時間。一般圖片綽綽有餘,但若推送的是大檔影片、用戶又正好身處糟糕網路,很可能來不及下載完成。
- 若要在遠程推送中顯示 bundle 內的資源,注意 extension 的 bundle 與 app main bundle 並非同一個。你可以把資源放進 extension bundle,也可以放 main bundle,重點是確保能取到正確且有讀取權限的 URL。
- 系統會依 URL 副檔名判斷媒體類型;若沒有副檔名或副檔名無法正確判斷,可在建立時透過 UNNotificationAttachmentOptionsTypeHintKey 明確指定。
- 不在 bundle 內的媒體檔會被「移動」到系統負責通知的目錄,通知被移除後一併刪除;bundle 內的則是「複製」過去。每個應可用的媒體總容量有上限,超過時建立 attachment 會拋出例外,可能的錯誤都定義在 UNError 中。
- 你可以存取已建立 attachment 的內容,但要注意權限,需先用 startAccessingSecurityScopedResource 暫時取得存取權:
let content = notification.request.content
if let attachment = content.attachments.first {
    if attachment.url.startAccessingSecurityScopedResource() {
        eventImage.image = UIImage(contentsOfFile: attachment.url.path!)
        attachment.url.stopAccessingSecurityScopedResource()
    }
}
Service Extension 與多媒體通知的示範,可參考 Demo 中的 NotificationService 與 MediaViewController。
自訂通知視圖樣式
另一個新加入的 Content Extension 用來客製通知詳情頁的視圖。建立一個 Notification Content Extension 後,Xcode 會給你一個實作 UNNotificationContentExtension 的 UIViewController 子類。其中必須實作 didReceive(_:),系統在需要顯示自訂通知詳情時會呼叫它,你在裡頭配置 UI;UI 本身則可透過 extension 中的 MainInterface.storyboard 定義。
自訂 UI 是與通知 category 綁定的,因此需要在 extension 的 Info.plist 中指定這個樣式對應的 category 標識符:
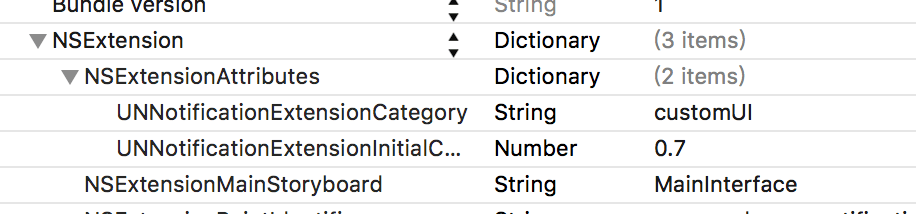
系統收到通知後會先尋找是否有能處理這類通知的 content extension,有的話就交給它。此外,你也可以透過 Info.plist 控制詳情視圖的尺寸,以及是否顯示原始通知。
雖然畫面上可以放各種控件(包含按鈕),但系統「不允許」用戶直接與這些 UI 互動——點擊通知視圖本身只會把用戶導向應用。真正的互動要靠 action:UNNotificationContentExtension 提供了可選方法 didReceive(_:completionHandler:),在用戶選擇某個 action 時被呼叫,你有機會在此更新通知 UI。若有更新,可在 completionHandler 中傳入 .doNotDismiss 讓通知繼續顯示;若無需保留,可傳 .dismissAndForwardAction(把 action 繼續轉發給應用的 UNUserNotificationCenterDelegate)或 .dismiss(直接關閉通知)。
若自訂 UI 含影片,還可以實作 UNNotificationContentExtension 中 media 開頭的一系列屬性,系統會提供播放控制項與相關方法。
Content Extension 與自訂樣式的完整示範,可參考 Demo 中的 NotificationViewController 與 CustomizeUIViewController。
總結
iOS 10 對通知體系做了一次 iOS 問世以來規模最大的重構,許多「老朋友」被標上了 deprecated:
- UILocalNotification
- UIMutableUserNotificationAction
- UIMutableUserNotificationCategory
- UIUserNotificationAction
- UIUserNotificationCategory
- UIUserNotificationSettings
- handleActionWithIdentifier:forLocalNotification:
- handleActionWithIdentifier:forRemoteNotification:
- didReceiveLocalNotification:withCompletion:
- didReceiveRemoteNotification:withCompletion:
以及一系列 UIKit 中用於發送與處理通知的型別與方法。
相較於 iOS 早期的 API,新體系展現出高度的模組化與一致性,易用性也更好,明顯是更先進的一套設計。如果你的應用重度依賴通知,直接以 iOS 10 為起點,就能完整享受新體系的種種能力。
當然,若仍需支援 iOS 10 之前的系統,舊 API 還是得留著。可以這樣做版本分流:
if #available(iOS 10.0, *) {
    // 使用 UserNotifications
}
先讓 iOS 10 用戶享受到新特性,等未來最低支援版本提升到 iOS 10 時,再把所有 deprecated 的程式碼一次清掉。就通知相關程式碼的梳理與設計品質而言,這點適配成本完全值得。