
iOS 繪圖(Quartz2D)入門使用教學
前言
什麼是 Quartz 2D?
Quartz 2D 是一個二維圖形繪製引擎,支援 iOS 與 Mac OS X 環境。我們可以運用 Quartz 2D API 實現許多功能,例如基本路徑繪製、透明度、描影、陰影、透明層、顏色管理、反鋸齒、PDF 文檔生成與 PDF 中繼資料存取等。必要時,Quartz 2D 還能借助圖形硬體的效能。在 Mac OS X 中,Quartz 2D 可與其他圖形圖像技術混合使用,如 Core Image、Core Video、OpenGL、QuickTime。舉例來說,透過 QuickTime 的 GraphicsImportCreateCGImage 函式,就能用 Quartz 從 QuickTime 圖形匯入器建立一個圖像。
繪圖的基本流程:
(1) CGContextRef 上下文 → 畫板
(2) 設定要畫的內容
(3) 把內容加入到上下文(畫板)
(4) 把內容畫到畫板上
基礎知識
常用方法介紹:
(1) CGContextRef 上下文 → 畫板
(2) 路徑
《1》UIBezierPath
《2》CGMutablePathRef 透過點繪製一個路徑
《3》CGContextMoveToPoint(注意必須設定起始點)
(3) 畫形狀
《1》矩形 CGContextAddRect
《2》曲線 CGContextAddCurveToPoint
《3》圓形 CGContextAddEllipseInRect
《3.1》CGContextSetLineWidth 設定筆畫寬度
《3.2》set 設定筆畫顏色
《3.3》setFill 設定劃線區域範圍的填充
《3.4》setStroke 設定筆畫的顏色
《3.5》設定畫筆填充樣式:
1. kCGPathFill 只填充
2. kCGPathStroke 畫筆顏色
3. kCGPathFillStroke 既填充又有畫筆顏色
(4) 截圖
《1》UIGraphicsBeginImageContextWithOptions 開始截圖
《2》UIGraphicsGetImageFromCurrentImageContext() 取得當前圖片上下文的圖片 —— 從畫圖視圖的 layer 上取得
《3》UIGraphicsEndImageContext 關閉圖片上下文
《4》UIGraphicsBeginImageContext 開始取得圖片上下文
《5》CGContextStrokePath 把路徑繪製到圖片上下文
《6》直接把路徑繪製到介面 stroke
畫線流程:
(1) CGContextRef 上下文 → 畫板
(2) 路徑(畫圖的內容)
(3) CGContextAddPath 把路徑加入到上下文
(4) CGContextStrokePath 把路徑渲染到上下文
1. 首先建立一個類,繼承自 UIView,這裡命名為 PaintingView
// 所有畫圖的程式碼都寫在 drawRect 裡面
// 1. 在初始化這個類的物件時會被呼叫 2. setNeedsDisplay
// 以下會寫幾種畫直線、矩形、圓形、曲線以及畫線簡化,還有截屏保存到相簿的方法,只需在 drawRect 用 self 呼叫一下即可
- (void)drawRect:(CGRect)rect { [super drawRect:rect]; }
畫直線
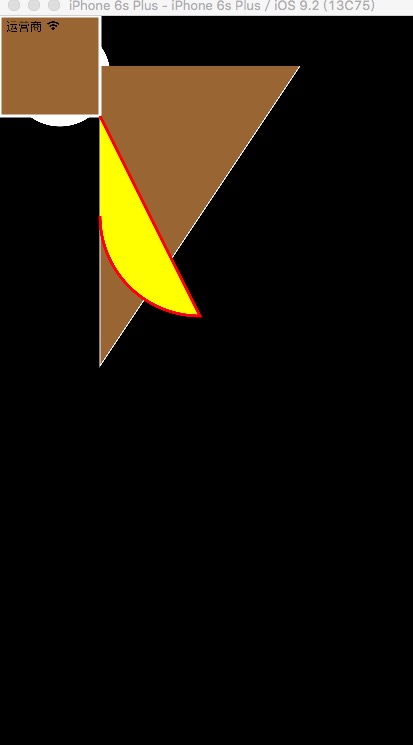
//畫直線 - (void)addLine{ //1.創建 畫布 上下文 //獲得當前上下文 當做畫布 CGContextRef context = UIGraphicsGetCurrentContext(); //2.創建畫圖的內容 UIBezierPath *path = [UIBezierPath bezierPath]; //point 中心點 //x 中心點x //y 中心點y //y不變 x從小值 - 大值 橫向直線 //2.1 [path moveToPoint:CGPointMake(100, 50)]; //2.2添加其他點 [path addLineToPoint:CGPointMake(100, 350)]; [path addLineToPoint:CGPointMake(300, 50)]; //2.3設置畫筆的寬度 path.lineWidth = 2; //2.4設置畫筆顏色 // [[UIColor whiteColor]set]; [[UIColor whiteColor]setStroke];//畫筆顏色為白色 [[UIColor brownColor]setFill];//設置填充顏色 //3.把畫的內容<路徑>添加到上下文<畫布> CGContextAddPath(context, path.CGPath); //4.繪制 渲染 內容到上下文《畫布》 // CGContextStrokePath(context); //設置填充的樣式 CGContextDrawPath(context, kCGPathFillStroke); }
畫矩形
//添加矩形 - (void)addRect{ //1.畫布 CGContextRef context = UIGraphicsGetCurrentContext(); //2.內容 CGContextAddRect(context, CGRectMake(0, 0, 100, 100)); // [[UIColor redColor]set]; [[UIColor whiteColor]setStroke]; [[UIColor brownColor]setFill]; //設置畫筆寬度 CGContextSetLineWidth(context, 3); //3.渲染 //直接渲染矩形 // CGContextStrokeRect(context, CGRectMake(0, 0, 100, 100)); CGContextDrawPath(context, kCGPathFillStroke); }
畫圓形
//畫圓形 - (void)addRound{ //1.畫布 contextRef = UIGraphicsGetCurrentContext(); //2.內容 CGContextAddEllipseInRect(contextRef, CGRectMake(10, 10, 100, 100)); [[UIColor whiteColor]set]; //3.渲染到畫布 CGContextDrawPath(contextRef, kCGPathFillStroke); }
畫曲線
//畫曲線 - (void)addCurve{ //1.畫布 CGContextRef context = UIGraphicsGetCurrentContext(); //2.內容 UIBezierPath *path = [UIBezierPath bezierPath]; [path moveToPoint:CGPointMake(100, 100)]; // [path addCurveToPoint:CGPointMake(200, 150) controlPoint1:CGPointMake(300, 50) controlPoint2:CGPointMake(100, 100)]; /* Center:中心點 radius:半徑 startAngle:開始的弧度 endAngle:結束的弧度 clockwise:是順時針 還是逆時針 */ [path addArcWithCenter:CGPointMake(200, 200) radius:100 startAngle:M_PI_2 endAngle:M_PI clockwise:YES]; [[UIColor redColor]setStroke]; [[UIColor yellowColor]setFill]; //3.把內容添加到畫布上 CGContextAddPath(context, path.CGPath); //4.渲染 CGContextDrawPath(context, kCGPathFillStroke); }
畫線簡化
//畫線簡化 -(void)addLine2{ //1.路徑 //2.畫出內容 UIBezierPath *path = [UIBezierPath bezierPath]; [path moveToPoint:CGPointMake(200, 200)]; [path addLineToPoint:CGPointMake(200, 500)]; [[UIColor whiteColor]set]; [path stroke]; }
截屏 —— 需要注意的是,這個方法不會在類中被自己呼叫,必須先有圖才能截圖,所以要把這個方法放到 PaintingView.h 中宣告,再在 ViewController 中建立 PaintingView 物件並呼叫即可。
//截屏 - (void)cutScreen{ //1.獲得一個圖片的上下文(畫布) //2.畫布的上下文 //3.設置截圖的參數 //3.5 截圖 //4.關閉圖片的上下文 //5.保存 UIGraphicsBeginImageContext(self.frame.size); [self addRound]; [self.layer renderInContext:contextRef]; /* size 圖片尺寸 opaque 透明度 YES-->不透明 NO--->透明 scale 比例 */ UIGraphicsBeginImageContextWithOptions(self.frame.size, YES, 1); //開始截圖 UIImage *image = UIGraphicsGetImageFromCurrentImageContext(); //關閉截圖上下文 UIGraphicsEndImageContext(); UIImageWriteToSavedPhotosAlbum(image, self, @selector(image:didFinishSavingWithError:contextInfo:), nil); } - (void)image:(UIImage *)image didFinishSavingWithError:(NSError *)error contextInfo:(void *)contextInfo{ }
回到 ViewController 中建立 Painting 這個類的物件,呼叫截屏的方法
- (void)viewDidLoad { [super viewDidLoad]; // Do any additional setup after loading the view, typically from a nib. PaintingView *view = [[PaintingView alloc]initWithFrame:self.view.frame]; [self.view addSubview:view]; [view cutScreen]; }
得到的效果圖如下:


- 上一篇文章: 仿作並對比標哥的 iOS 時鐘動畫
- 下一篇文章: iOS 開發:取得專案名稱與版本號