IOS開發之濾鏡 CIImage、CIFilter
濾鏡這個詞也許大家會耳生,特別是男生,不是歧視哦,只是你不經常用而已,那麼肯定就有人說,我是女生怎麼了,我也沒有聽過這個詞啊,是不是過濾代碼的?(你真是想多了-3-!)
但是你會對一下的幾個詞比較耳熟,比如說anglelababy代言的美顏相機,還有你們經常使用的美圖秀秀,你以為你照下來就是那麼美若天仙的樣子?本人表示再也不相信網上的美女了,忽然覺得咱班花都挺好。哈哈;
好了,話不多說,我們來進入今天的主題:濾鏡
- 介紹
框架介紹
類的介紹
效果介紹
- 使用
使用步驟
濾鏡屬性
- 濾鏡鏈的使用
1. *框架介紹
(1) CoreImage
(2) 是一個圖像框架 他是基於OpenGL頂層創建的一個框架
(3) 它是利用GPU機遇硬件加速來處理圖像
(4) CoreImage中有很多濾鏡
(5)它們能夠一次給予一張圖像或者視頻幀多種視覺效果 -> 濾鏡鏈
(6)而且濾鏡可以連接起來組成一個濾鏡鏈 把濾鏡效果疊加起來處理圖像
2.類的介紹
(1)CIImage 保存圖像數據的類 可以和UIImage去轉換
CGImgeRef 圖像裡面的數據‘
(2)CIFilter:濾鏡類 對濾鏡對象進行設置的時候是通過鍵值編碼來設置的(KVC)
(3)CIContext :上下文 是實現對圖像處理的具體對象 ——》濾鏡對象輸出的對象並不是合成之後的對象、需要使用圖像處理的上下文 合並輸出的圖像
3.效果介紹
100+效果可以通過可以通過Attribute這個屬性得到你先要在濾鏡上面展示的效果(詳細不列舉,列舉明天早上就起不來了)
*使用
使用步驟:
1、有一個CIImage的對象 不能直接把UIIMage轉成CIImage 應該先把UIIMage轉成CGImgeRef再轉成CIImage
2、創建一個濾鏡的對象,設置他的參數(KVC)
3、創建CIContext上下文
4、合並濾鏡輸出的圖像 —— 合並之後會得到一個圖像
5、賦值給UIImageView顯示出來
6、如果想要繼續添加濾鏡可以繼續循環
濾鏡屬性:
注意:我們這裡是直接查詢到自己需要的屬性,並不需要去記,不然就會有一種紀英漢大字典的感覺
1.查詢效果分類裡面的效果
filterNamesInCategory:
2.查詢效果的屬性
[CIFilter filterWithName:XXX].attributes
下面老夫為大家上代碼:(不給你整點料,你是不知道我文武全才)
先做准備工作,實在是劇情需要,不然看不出特效:兩個button,一個pickViewController(因為要訪問到你的相冊)、一個ImageView
- (void)viewDidLoad {
    [super viewDidLoad];
    self.view.backgroundColor = [UIColor whiteColor];
    self.navigationController.navigationBarHidden = YES;


    imageView = [[UIImageView alloc]initWithFrame:CGRectMake(0, 200, 500, 600)];
    imageView.contentMode = UIViewContentModeScaleAspectFill;
    imageView.backgroundColor = [UIColor grayColor];
    [self.view addSubview:imageView];


    UIButton *button = [UIButton buttonWithType:UIButtonTypeCustom];
    button.frame = CGRectMake(0, 0, 50, 50);
    button.backgroundColor = [UIColor grayColor];
    [button addTarget:self action:@selector(tap:) forControlEvents:UIControlEventTouchUpInside];
    [self.view addSubview:button];

//
    UIButton *button1 = [UIButton buttonWithType:UIButtonTypeCustom];
    button1.frame = CGRectMake(100, 100, 100, 100);
    [button1 setTitle:@"TICK" forState:UIControlStateNormal];
    button1.backgroundColor = [UIColor brownColor];
    [button1 addTarget:self action:@selector(addEffect) forControlEvents:UIControlEventTouchUpInside];
    [self.view addSubview:button1];

  }

- (void)tap:(UIButton *) sender{
    UIImagePickerController *picker = [[UIImagePickerController alloc]init];
    picker.delegate = self;
//    picker.sourceType = 默認是照片
    [self presentViewController:picker animated:YES completion:nil];


}

- (void)imagePickerController:(UIImagePickerController *)picker didFinishPickingMediaWithInfo:(NSDictionary<NSString *,id> *)info{
    [self dismissViewControllerAnimated:YES completion:nil];
    UIImage *image = info[UIImagePickerControllerOriginalImage];
//    得到的照片顯示在視圖上
    imageView.image = image;
//    NSLog(@"%@",info);
}
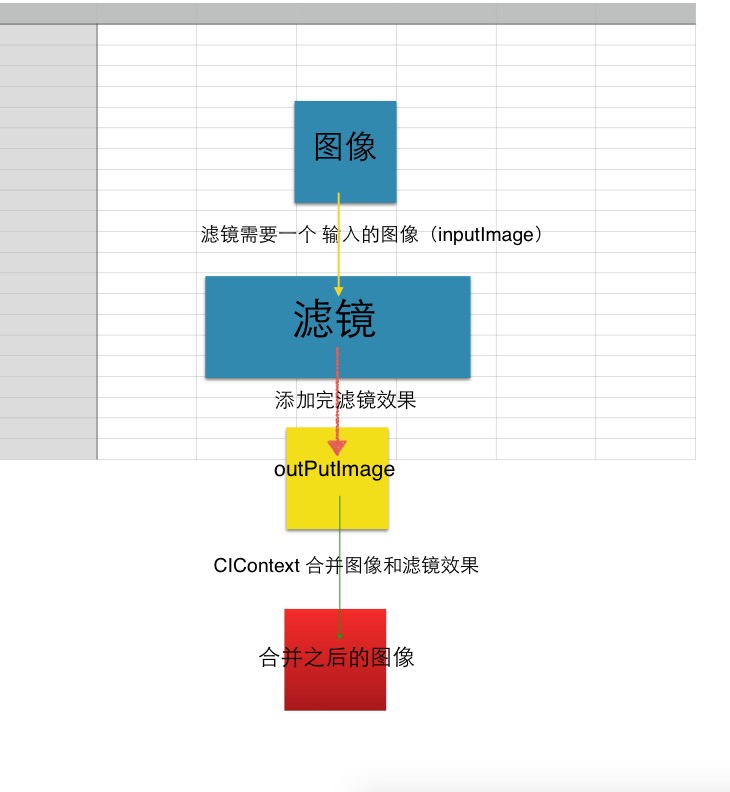
現在先講一下濾鏡的大概流程,我覺得一張圖就足矣表達:
- (void)addFilter{

    //   1. 需要有一個輸入的原圖
    CIImage *inputImage = [CIImage imageWithCGImage:imageView.image.CGImage];
    //   2. 需要一個濾鏡
    CIFilter *filter = [CIFilter filterWithName:@"CIBumpDistortion"];
    //     通過打印可以設置的屬性裡面 得到可以設置 inputImage ——》在接口文件裡面查找得到的key

     // 這裡我們使用的是KVC的方式給filter設置屬性
    [filter setValue:inputImage forKey:kCIInputImageKey];
    // 設置凹凸的效果半徑  越大越明顯
    [filter setValue:@500 forKey:kCIInputRadiusKey];
    // CIVector :表示 X Y 坐標的一個類
    // 設置中心點的
    [filter setValue:[CIVector vectorWithX:200 Y:200] forKey:kCIInputCenterKey];

    //    3.有一個CIContext的對象去合並原圖和濾鏡效果
    CIImage *outputImage = filter.outputImage;
    //      創建一個圖像操作的上下文
    CIContext *context = [CIContext contextWithOptions:nil];
    //      把原圖和濾鏡合並起來  包含原圖和濾鏡效果的圖像
    /**
     *  Image :   合成之後的圖像
     *  fromRect:  合成之後圖像的尺寸: 圖像.extent
     */
    CGImageRef imageRef = [context createCGImage:outputImage fromRect:outputImage.extent];
    imageView.image = [UIImage imageWithCGImage:imageRef];


}
注意 :這裡有幾個坑啊:1。需要原圖的時候我們需要的是一個CIImage Class的對象,不是CGIMage的對象,很多人都寫錯了,所以我們只能轉化把CGImage轉成CIImage
2. 我們所需要的濾鏡屬性以及特效的類都只能NSLog出來,而且這裡特別容易混淆,具體方法如下:
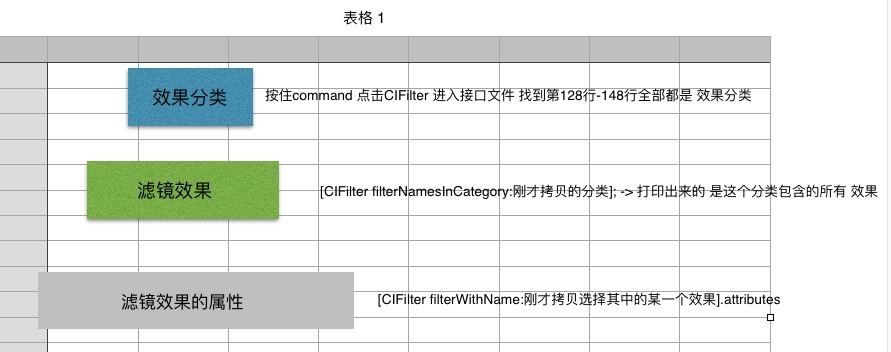
1.查詢 效果分類中 包含什麼效果:filterNamesInCategory:
(1)按住command 點擊CIFilter 進入接口文件 找到第128行-148行全部都是 效果分類
(2)選擇其中某一個分類 NSLog -> [CIFilter filterNamesInCategory:剛才拷貝的分類]; -> 打印出來的 是這個分類包含的所有 效果 -> 拷貝選擇其中的某一個效果
2.查詢 使用的效果中 可以設置什麼屬性(KVC) attributes
NSLog -> [CIFilter filterWithName:剛才拷貝選擇其中的某一個效果].attributes ->得到這個濾鏡所有可以設置的屬性
你要是還理不清的話:1.求神保佑你蒙對了(可能性為負數) 2.如圖所示,多多參悟
大概流程是:先CIFiliter ——》 點進去得到category中的其中一個 ——》使用 [CIFilter filterNamesInCategory:剛才拷貝的分類] 方法nslog出所需要的類; ————》 在類裡有很多的子類 隨便copy一個 ——》 [CIFilter filterWithName:剛才拷貝選擇其中的某一個效果].attributes 獲得到所有可設置的屬性 ————》 使用KVC的方法設置屬性 setValue:Forkey:(注意:這裡的key也需要進CIFilter裡去找和你所選的屬性類似的Key,在CIFilter的165-191行)
*濾鏡鏈:就是濾鏡的嵌套組合使用
#pragma mark===濾鏡鏈
//再次添加濾鏡 形成濾鏡鏈
- (void)addfilterLinkerWithImage:(CIImage *)image{
    CIFilter *filter = [CIFilter filterWithName:@"CISepiaTone"];
    [filter setValue:image forKey:kCIInputImageKey];

    [filter setValue:@0.5 forKey:kCIInputIntensityKey];
    CIContext *context = [CIContext contextWithOptions:nil];
    CGImageRef imageRef = [context createCGImage:filter.outputImage fromRect:filter.outputImage.extent];
    imageView.image = [UIImage imageWithCGImage:imageRef];

//保存圖片到相冊  不可以直接保存outputImage 因為這是一個沒有合成的圖像
    UIImageWriteToSavedPhotosAlbum(imageView.image, self, @selector(image:didFinishSavingWithError:contextInfo:), nil);

}
當然 ,你也可以一直添加,到最後一步再把濾鏡和原圖結合起來,這樣更省代碼-3-!