
打造帶搜尋框與 A~Z 索引的 UITableView
編輯:iOS 技巧大全
通訊錄風格的列表是 iOS 裡最經典的互動模式之一:頂端有搜尋欄,右側有一條可以滑動的字母索引,點字母就能快速跳到對應分區。本文示範如何只用 UITableView、UISearchBar 與 UISearchDisplayController 把這套 UI 搭起來。
效果預覽
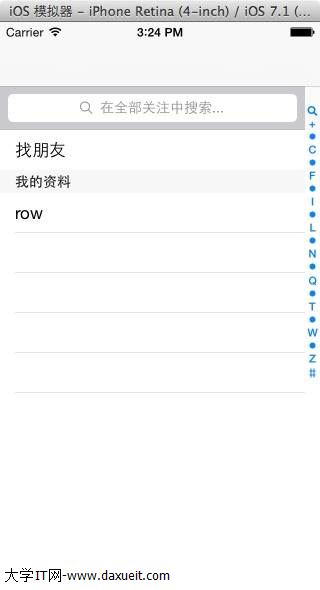
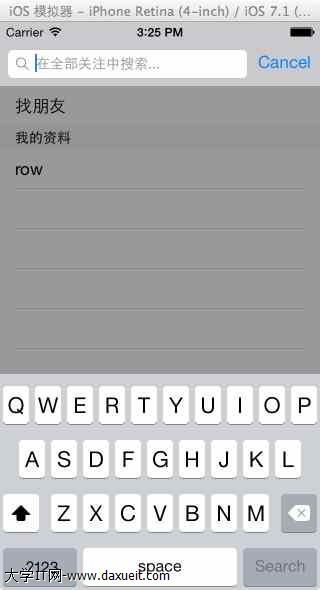
標頭檔宣告
這個畫面同時扮演了列表的資料來源、代理人,以及搜尋的資料來源與代理人,因此宣告時要一次列出相關協定:
#import <UIKit/UIKit.h>

@interface RootViewController : UIViewController <UITableViewDelegate,
                                           UITableViewDataSource,
                                           UISearchDisplayDelegate,
                                           UISearchBarDelegate>
{
    UITableView *tableview;
    NSMutableArray *Aarray;
    UISearchBar *searchBar;
    UISearchDisplayController *searchControl;
}
@end
實作檔
- (void)viewDidLoad
{
    [super viewDidLoad];
    // 初始化背景與各項元件
    [self initBackGroundView];
}

#pragma mark - functions

- (void)initBackGroundView
{
    Aarray = [[NSMutableArray alloc] initWithObjects:@"+", @"我",
                @"A", @"B", @"C", @"D", @"E", @"F", @"G", @"H", @"I", @"J",
                @"K", @"L", @"M", @"N", @"O", @"P", @"Q", @"R", @"S", @"T",
                @"U", @"V", @"W", @"X", @"Y", @"Z", @"#", nil];

    // tableView
    tableview = [[UITableView alloc] initWithFrame:CGRectMake(0, 0, 320, 460 - 44 - 10 - 10 - 20)
                                             style:UITableViewStylePlain];
    tableview.tag = 101;
    tableview.delegate = self;
    tableview.dataSource = self;
    [self.view addSubview:tableview];

    // searchView
    searchBar = [[UISearchBar alloc] initWithFrame:CGRectMake(0, 0, 320, 44)];
    tableview.tableHeaderView = searchBar;
    searchBar.showsScopeBar = YES;
    searchBar.placeholder = @"在全部關注中搜索...";

    // 建立搜尋控制器,讓搜尋結果以滑動動畫呈現
    searchControl = [[UISearchDisplayController alloc] initWithSearchBar:searchBar
                                                     contentsController:self];
    searchControl.delegate = self;
    searchControl.searchResultsDataSource = self;
    searchControl.searchResultsDelegate = self;
}

#pragma mark - searchbar

- (void)searchBar:(UISearchBar *)searchBar
    selectedScopeButtonIndexDidChange:(NSInteger)selectedScope
{
    ;
}

#pragma mark - UITableViewDelegate

- (NSInteger)numberOfSectionsInTableView:(UITableView *)tableView
{
    return 2;
}

- (NSInteger)tableView:(UITableView *)tableView
 numberOfRowsInSection:(NSInteger)section
{
    if (section == 0) {
        return 1;
    }
    return 100;
}

- (CGFloat)tableView:(UITableView *)tableView
heightForRowAtIndexPath:(NSIndexPath *)indexPath
{
    return 40.0;
}

- (UITableViewCell *)tableView:(UITableView *)tableView
         cellForRowAtIndexPath:(NSIndexPath *)indexPath
{
    NSString *strID = @"ID";
    UITableViewCell *cell = [tableview dequeueReusableCellWithIdentifier:strID];
    if (cell == nil) {
        cell = [[UITableViewCell alloc] initWithStyle:UITableViewCellStyleValue1
                                    reuseIdentifier:strID];
    }
    if (indexPath.section == 0 && indexPath.row == 0) {
        cell.textLabel.text = @"找朋友";
    } else if (indexPath.section == 1 && indexPath.row == 0) {
        cell.textLabel.text = @"row";
    }
    return cell;
}

- (NSString *)tableView:(UITableView *)tableView
titleForHeaderInSection:(NSInteger)section
{
    if (section == 1) {
        return @"我的資料";
    }
    return nil;
}

- (NSArray *)sectionIndexTitlesForTableView:(UITableView *)tableView
{
    return [NSArray arrayWithObjects:UITableViewIndexSearch,
                     @"+", @"A", @"B", @"C", @"D", @"E", @"F", @"G", @"H", @"I",
                     @"J", @"K", @"L", @"M", @"N", @"O", @"P", @"Q", @"R", @"S",
                     @"T", @"U", @"V", @"W", @"X", @"Y", @"Z", @"#", nil];
}
幾個值得注意的設計細節
索引列並不是隨便給的,它由 sectionIndexTitlesForTableView: 回傳,順序即為右側從上到下的排列。範例刻意在第一個位置放進系統常量 UITableViewIndexSearch,也就是放大鏡圖示,點它會直接跳到搜尋框。
另外,searchBar.showsScopeBar = YES 會顯示範圍切換列,這在資料需要分類檢索(例如「全部」「關注」)時很好用;若不需要,把這行拿掉即可。
最後要提醒的是,這裡的資料還寫死在程式碼中,section 之間也沒有真正對應到字母分組。實作正式功能時,通常會先把原始資料依首字母分桶(bucket),再用 NSDictionary 以字母為 key 存放陣列,並讓 numberOfRowsInSection: 回傳該桶的實際筆數;搜尋結果則改用 searchResultsTableView 這條獨立的資料來源,避免與原列表互相干擾。
- 上一篇文章: NSTimer 排程與重複執行任務的完整做法
- 下一篇文章: iOS 平台漢字轉拼音:用 CFStringTransform 一步到位