
用 plist 實作城市清單:Section、索引列與排序一次完成
編輯:iOS 技巧大全
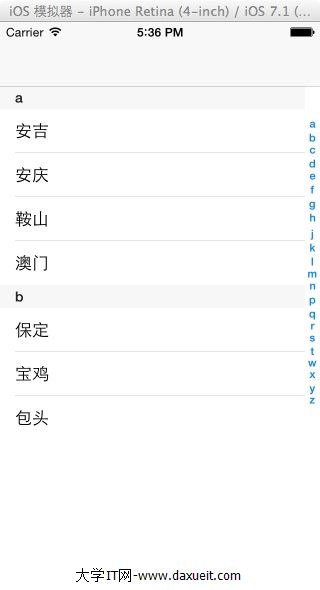
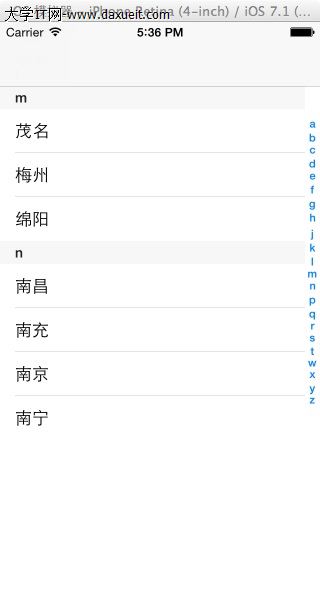
通訊錄風格的「A、B、C 索引 + 分組列表」是常見介面。實作它最省事的做法是把資料放進 plist,再用 NSDictionary 讀取——key 就是分組標題,value 則是該組的城市陣列。
未點擊索引時的效果:
點擊索引後的效果:
RootViewController.h
#import <UIKit/UIKit.h>

@interface RootViewController : UIViewController <UITableViewDelegate, UITableViewDataSource>
{
    UITableView *city;
    NSDictionary *dic;
}
@property (nonatomic, strong) NSArray *keyArray;
@end
RootViewController.m
- (void)viewDidLoad {
    [super viewDidLoad];
    [self initBackgroundView];
}

#pragma mark - 初始化
- (void)initBackgroundView {
    city = [[UITableView alloc] initWithFrame:CGRectMake(0, 0, 320, 460 - 44)
                                        style:UITableViewStylePlain];
    city.delegate = self;
    city.dataSource = self;
    [self.view addSubview:city];

    // 從 bundle 讀取 plist,key 為分組名稱、value 為城市陣列
    dic = [[NSDictionary alloc] initWithContentsOfFile:
           [[NSBundle mainBundle] pathForResource:@"citydict" ofType:@"plist"]];

    // 依 key 排序,決定 section 順序
    self.keyArray = [dic.allKeys sortedArrayUsingDescriptors:
                     [NSArray arrayWithObjects:
                      [NSSortDescriptor sortDescriptorWithKey:nil ascending:YES], nil]];
}

#pragma mark - UITableViewDataSource
- (NSInteger)numberOfSectionsInTableView:(UITableView *)tableView {
    return dic.count;
}

- (NSInteger)tableView:(UITableView *)tableView numberOfRowsInSection:(NSInteger)section {
    NSArray *array = [dic objectForKey:[self.keyArray objectAtIndex:section]];
    return array.count;
}

- (NSString *)tableView:(UITableView *)tableView titleForHeaderInSection:(NSInteger)section {
    return [self.keyArray objectAtIndex:section];
}

- (UITableViewCell *)tableView:(UITableView *)tableView cellForRowAtIndexPath:(NSIndexPath *)indexPath {
    UITableViewCell *cell = [tableView dequeueReusableCellWithIdentifier:@"ID"];
    if (cell == nil) {
        cell = [[UITableViewCell alloc] initWithStyle:UITableViewCellStyleValue1
                                    reuseIdentifier:@"ID"];
    }
    cell.textLabel.text = [[dic objectForKey:[self.keyArray objectAtIndex:indexPath.section]]
                           objectAtIndex:indexPath.row];
    return cell;
}

// 實作這個方法,右側就會出現索引列
- (NSArray *)sectionIndexTitlesForTableView:(UITableView *)tableView {
    return self.keyArray;
}

- (void)tableView:(UITableView *)tableView didSelectRowAtIndexPath:(NSIndexPath *)indexPath {
    NSLog(@"---didSelectRowAtIndexPath--");
}
運作邏輯拆解
整個結構可以概括為三層:dic 是「城市 → 分組」的對照表,keyArray 是排序後的分組清單,而 tableView 的 section 索引就是 keyArray 的索引。只要這三者的對應關係一致,資料顯示就不會錯位。
幾個實務提醒
- NSDictionary 本身無序,所以一定要像範例這樣另外排序 key,否則每次執行 section 順序都可能不同。
- plist 的 key 建議直接用「A、B、C、…、Z、#」這類羅馬字母或中文注音/拼音首字母,索引列點擊後才能正確跳到對應位置。
- 若要支援中文城市名,需要自行把中文名稱轉成拼音或注音首字母來分組,系統不會自動幫你分類。
- 實作
sectionIndexTitlesForTableView:時,回傳的陣列「數量」必須與 section 數一致,否則點擊索引會對到錯誤的分組。 - 點擊索引後若希望有放大提示效果,可另外實作
tableView:sectionForSectionIndexTitle:atIndex:。