
iOS 進階控制項完全解析
UITableView
UITableView 有兩種樣式:Grouped(左圖)與 Plain(右圖)。對應的屬性是 style,型別為 UITableViewStyle,枚舉值分別是 UITableViewStyleGrouped 與 UITableViewStylePlain。
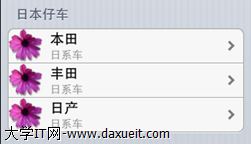
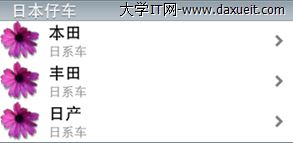
使用這個控制項的 ViewController 可以選用 UITableViewController。好處是內建了 UITableView,也預先實作了 UITableViewDataSource 與 UITableViewDelegate 兩個協定;但缺點是預設的 tableView 會填滿整個螢幕。若你需要的 tableView 並不填滿全屏,就該改用一般的 UIViewController。
UITableView 的資料有靜態綁定與動態綁定兩種方式,預設是動態綁定。在 StoryBoard 中設定 Content 屬性即可切換 Static Cells 與 Dynamic Cells。若選擇 Static Cells,就能直接點擊 Section 標題來增減列數,也能直接把控制項拖進儲存格裡填入內容。
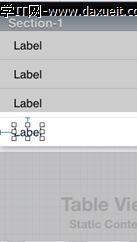
若要動態填充內容,則需實作 UITableViewDataSource 與 UITableViewDelegate 的幾個方法。這兩個協定的作用有點類似 Android 的各種 Adapter,負責定義資料來源與各儲存格的呈現方式。
// 回傳分組數量
- (NSInteger)numberOfSectionsInTableView:(UITableView *)tableView {
}
// 每個分組內的列數
- (NSInteger)tableView:(UITableView *)tableView numberOfRowsInSection:(NSInteger)section {
}
// 定義並回傳儲存格內容
- (UITableViewCell *)tableView:(UITableView *)tableView cellForRowAtIndexPath:(NSIndexPath *)indexPath {
}
如果使用 UITableViewController,可直接實作上述方法;若用的是 UIViewController,則需在類別宣告處顯式宣告遵循 UITableViewDataSource 與 UITableViewDelegate。
每個儲存格都是 UITableViewCell 型別,在最後一個方法中建立並回傳。儲存格的樣式為 UITableViewCellStyle 列舉,通常在初始化時設定:
- UITableViewCellStyleDefault:只有一個靠左對齊的 Label,透過 cell.textLabel 設定。
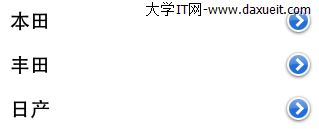
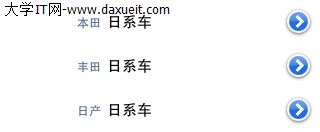
- UITableViewCellStyleValue1:一個靠左的 Label 與一個靠右、藍色字體的 Label,分別透過 textLabel 與 detailTextLabel 設定。
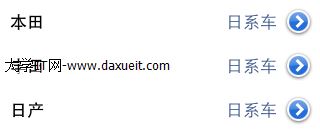
- UITableViewCellStyleValue2:同樣有兩個 Label,但左邊的 Label 為靠右對齊,屬性設定方式與上一種相同。
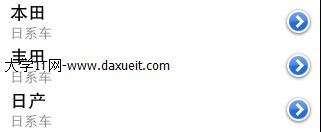
- UITableViewCellStyleSubtitle:同樣有兩個 Label,第二個 Label 作為副標題呈現。
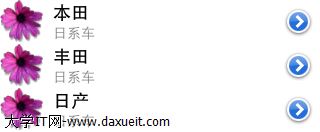
每個儲存格的版面大致分為左中右三塊:最左側是圖示,最右側是附件視圖(通常是箭頭),透過 UITableViewCellAccessoryType 型別的 accessoryType 屬性設定,可選值包括:
- UITableViewCellAccessoryNone、UITableViewCellAccessoryDisclosureIndicator、
 UITableViewCellAccessoryDetailDisclosureButton、
 UITableViewCellAccessoryCheckmark、
 UITableViewCellAccessoryDetailButton
官方文件列了以上幾種,但筆者的環境為 iOS 6,只有截圖中的那幾個值(None 除外)。附件區域也可以自行放入控制項,例如為每一列加入一個開關:
cell.accessoryView = [[UISwitch alloc] init];
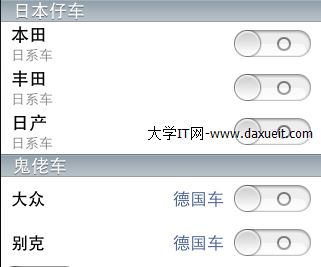
UITableViewCell 還提供了 imageView 屬性來設定每個儲存格的圖示,它是 UIImageView 型別,直接設定 image 即可:
cell.imageView.image = [UIImage imageNamed:@"African Daisy.gif"];
若上述控制項仍不夠用,還可以透過 contentView 的 addSubview 方法往儲存格裡加入更多控制項:
[cell.contentView addSubview:label];
但要留意控制項的數量,一旦超過三四個,滾動列表時就容易出現卡頓。
在 UITableView 的表頭、表尾、分組頭與分組尾都可以加入視圖。表頭表尾可透過 tableHeaderView 與 tableFooterView 兩個屬性設定:
self.tableView.tableHeaderView = [[UIImageView alloc] initWithImage:[UIImage imageNamed:@"bd_logo1.png"] highlightedImage:nil];
self.tableView.tableFooterView = [[UISwitch alloc] init];
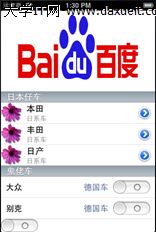
而分組頭與分組尾則可透過實作以下兩個方法來設定:
- (NSString *)tableView:(UITableView *)tableView titleForFooterInSection:(NSInteger)section {
}
- (NSString *)tableView:(UITableView *)tableView titleForHeaderInSection:(NSInteger)section {
}
接著用一個簡單的例子說明動態綁定的完整步驟。這裡的資料來源由自己填充:
@property(nonatomic,strong) NSArray *carGroups;

- (NSArray *)carGroups {
    if (_carGroups == nil) {
        // 1. 建立模型
        HGTableviewModel *cg1 = [[HGTableviewModel alloc] init];
        cg1.group = @"日本仔車";
        cg1.desc = @"日系車";
        cg1.cars = @[@"本田", @"豐田", @"日產"];

        HGTableviewModel *cg2 = [[HGTableviewModel alloc] init];
        cg2.group = @"鬼佬車";
        cg2.desc = @"德國車";
        cg2.cars = @[@"大眾", @"別克"];

        // 2. 將模型加入陣列
        _carGroups = @[cg1, cg2];
    }
    return _carGroups;
}
在 viewDidLoad 中為 tableView 指定資料來源:
self.tableView.dataSource = self;
最後實作前面提到的三個方法:取得分組數量、每個分組的列數,以及建構儲存格。
- (NSInteger)numberOfSectionsInTableView:(UITableView *)tableView {
    return self.carGroups.count;
}
- (NSInteger)tableView:(UITableView *)tableView numberOfRowsInSection:(NSInteger)section {
    HGTableviewModel *item = self.carGroups[section];
    return item.cars.count;
}
- (UITableViewCell *)tableView:(UITableView *)tableView cellForRowAtIndexPath:(NSIndexPath *)indexPath {
    UITableViewCell *cell = nil;
    if (indexPath.section == 0)
        cell = [[UITableViewCell alloc] initWithStyle:UITableViewCellStyleSubtitle reuseIdentifier:nil];
    else
        cell = [[UITableViewCell alloc] initWithStyle:UITableViewCellStyleValue1 reuseIdentifier:nil];

    HGTableviewModel *item = self.carGroups[indexPath.section];
    cell.textLabel.text = item.cars[indexPath.row];
    cell.accessoryType = UITableViewCellAccessoryDetailDisclosureButton;
    cell.detailTextLabel.text = item.desc;
    if (indexPath.section == 0)
        cell.imageView.image = [UIImage imageNamed:@"African Daisy.gif"];
    else
        cell.accessoryView = [[UISwitch alloc] init];
    return cell;
}
若要為「選中儲存格」綁定事件,只要實作下面這個方法即可。以下範例在選中某列後彈出提示,說明目前選中了哪個品牌:
- (void)tableView:(UITableView *)tableView didSelectRowAtIndexPath:(NSIndexPath *)indexPath {
    NSString *msg = [[NSString alloc] initWithFormat:@"你選中了 %@", ((HGTableviewModel *)self.carGroups[indexPath.section]).cars[indexPath.row]];
    UIAlertView *alert = [[UIAlertView alloc] initWithTitle:@"選中行" message:msg delegate:self cancelButtonTitle:nil otherButtonTitles:@"確定", nil];
    [alert show];
}
UIDatePicker
UIDatePicker 是以滾輪形式呈現的日期時間選擇控制項,可以設定當前顯示時間與最大、最小時間範圍,這些值都是 NSDate 型別:
NSDateFormatter *formatter = [[NSDateFormatter alloc] init];
[formatter setDateFormat:@"yyyy-MM-dd HH:mm:ss"];
self.dtpDateTime.minimumDate = [formatter dateFromString:@"2011-01-01 00:00:00"];
self.dtpDateTime.maximumDate = [formatter dateFromString:@"2015-01-01 00:00:00"];
self.dtpDateTime.date = [formatter dateFromString:@"2015-03-01 00:00:00"];
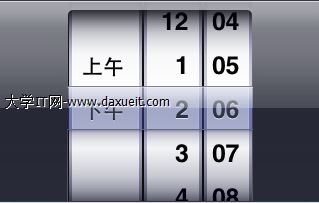
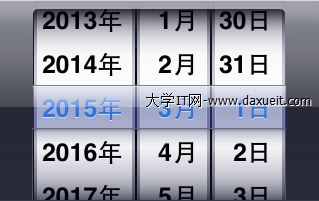
它有一個 datePickerMode 屬性用來設定顯示類型,型別為 UIDatePickerMode 列舉,可選值有:
- UIDatePickerModeTime:時鐘模式,只有時分。
- UIDatePickerModeDate:日期模式。
- UIDatePickerModeDateAndTime:日期時間模式,時間只有時分,日期只有月日。
- UIDatePickerModeCountDownTimer:時鐘模式,只有時分,採 24 小時制。
效果圖依序如下:
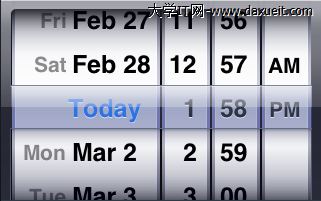
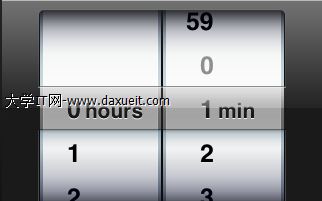
UIDatePicker 有個 ValueChanged 事件,在值變動後觸發,需要綁定事件,可透過 StoryBoard 或 addTarget:action:forControlEvents: 方法。以下在值改變後輸出當前日期:
- (IBAction)dtpValueChanged:(id)sender {
    NSLog(@"當前日期是 %@", self.dtpDateTime.date);
}
UIPickerView
UIPickerView 把資料清單以滾輪形式呈現給使用者,與 UITableView 類似,需實作 UIPickerViewDataSource 與 UIPickerViewDelegate 兩個協定來綁定資料,但它並不支援靜態綁定。主要需實作的方法有:
// 回傳顯示的欄數
- (NSInteger)numberOfComponentsInPickerView:(UIPickerView *)pickerView {
}
// 回傳目前欄顯示的列數
- (NSInteger)pickerView:(UIPickerView *)pickerView numberOfRowsInComponent:(NSInteger)component {
}
// 以下為 PickerDelegate 協定的方法,二選一即可,用來回傳每一項顯示的內容
- (NSString *)pickerView:(UIPickerView *)pickerView titleForRow:(NSInteger)row forComponent:(NSInteger)component {
}
- (UIView *)pickerView:(UIPickerView *)pickerView viewForRow:(NSInteger)row forComponent:(NSInteger)component reusingView:(UIView *)view {
}
若滾輪中只是純文字資訊,用回傳 String 的那個方法即可;若每一項包含文字以外的內容,則需用回傳 UIView 的方法——既然回傳的是 View,就代表可以回傳任何控制項,包含自訂的也沒問題。
若要在選中後觸發事件,實作下面這個方法即可:
- (void)pickerView:(UIPickerView *)pickerView didSelectRow:(NSInteger)row inComponent:(NSInteger)component {
    NSLog(@"%@", [[NSString alloc] initWithFormat:@"SELECT Item %@ ", [pickerDs objectAtIndex:row]]);
}
下面用一個完整例子說明如何為 UIPicker 綁定資料。首先要宣告遵循兩個協定:
@interface HGDatePickerViewController : UIViewController <UIPickerViewDataSource, UIPickerViewDelegate>
@end
透過 StoryBoard 建立關聯的 picker 變數並定義資料來源 NSArray,然後在 viewDidLoad 中加入以下程式碼,其中設定 delegate 最為關鍵:
pickerDs = [[NSArray alloc] initWithObjects:@"許嵩", @"周傑倫", @"梁靜茹", @"許飛", @"鳳凰傳奇", @"阿杜", @"方大同", @"林俊傑", @"胡夏", @"邱永傳", nil];
self.picker.delegate = self;
接著實作前面提到的方法,這裡把兩個 UIPickerViewDelegate 的方法都列出來,其中回傳 View 的那個回傳一個 UILabel:
- (NSInteger)numberOfComponentsInPickerView:(UIPickerView *)pickerView {
    return 1;
}
- (NSInteger)pickerView:(UIPickerView *)pickerView numberOfRowsInComponent:(NSInteger)component {
    return [pickerDs count];
}
- (NSString *)pickerView:(UIPickerView *)pickerView titleForRow:(NSInteger)row forComponent:(NSInteger)component {
    return [pickerDs objectAtIndex:row];
}
- (UIView *)pickerView:(UIPickerView *)pickerView viewForRow:(NSInteger)row forComponent:(NSInteger)component reusingView:(UIView *)view {
    UILabel *myView = nil;
    myView = [[UILabel alloc] initWithFrame:CGRectMake(0.0, 0.0, 180, 30)];
    myView.text = [pickerDs objectAtIndex:row];
    myView.textAlignment = NSTextAlignmentCenter;
    myView.font = [UIFont systemFontOfSize:14];
    myView.backgroundColor = [UIColor clearColor];
    return myView;
}
使用 titleForRow 方法實現的效果:
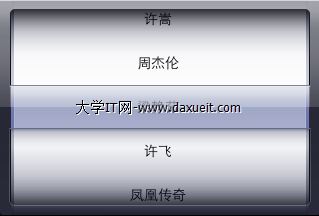
使用 viewForRow 方法實現的效果:
其實 UIPicker 也能實現類似 B/S 或 C/S 開發中的下拉選單多級聯動效果,做法是在 didSelectRow 方法中,依當前級別的資料呼叫 [self.picker reloadComponent:xxx]; 來重新載入下一級的值,這裡不再詳述。
UIActionSheet
UIActionSheet 這個控制項是在研究 UIDatePicker 時偶然發現的,感覺相當實用,於是也一併記錄下來。由於筆者手上沒有 iOS 裝置,對有哪些控制項瞭解有限,之前在介面原型圖上看過它卻不知其名。就個人感覺而言,ActionSheet 與 AlertView 頗為相似,都能彈出按鈕選擇框,並具備遮罩效果。
使用 UIActionSheet 需實作 UIActionSheetDelegate 協定,建構與初始化的程式碼如下:
UIActionSheet *as = [[UIActionSheet alloc] initWithTitle:@"This is my First ActionSheet"
                                              delegate:self
                                     cancelButtonTitle:@"Cancle"
                                destructiveButtonTitle:@"Sure"
                                     otherButtonTitles:@"First Btn", @"Second Btn", nil];
上述參數中有兩個比較特殊的按鈕:cancelButton 與 destructiveButton。ActionSheet 中的按鈕是有順序的:預設 destructiveButton 排在第一,是一個紅色按鈕;接著是 otherButton,順序由加入的先後決定;最後是 cancelButton,為黑色按鈕。初始化時若某個按鈕不需要,傳入 nil 即可。顯示效果如下圖:
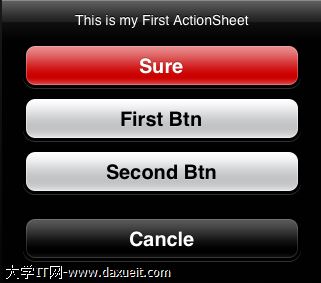
若要新增 OtherButton,也可呼叫:
[as addButtonWithTitle:@"addButton"];
destructiveButton 也可以改由其他按鈕擔任,透過設定下面的屬性即可:
as.destructiveButtonIndex = 1;
效果如下圖:
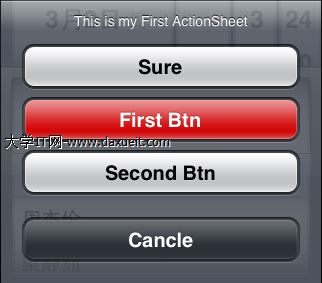
顯示 ActionSheet 則呼叫:
[as showInView:self.view];
開發過程中發現,某些情況下點擊 UIActionSheet 的最後一項會失效,只有點擊最後一項上半區域才有效——這個問題在使用 UITabBar 時才會出現。解法是改用下面任一方式顯示:[actionSheet showInView:[UIApplication sharedApplication].keyWindow]; 或 [sheet showInView:[AppDelegate sharedDelegate].tabBarController.view]; 如此便不會出現遮擋。
actionSheetStyle 屬性用來設定樣式,型別為 UIActionSheetStyle 列舉,有三種值:
- UIActionSheetStyleDefault:預設風格,灰色背景配白色文字。
- UIActionSheetStyleBlackTranslucent:透明黑色背景,白色文字。
- UIActionSheetStyleBlackOpaque:純黑背景,白色文字。
與 UIAlertView 類似,UIActionSheet 也有一組在出現、點擊、消失等時機觸發的方法:
- (void)actionSheet:(UIActionSheet *)actionSheet clickedButtonAtIndex:(NSInteger)buttonIndex {
}
- (void)willPresentActionSheet:(UIActionSheet *)actionSheet {
}
- (void)didPresentActionSheet:(UIActionSheet *)actionSheet {
}
- (void)actionSheetCancel:(UIActionSheet *)actionSheet {
}
- (void)actionSheet:(UIActionSheet *)actionSheet didDismissWithButtonIndex:(NSInteger)buttonIndex {
}
- (void)actionSheet:(UIActionSheet *)actionSheet willDismissWithButtonIndex:(NSInteger)buttonIndex {
}
這些方法的觸發順序如下(actionSheetCancel 是依 UIAlertView 的順序推斷而來):
willPresentActionSheet → didPresentActionSheet
點擊按鈕之後:
actionSheetClickedButtonAtIndex → willDismissWithButtonIndex → didDismissWithButtonIndex
- 上一篇文章: 為什麼要善用斷點除錯
- 下一篇文章: XMPP 入門筆記:伺服器環境快速配置教學