
不等高 Cell 搭建(二):評論區、底部列與外觀細節收尾
上一篇完成了 topView 與 middleView,這一篇接著處理 commentView、bottomView,以及最後的外觀打磨。順帶會談到 MJExtension 的巢狀模型轉換與 KVC 的底層規則。
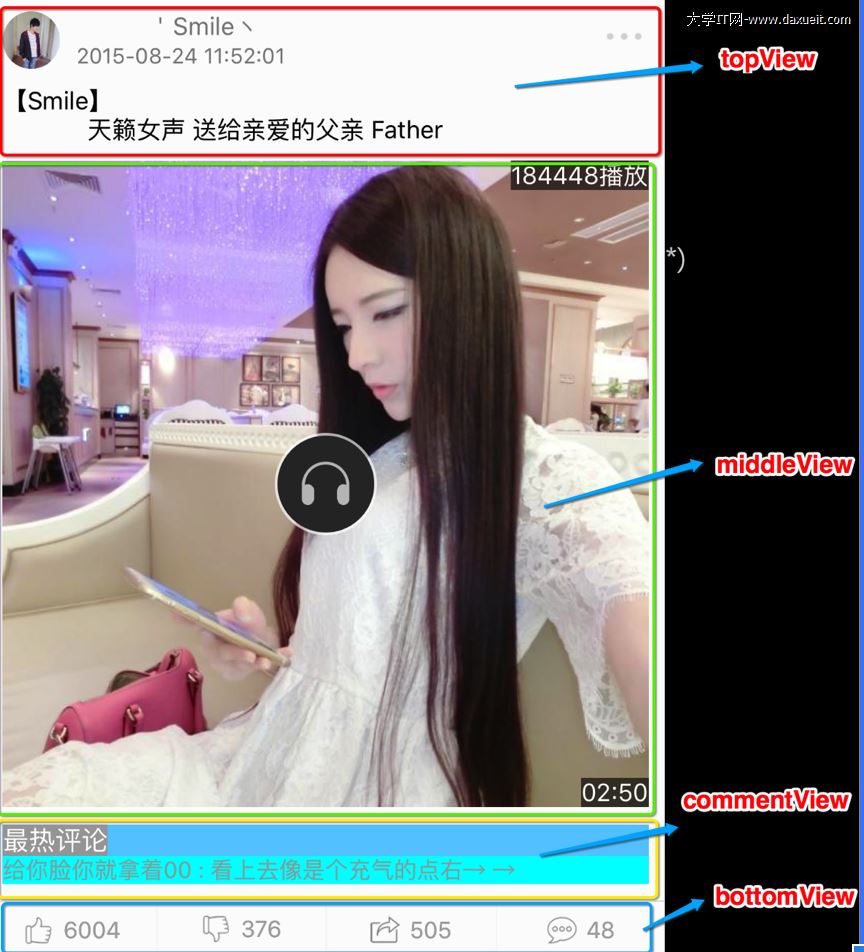
一、commentView 模組
評論區有兩種樣式:純文字評論與語音評論。

1. 用同一個 xib 處理兩種樣式
「最熱評論」標題用一個 label;下方內容依型別分流:文字評論也只用一個 label,約束設為左右固定、頂部固定間距、高度由內容撐開,記得把 label 行數設為 0。
語音評論高度固定:先放一個 view 佔位,裡面再放 label 與 button。button 圖片與文字之間的間距靠內縮(contentEdgeInsets/titleEdgeInsets)調整即可。要注意 label 下方若已對 view 設過約束,button 下方就不要再設,否則會衝突,兩者擇一即可。
2. 資料處理與巢狀模型
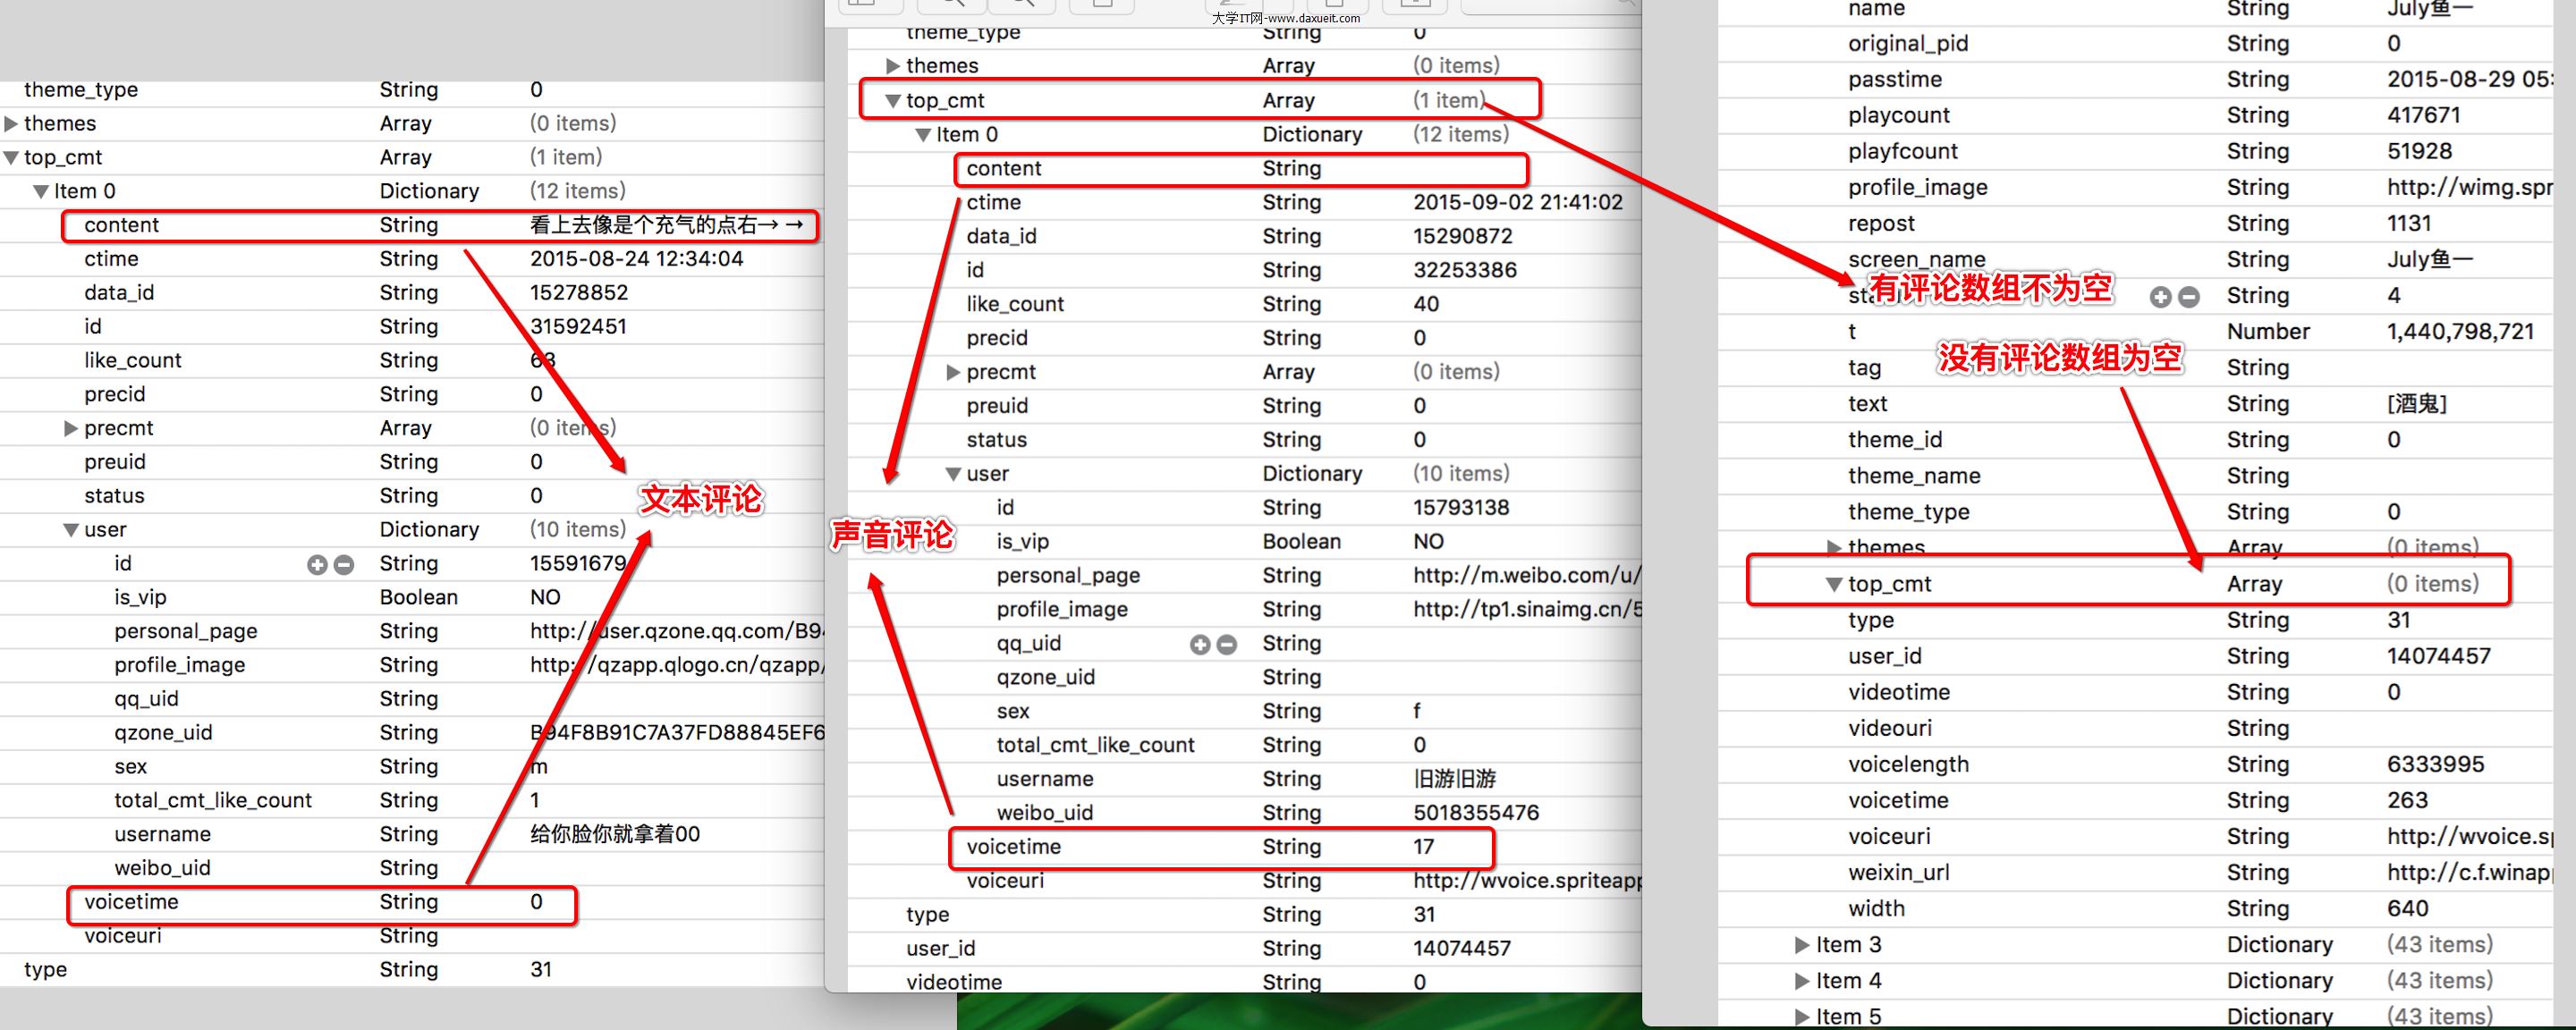
使用者名稱藏在 top_cmt 陣列的第一個元素裡的 user 字典中。既然習慣面向模型開發,就自訂兩個模型(評論模型與使用者模型),並在最外層模型宣告一個屬性直接持有內層模型。
這樣做的原因很實際:若不這麼做,取得內層屬性時層級太深、程式碼又臭又長;優化之後取值就清爽多了。
把陣列屬性中的字典轉為模型屬性,做法是重寫陣列屬性的 setter,順便判空:
- (void)setTop_cmt:(NSArray *)top_cmt {
    _top_cmt = top_cmt;
    if (top_cmt.count) {
        _commentItem = top_cmt.firstObject;
    }
}
3. 讓 MJExtension 自動轉巢狀模型
有兩條路:手動轉,或讓 MJExtension 自動處理。MJ 的規則是:
模型中有模型 → 會自動轉;模型中有陣列、陣列裡又是字典 → 不會自動轉,必須告訴它目標型別:
+ (NSDictionary *)mj_objectClassInArray {
    return @{@"top_cmt": @"XTCommentItem"};
}
4. MJExtension 底層其實是 KVC
MJ 會遍歷模型的 property,再去字典中找對應的 value 賦值。KVC 賦值時,模型可以少於字典的 key,但模型宣告的屬性若在字典中找不到對應 value,就會報錯,而 MJ 對這點做了保護。
KVC 的查找順序(setValue:forKeyPath:)大致如下:先找同名 setter → 再找同名成員變數 → 再找「_前綴」的同名成員變數 → 都沒有就呼叫 setValue:forUndefinedKey:,未實作則直接拋錯。此外,模型屬性的型別必須與字典 value 的型別一致,MJ 則能在可轉換的前提下自動轉型。
5. 高度計算
if (item.commentItem) {
    CGFloat commentH = 42;   // 語音評論高度固定
    // 判斷字串有沒有內容,用 length 最可靠
    if (item.commentItem.content.length) {
        NSString *totalStr = [NSString stringWithFormat:@"%@:%@",
                              item.commentItem.user.username,
                              item.commentItem.content];
        CGFloat textH = [totalStr sizeWithFont:[UIFont systemFontOfSize:17]
                             constrainedToSize:CGSizeMake(textW, MAXFLOAT)].height;
        commentH = 21 + textH;
    }
    _commentViewFrame = CGRectMake(margin, _cellH, textW, commentH);
    _cellH = CGRectGetMaxY(_commentViewFrame) + margin;
}
是否顯示 commentView,可以依 top_cmt 的元素個數,或依轉出的模型是否存在來判斷。
二、bottomView 模組
這一塊相對簡單:xib 搭界面 → 發請求 → 轉模型與視圖模型 → 計算 frame(高度給固定值即可)→ 展示資料。
展示時的重點在數字格式化:超過一萬要顯示為「xx.x 萬」,為 0 時則顯示佔位文字。抽方法的心訣是「先複製、缺什麼補什麼、需要外部決定的寫成參數」:
- (void)setItem:(XTThemeItem *)item {
    [super setItem:item];
    [self setButton:_dingView    count:item.ding    title:@"贊"];
    [self setButton:_caiView     count:item.cai     title:@"踩"];
    [self setButton:_shareView   count:item.repost  title:@"轉發"];
    [self setButton:_commentView count:item.comment title:@"評論"];
}

- (void)setButton:(UIButton *)button count:(NSInteger)count title:(NSString *)title {
    CGFloat valueF = 0;
    NSString *str = title;

    if (count > 10000.0) {
        valueF = count / 10000.0;
        str = [NSString stringWithFormat:@"%.1f萬", valueF];
        str = [str stringByReplacingOccurrencesOfString:@".0" withString:@""];
    } else if (count > 0) {
        str = [NSString stringWithFormat:@"%ld", count];
    }
    [button setTitle:str forState:UIControlStateNormal];
}
三、外觀細節收尾
1. 取消選中高亮
系統預設的灰底很醜,在 initWithStyle:reuseIdentifier: 裡一行解決:
self.selectionStyle = UITableViewCellSelectionStyleNone;
2. 自訂分割線
先關掉系統分割線:
self.tableView.separatorStyle = UITableViewCellSeparatorStyleNone;
接著有三種做法:在 cell 底部加一個 UIView 當線;或縮短 cell 的 frame,露出 tableview 背景色:
- (void)setFrame:(CGRect)frame {
    frame.origin.y    += 10;
    frame.size.height -= 10;
    [super setFrame:frame];   // 別忘了呼叫 super
}
這裡減掉的高度,必須在計算 cell 高度時加回去,否則 cell 會被壓縮。
3. 設定背景圖並避免邊緣變形
透過 backgroundView 指定 UIImageView 即可,但圖片常被拉伸變形,記得先設定可拉伸區域:
UIImage *image = [UIImage imageNamed:@"mainCellBackground"];
image = [image stretchableImageWithLeftCapWidth:image.size.width * 0.5
                                   topCapHeight:image.size.height * 0.5];
self.backgroundView = [[UIImageView alloc] initWithImage:image];
到這裡,一個資料驅動、可複用、高度自適應的資訊流 cell 就完成了。