
iOS UIButton 圖片在左、文字緊貼其後的排版技巧
編輯:iOS 7 技巧
UIButton 預設的排版是「圖片在上、文字在下」且整體居中。但設計稿經常要求「圖示在左、文字緊緊貼在右邊」的樣式。UIButton 並沒有提供直接的 API,需要透過 imageEdgeInsets 與 titleEdgeInsets 這兩個屬性來微調。本文示範做法。
原理說明
UIButton 內部有兩個子 view:imageView 與 titleLabel。Edge Insets 的作用是「把內容往某個方向推擠」。注意其四邊數值的語意:
- 左邊正值 → 往右推;右邊正值 → 往左推(因此要把元素推到左側,右邊需給很大的正值)。
- 上邊正值 → 往下推;下邊正值 → 往上推。
所以「圖片靠左、文字緊跟其後」的做法是:給 image 一個很大的右 inset 把它推到左側,再給 title 一個同樣大的右 inset 讓它被擠到圖片旁邊。
完整程式碼
- (void)viewDidLoad {
    [super viewDidLoad];
    self.view.backgroundColor = RGB(235, 235, 240);

    UIButton *oneButton = [[UIButton alloc] initWithFrame:CGRectMake(0, kHeaderHeight + 8, kScreenWidth, 40)];
    [oneButton setImage:[UIImage imageNamed:@"icon_party_knowledge_rights_obligations"]
               forState:UIControlStateNormal];
    [oneButton setTitle:@"第一個" forState:UIControlStateNormal];
    oneButton.titleLabel.font = FONT(12);
    [oneButton setTitleColor:[UIColor blackColor] forState:UIControlStateNormal];

    // 圖片靠左:右邊給極大值,把 imageView 推到最左
    [oneButton setImageEdgeInsets:UIEdgeInsetsMake(2, 8, 0, kScreenWidth - 50)];
    // 文字緊跟圖片之後
    [oneButton setTitleEdgeInsets:UIEdgeInsetsMake(0, 0, 0, kScreenWidth - 100)];

    oneButton.backgroundColor = [UIColor whiteColor];
    [oneButton addTarget:self action:@selector(oneButtonAction:)
        forControlEvents:UIControlEventTouchUpInside];
    [self.view addSubview:oneButton];

    UIButton *twoButton = [[UIButton alloc] initWithFrame:CGRectMake(0, oneButton.maxY + 8, kScreenWidth, 40)];
    [twoButton setImage:[UIImage imageNamed:@"icon_party_knowledge_dues_collection_standard"]
               forState:UIControlStateNormal];
    [twoButton setTitle:@"第二個" forState:UIControlStateNormal];
    twoButton.titleLabel.font = FONT(12);
    [twoButton setTitleColor:[UIColor blackColor] forState:UIControlStateNormal];
    [twoButton setImageEdgeInsets:UIEdgeInsetsMake(2, 8, 0, kScreenWidth - 50)];
    [twoButton setTitleEdgeInsets:UIEdgeInsetsMake(0, 0, 0, kScreenWidth - 100)];
    twoButton.backgroundColor = [UIColor whiteColor];
    [twoButton addTarget:self action:@selector(twoButtonAction:)
        forControlEvents:UIControlEventTouchUpInside];
    [self.view addSubview:twoButton];

    // 右箭頭
    for (int i = 0; i < 2; i++) {
        UIImageView *rightImgView = [[UIImageView alloc]
            initWithFrame:CGRectMake(kScreenWidth - 20, kHeaderHeight + 20 + i * 48, 7, 12)];
        rightImgView.image = [UIImage imageNamed:@"icon_right"];
        [self.view addSubview:rightImgView];
    }
}
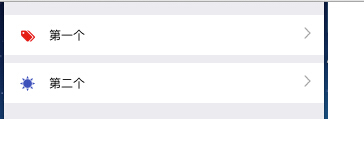
效果如下:
這個做法的問題與更好的替代方案
Edge Insets 這招雖然常見,但缺點明顯:它依賴寫死的像素值。inset 值與螢幕寬度 kScreenWidth 綁在一起,一旦換成不同尺寸、或文字長度改變,對齊就會跑掉。若圖片尺寸變了,兩個 inset 還得手動重新配比。
較好的做法有兩種:
- iOS 15 以上的 UIBConfiguration。使用
UIButton.Configuration並設定imagePadding與imagePlacement = .leading,系統會自動處理間距,不必算任何數值。 - 自行組合。用一個 UIStackView(
axis = .horizontal、spacing設為想要的間距)包住 UIImageView 與 UILabel,再整體塞進 UIButton 或直接當作一個可點擊的 view。這在舊版 iOS 上最穩定。
另外,範例中的右箭頭是用獨立 UIImageView 疊上去的。實務上更乾淨的做法是把箭頭放進 button 的 accessoryView 概念裡,或直接在 button 內以 Auto Layout 定位,避免用 for 迴圈硬算 Y 座標。
- 上一篇文章: iOS UITextView 實作首行縮進與預設提示文字
- 下一篇文章: iOS 如何縮放 UISwitch 開關的大小