
Swift 多列表格元件:用 UICollectionView 自訂版面完成基本表格
編輯:iOS 7 技巧
為什麼需要多列表格
手機 App 常見的是單列表格,但在報表、數據比較、iPad 大螢幕或需要並列顯示多欄資訊時,多列表格會更合適。利用 UICollectionView 與自訂 UICollectionViewLayout,可以做出接近表格的版面。
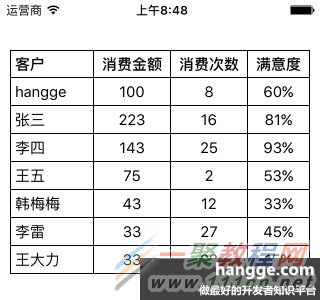
基本設計
可以把每一列視為一個 section,每一欄視為 section 內的 item。第一個 section 當作表頭,後面的 section 是資料列。
表格樣式可以包含:表頭文字加粗、1px 邊框、第一列靠左、其餘欄置中、左右內距,以及點擊後輸出座標。
資料源概念
最簡單的實作方式是讓 section 數量等於資料列數加一,讓 item 數量等於欄位數。
override func numberOfSections(in collectionView: UICollectionView) -> Int {
    return rows.count + 1
}

override func collectionView(_ collectionView: UICollectionView, numberOfItemsInSection section: Int) -> Int {
    return cols.count
}
Cell 內容
每個 Cell 可以先移除舊有子檢視,再加入新的 label。若目前是表頭列,文字使用粗體;若是資料列,則帶入對應的 row 與 column 資料。
for subview in cell.subviews {
    subview.removeFromSuperview()
}

let label = UILabel(frame: cell.bounds)
label.text = "內容"
cell.addSubview(label)
版面更新時機
自訂 layout 時,要注意 shouldInvalidateLayoutForBoundsChange。若每次捲動都重新計算版面,會影響效能。通常只在寬度改變時才需要重新計算。
override func shouldInvalidateLayout(forBoundsChange newBounds: CGRect) -> Bool {
    guard let oldBounds = collectionView?.bounds else { return false }
    return oldBounds.width != newBounds.width
}
點擊事件
點擊 Cell 時,可以取得 indexPath.section 與 indexPath.row,用來表示目前點擊的列與欄。

這種做法很適合用來建立簡單報表、比較表格或可捲動的資料矩陣。
- 上一篇文章: Swift 解方:導航欄標題過長導致返回按鈕文字消失
- 下一篇文章: Swift 多列表格加入排序:點擊標題切換升降序