
Swift 自訂載入進度條元件(支援 StoryBoard 即時預覽)
編輯:iOS 7 技巧
進度條是頁面載入、資料處理時常見的元件。為了讓程式碼更簡潔、也更容易複用,我們通常會把常用功能封裝成獨立元件。本文示範如何打造一個可在 StoryBoard 中即時預覽、並能調整多項屬性的自訂進度條。
為什麼要在 StoryBoard 中使用自訂元件
只要在類別與屬性上加上適當的關鍵字,就能享有兩大便利:
(1)在 StoryBoard 中能方便地調整元件的位置、布局與約束;
(2)可在屬性面板設定元件的各項屬性(含自訂屬性),且畫布會即時反映樣式變化。
一、建立自訂可視化元件
關鍵在於兩個 Interface Builder 屬性宣告:@IBDesignable 用來標識類別,讓 StoryBoard 能即時渲染;@IBInspectable 用來標識屬性,讓它出現在屬性檢查器中。
import UIKit

@IBDesignable class MyProgressBar: UIView {

    // 顯示進度的文字標籤
    private let textLabel = UILabel()
    // 顯示當前進度的區域
    private let bar = UIView()

    // 進度
    @IBInspectable var percent: Int = 0 {
        didSet {
            if percent > 100 { percent = 100 }
            else if percent < 0 { percent = 0 }
            textLabel.text = "\(percent)%"
            setNeedsLayout()
        }
    }

    // 文字顏色
    @IBInspectable var color: UIColor = .white {
        didSet { textLabel.textColor = color }
    }

    // 進度條顏色
    @IBInspectable var barColor: UIColor = .orange {
        didSet { bar.backgroundColor = barColor }
    }

    // 進度條背景顏色
    @IBInspectable var barBgColor: UIColor = .lightGray {
        didSet { layer.backgroundColor = barBgColor.cgColor }
    }

    override init(frame: CGRect) {
        super.init(frame: frame)
        initialSetup()
    }

    required init?(coder aDecoder: NSCoder) {
        super.init(coder: aDecoder)
        initialSetup()
    }

    // 初始化相關設置
    private func initialSetup() {
        bar.backgroundColor = self.barColor
        addSubview(bar)

        textLabel.textAlignment = .center
        textLabel.numberOfLines = 0
        textLabel.textColor = self.color
        textLabel.text = "\(self.percent)%"
        addSubview(textLabel)
    }

    // 布局相關設置
    override func layoutSubviews() {
        super.layoutSubviews()
        layer.backgroundColor = self.barBgColor.cgColor

        var barFrame = bounds
        barFrame.size.width *= (CGFloat(self.percent) / 100)
        bar.frame = barFrame

        textLabel.frame = bounds
    }
}
可以先用程式碼快速驗證效果:
class ViewController: UIViewController {

    override func viewDidLoad() {
        super.viewDidLoad()
        let myProgressBar = MyProgressBar(frame: CGRect(x: 50, y: 50, width: 200, height: 20))
        myProgressBar.percent = 50
        self.view.addSubview(myProgressBar)
    }
}
二、在 StoryBoard 中使用自訂元件
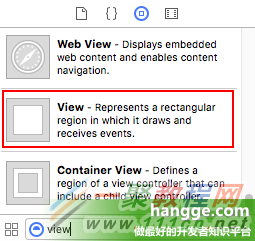
(1)打開 Main.storyboard,從元件庫拖入一個 View。
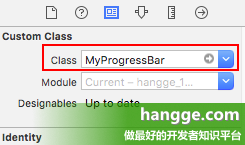
(2)在 Identity Inspector 中,把這個視圖的類別改成 MyProgressBar。
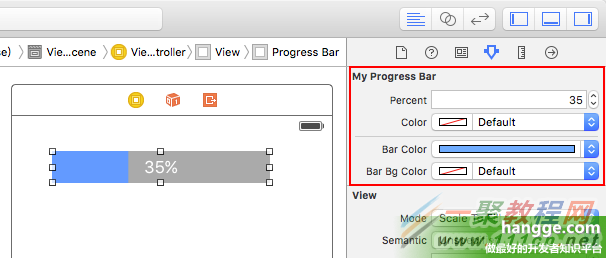
(3)此時畫布上已能看到自訂元件即時渲染的樣子。

(4)在 Attributes Inspector 面板中,可以調整元件的各項自訂屬性。
補充一點:即便自訂元件沒有使用 IB 關鍵字,也仍然能在 StoryBoard 中添加使用,只是畫布上無法即時更新,只會顯示一個空白矩形。加上 @IBDesignable 與 @IBInspectable 之後,開發體驗會提升一大截。
- 上一篇文章: iOS 購物車加入動畫效果實作
- 下一篇文章: 解決 iOS 開發證書「此證書的簽發者無效」問題