
UIPickerView 實作省、市、區三級聯動選擇器
編輯:iOS 7 技巧
UIPickerView 是 iOS 的滚轮式選擇器,可以產生單列或多列選項,外觀也能自訂,彈性很高。本文用它實作一個地址選擇器:選省份會帶動城市、選城市再帶動區縣。
先理解 UIPickerView 的分工
UIPickerView 直接繼承 UIView 而非 UIControl,所以它不像一般控制項那樣綁定事件,而是透過 delegate 與 dataSource 運作。
常用屬性與方法:
numberOfComponents:指定列的列表項數量(唯讀)。showsSelectionIndicator:是否顯示選中高亮。numberOfRowsInComponent::取得列數。rowSizeForComponent::取得指定列中列表項尺寸,回傳 CGSize。selectRow:inComponent:animated::程式化選取某列某項。selectedRowInComponent::取得指定列目前選中的列號。viewForRow:forComponent::取得指定列項的 UIView。
dataSource 必須實作的兩個方法:
numberOfComponentsInPickerView::決定有幾列。pickerView:numberOfRowsInComponent::決定指定列有幾項。
delegate 負責外觀與互動:
pickerView:rowHeightForComponent::列項高度。pickerView:widthForComponent::列寬。pickerView:titleForRow:forComponent::列項文字標題。pickerView:viewForRow:forComponent:reusingView::自訂列項視圖。pickerView:didSelectRow:inComponent::使用者選取時觸發——聯動的關鍵就在這裡。
在 Interface Builder 中,UIPickerView 只開放一個屬性可設定:Shows Selection Indicator。
實作步驟
1. 在 storyboard 上拖入 UIPickerView並建立 outlet:
@property (weak, nonatomic) IBOutlet UIPickerView *picker;
2. 宣告代理與資料結構
#import "ViewController.h"

@interface ViewController () <UIPickerViewDelegate, UIPickerViewDataSource>
{
    NSArray *_province;      // 省份
    NSDictionary *_city;     // 省 → 城市陣列
    NSDictionary *_country;  // 城市 → 區縣陣列
}
@end
3. 準備三層資料(用陣列存省、用字典做關聯,是聯動最直白的寫法)
_province = @[@"北京", @"廣西", @"廣東"];

_city = @{
    @"北京": @[@"朝陽區", @"東城區", @"西城區"],
    @"廣西": @[@"桂林市", @"南寧市"],
    @"廣東": @[@"惠州市", @"廣州市", @"深圳市", @"東莞市"]
};

_country = @{
    @"朝陽區": @[@"朝陽區1", @"朝陽區2", @"朝陽區3"],
    @"東城區": @[@"東城區1", @"東城區2", @"東城區3", @"東城區4"],
    @"西城區": @[@"西城區1", @"西城區2", @"西城區3", @"西城區4"],
    @"桂林市": @[@"桂林市1", @"桂林市2", @"桂林市3"],
    @"南寧市": @[@"南寧市1", @"南寧市2", @"南寧市3", @"南寧市4"],
    @"惠州市": @[@"惠州市1", @"惠州市2", @"惠州市3", @"惠州市4"],
    @"廣州市": @[@"廣州市1", @"廣州市2", @"廣州市3"],
    @"深圳市": @[@"深圳市1", @"深圳市2", @"深圳市3", @"深圳市4"],
    @"東莞市": @[@"東莞市1", @"東莞市2", @"東莞市3", @"東莞市4"]
};
4. 綁定代理
self.picker.dataSource = self;
self.picker.delegate = self;
5. 實作 dataSource:列數固定三列,每列項數依上層選取值推算
#pragma mark - 決定總列數
- (NSInteger)numberOfComponentsInPickerView:(UIPickerView *)pickerView {
    return 3;
}

#pragma mark - 決定每列項數
- (NSInteger)pickerView:(UIPickerView *)pickerView numberOfRowsInComponent:(NSInteger)component {
    if (component == 0) {
        return _province.count;
    }

    // 第二列:依目前選中的省份取城市
    NSString *provinceName = _province[[pickerView selectedRowInComponent:0]];
    NSArray *citys = _city[provinceName];

    if (component == 1) {
        return citys.count;
    }

    // 第三列:依目前選中的城市取區縣
    NSString *cityName = citys[[pickerView selectedRowInComponent:1]];
    return _country[cityName].count;
}
6. 實作 delegate:回傳每列每項的文字
- (NSString *)pickerView:(UIPickerView *)pickerView titleForRow:(NSInteger)row forComponent:(NSInteger)component {
    if (component == 0) {
        return _province[row];
    }

    NSString *provinceName = _province[[pickerView selectedRowInComponent:0]];
    NSArray *citys = _city[provinceName];

    if (component == 1) {
        return citys[row];
    }

    NSString *cityName = citys[[pickerView selectedRowInComponent:1]];
    return _country[cityName][row];
}
7. 處理選取事件——聯動的核心
- (void)pickerView:(UIPickerView *)pickerView didSelectRow:(NSInteger)row inComponent:(NSInteger)component {
    // 改省份 → 重載城市與區縣兩列
    if (component == 0) {
        [pickerView reloadComponent:1];
        [pickerView reloadComponent:2];
    }
    // 改城市 → 只需重載區縣那一列
    if (component == 1) {
        [pickerView reloadComponent:2];
    }

    NSInteger rowOne   = [pickerView selectedRowInComponent:0];
    NSInteger rowTwo   = [pickerView selectedRowInComponent:1];
    NSInteger rowThree = [pickerView selectedRowInComponent:2];

    NSString *provinceName = _province[rowOne];
    NSString *cityName     = _city[provinceName][rowTwo];
    NSString *areaName     = _country[cityName][rowThree];

    NSLog(@"%@~%@~%@", provinceName, cityName, areaName);
}
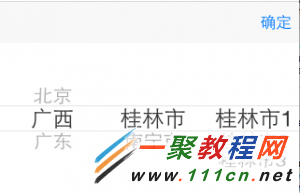
完成後即可得到一個可聯動的三列選擇器。

實務提醒
畫面上方那顆藍色「確定」按鈕所在的那一條,其實是一個 UIToolbar,本文不展開以免失焦。另外,真實專案的地址資料通常動輒數千筆,寫死在程式碼裡並不實際,建議改成 bundle 內的 plist/JSON 或後端 API,並在 reloadComponent: 時一併把選下列的偏移重設到 0,否則可能出現「新省份只有兩個城市,但城市列還停在第五格」這類空白錯位問題。
- 上一篇文章: iOS 頁面跳轉的五種做法與適用時機
- 下一篇文章: iOS 驗證碼倒數計時按鈕實作:用 GCD Timer 每秒更新