
iOS 定位與地圖實作:CoreLocation 與 MapKit 完整範例
編輯:iOS 相關教學
一、取得裝置位置:CoreLocation
Core Location 框架負責把硬體定位資訊轉成 CLLocation 物件。使用步驟是:導入 CoreLocation.framework,建立 CLLocationManager,設定精度與代理,然後呼叫 startUpdatingLocation。
要特別注意的是,持續定位非常耗電。一旦拿到需要的位置,就應該立刻 stopUpdatingLocation,這既是效能考量,也是使用者體驗的基本禮貌。
#import <CoreLocation/CoreLocation.h>

@interface HMTRootViewController : UIViewController <CLLocationManagerDelegate>
@property (nonatomic, retain) CLLocationManager *locationManage;
@end

@implementation HMTRootViewController

- (void)dealloc {
    RELEASE_SAFELY(_locationManage);
    [super dealloc];
}

- (void)viewDidLoad {
    [super viewDidLoad];
    [self createGPSMap];
    self.view.backgroundColor = [UIColor redColor];
}

- (void)createGPSMap {
    // 初始化位置服務
    self.locationManage = [[CLLocationManager alloc] init];

    // 回報所有位置變化,不做距離篩選
    _locationManage.distanceFilter = kCLDistanceFilterNone;

    // 採用最佳精度
    _locationManage.desiredAccuracy = kCLLocationAccuracyBest;

    _locationManage.delegate = self;

    // 開始定位
    [_locationManage startUpdatingLocation];
    [_locationManage release];
}

#pragma mark - 位置更新回呼
- (void)locationManager:(CLLocationManager *)manager didUpdateLocations:(NSArray *)locations {
    CLLocation *newLocation = [locations lastObject];

    // 拿到就停,省電
    [_locationManage stopUpdatingLocation];

    // 經緯度
    CLLocationCoordinate2D coord2D = newLocation.coordinate;
    NSLog(@"緯度 = %f, 經度 = %f", coord2D.latitude, coord2D.longitude);

    // 水平與垂直精度
    NSLog(@"水平精度 = %f, 垂直精度 = %f",
          newLocation.horizontalAccuracy, newLocation.verticalAccuracy);

    // 海拔高度
    NSLog(@"高度 = %f", newLocation.altitude);

    // 定位時間戳,格式化輸出
    NSDate *timestamp = [newLocation timestamp];
    NSDateFormatter *dateFormat = [[NSDateFormatter alloc] init];
    [dateFormat setDateFormat:@"yyyy-MM-dd HH:mm:ss a"];
    [dateFormat setAMSymbol:@"上午"];
    [dateFormat setPMSymbol:@"下午"];
    NSLog(@"時間 = %@", [dateFormat stringFromDate:timestamp]);

    // ============ 位置反編碼:座標 → 地址 ============
    CLGeocoder *geocoder = [[CLGeocoder alloc] init];
    [geocoder reverseGeocodeLocation:newLocation completionHandler:^(NSArray *placemarks, NSError *error) {
        for (CLPlacemark *place in placemarks) {
            NSLog(@"name = %@", place.name);                                  // 位置名稱
            NSLog(@"thoroughfare = %@", place.thoroughfare);                  // 街道
            NSLog(@"subAdministrativeArea = %@", place.subAdministrativeArea);
            NSLog(@"locality = %@", place.locality);                          // 城市
            NSLog(@"subLocality = %@", place.subLocality);                    // 區
            NSLog(@"country = %@", place.country);                            // 國家

            // 直接遍歷完整地址字典
            NSArray *allKeys = place.addressDictionary.allKeys;
            for (NSString *key in allKeys) {
                NSLog(@"key = %@, value = %@", key, place.addressDictionary[key]);
            }

            // 用系統常量取值,需導入 AddressBook 框架
            NSLog(@"city = %@", place.addressDictionary[(NSString *)kABPersonAddressCityKey]);

            NSString *city = place.locality;
            if (city == nil) {
                city = place.addressDictionary[(NSString *)kABPersonAddressStateKey];
            }
        }
    }];
}

@end
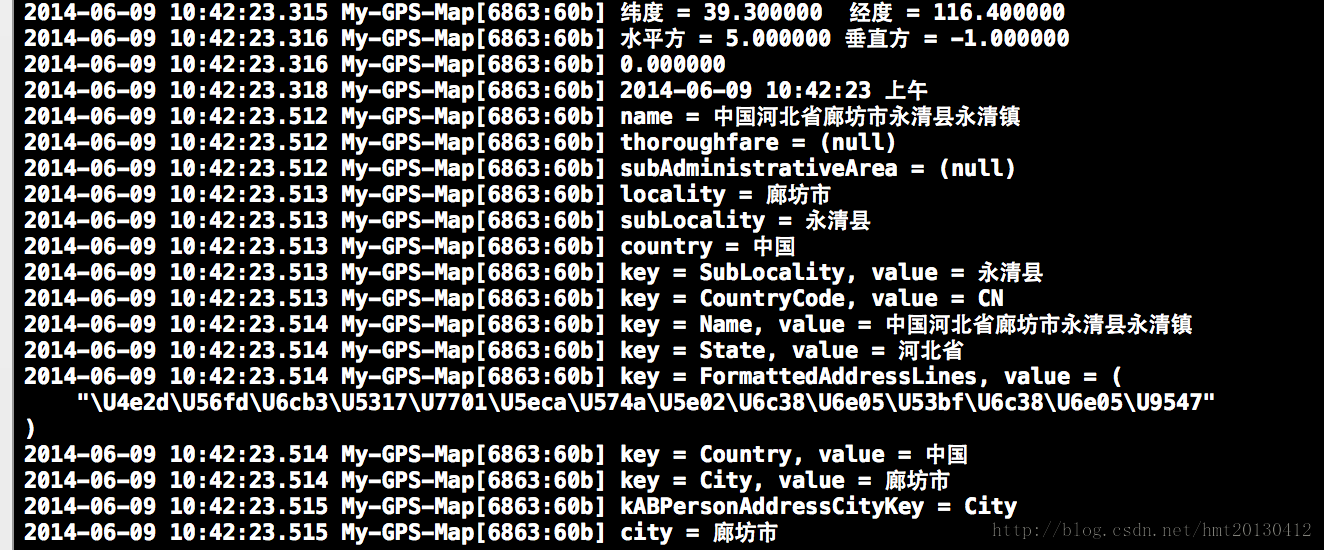
以 39.3, 116.4 這組座標測試,控制台會印出完整的地址層級資訊:
位置編碼:地址 → 座標
反方向的轉換同樣交給 CLGeocoder,只是改用 geocodeAddressString:。
// 先確認輸入不為空
if (self.locationTextField.text == nil || [self.locationTextField.text length] == 0) {
    return;
}

CLGeocoder *geocoder = [[CLGeocoder alloc] init];
[geocoder geocodeAddressString:_locationTextField.text completionHandler:^(NSArray *placemarks, NSError *error) {
    for (CLPlacemark *placemark in placemarks) {
        CLLocationCoordinate2D coordinate = placemark.location.coordinate;
        NSString *str = [NSString stringWithFormat:@"緯度 = %3.5f\n經度 = %3.5f",
                         coordinate.latitude, coordinate.longitude];
        NSLog(@"%@", str);

        NSDictionary *addressDictionary = placemark.addressDictionary;
        NSString *address = [addressDictionary objectForKey:(NSString *)kABPersonAddressStreetKey];
        NSString *state   = [addressDictionary objectForKey:(NSString *)kABPersonAddressStateKey];
        NSString *city    = [addressDictionary objectForKey:(NSString *)kABPersonAddressCityKey];
        NSLog(@"街道 = %@\n省 = %@\n城市 = %@", address, state, city);
    }
}];
二、顯示地圖與加入標注:MapKit
拿到座標之後,下一步自然就是把它畫在地圖上。導入 MapKit.framework,建立 MKMapView,設定地圖類型、顯示區域,再掛上自訂的 annotation。
#import <MapKit/MapKit.h>

@interface HMTMainViewController : UIViewController <MKMapViewDelegate>
@property (nonatomic, strong) MKMapView *mapView;
@end

@implementation HMTMainViewController

- (void)viewDidLoad {
    [super viewDidLoad];
    self.view.backgroundColor = [UIColor redColor];
    self.navigationItem.title = @"地圖標注";

    self.mapView = [[MKMapView alloc] initWithFrame:CGRectMake(0, 0, 320, 568)];
    self.mapView.showsUserLocation = YES;   // 顯示自身位置
    self.mapView.delegate = self;

    /* 地圖類型
       MKMapTypeStandard  標準地圖
       MKMapTypeSatellite 衛星地圖
       MKMapTypeHybrid    混合地圖 */
    self.mapView.mapType = MKMapTypeStandard;

    // 目標座標
    CLLocationCoordinate2D coord2D = {39.910650, 116.47030};
    // 顯示範圍,數值越大視野越廣
    MKCoordinateSpan span = {0.1, 0.1};
    MKCoordinateRegion region = {coord2D, span};
    [self.mapView setRegion:region animated:YES];

    // self.mapView.zoomEnabled = NO;    // 是否允許縮放
    // self.mapView.scrollEnabled = NO;  // 是否允許拖動

    // 加入自訂標注
    HMTAnnotation *annotation = [[HMTAnnotation alloc] initWithCGLocation:coord2D];
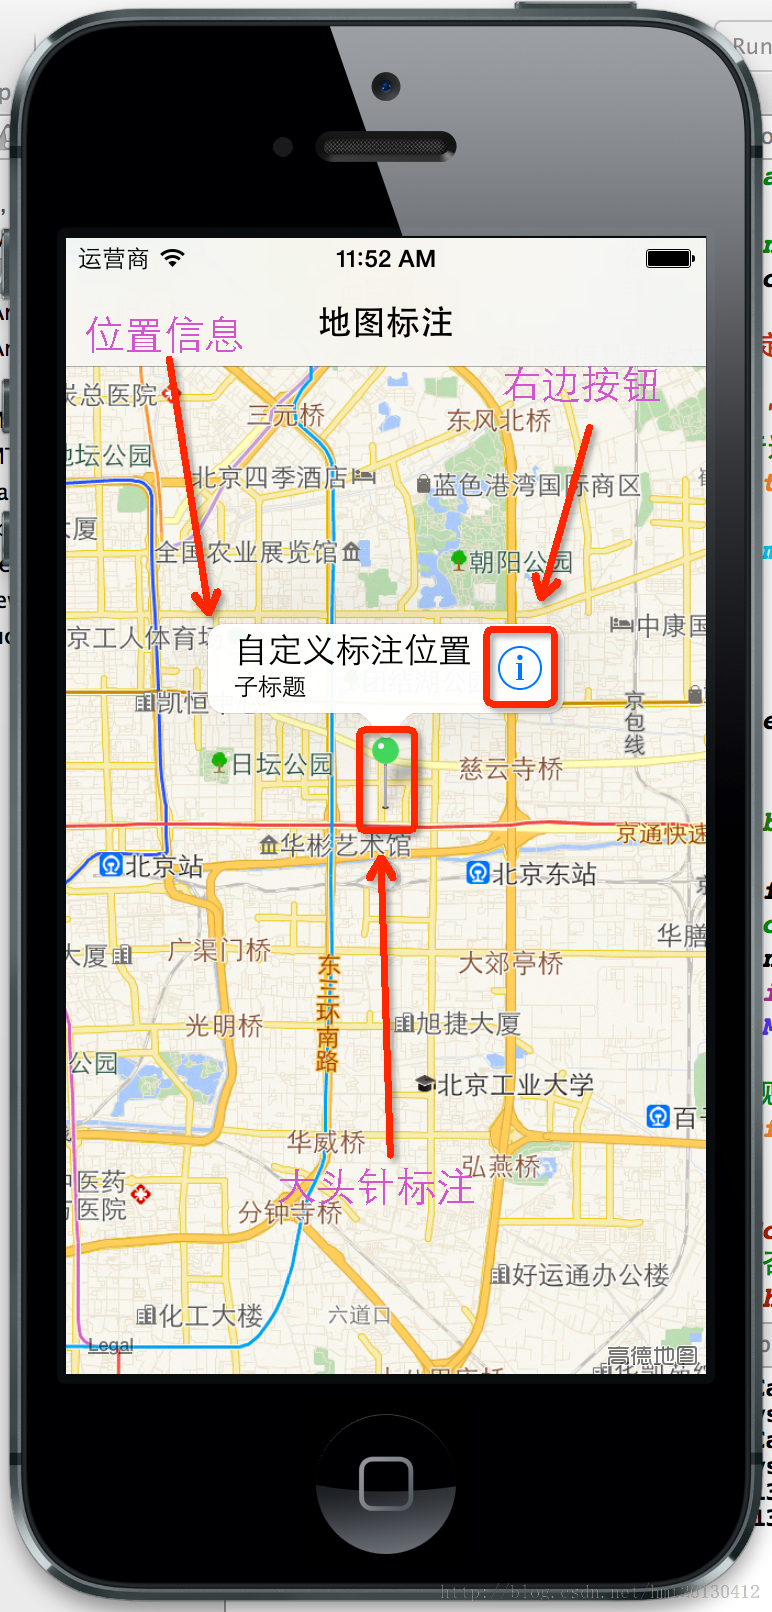
    annotation.title = @"自定義標注位置";
    annotation.subtitle = @"子標題";
    // 執行這一步就會觸發下面的 viewForAnnotation 代理
    [self.mapView addAnnotation:annotation];

    [self.view addSubview:_mapView];
}

#pragma mark - 提供標注視圖(大頭針)
- (MKAnnotationView *)mapView:(MKMapView *)mapView viewForAnnotation:(id<MKAnnotation>)annotation {
    /* 這個流程跟自訂 UITableViewCell 幾乎一模一樣:先從重用池取,取不到才建立 */
    static NSString *identifier = @"annotation";
    MKPinAnnotationView *annotationView =
        (MKPinAnnotationView *)[mapView dequeueReusableAnnotationViewWithIdentifier:identifier];
    if (annotationView == nil) {
        annotationView = [[MKPinAnnotationView alloc] initWithAnnotation:annotation
                                                         reuseIdentifier:identifier];
    }

    if ([annotation isKindOfClass:[HMTAnnotation class]]) {
        annotationView.pinColor = MKPinAnnotationColorGreen;   // 大頭針顏色
        annotationView.canShowCallout = YES;                   // 點擊後顯示標題氣泡
        // 若要完全自訂圖示,請改用 MKAnnotationView;MKPinAnnotationView 只能是大頭針造型
        annotationView.image = [UIImage imageNamed:@"customImage"];

        // 氣泡右側的附屬按鈕
        UIButton *button = [UIButton buttonWithType:UIButtonTypeDetailDisclosure];
        [button addTarget:self action:@selector(didClickAnnotationViewRightButtonAction:)
         forControlEvents:UIControlEventTouchUpInside];
        annotationView.rightCalloutAccessoryView = button;

        annotationView.animatesDrop = YES;   // 從天而降的動畫
        annotationView.annotation = annotation;
        return annotationView;
    }

    // 使用者當前位置這種系統標注,回傳 nil 讓系統用預設樣式
    return nil;
}

- (void)didClickAnnotationViewRightButtonAction:(UIButton *)button {
    NSLog(@"%d %s", __LINE__, __FUNCTION__);
}

// 位置更新
- (void)mapView:(MKMapView *)mapView didUpdateUserLocation:(MKUserLocation *)userLocation {
    NSLog(@"%d %s", __LINE__, __FUNCTION__);
}

// 標注被選中
- (void)mapView:(MKMapView *)mapView didSelectAnnotationView:(MKAnnotationView *)view {
    NSLog(@"%d %s", __LINE__, __FUNCTION__);
}

// 顯示區域改變
- (void)mapView:(MKMapView *)mapView regionDidChangeAnimated:(BOOL)animated {
    NSLog(@"%d %s", __LINE__, __FUNCTION__);
}

@end
自訂 MKAnnotation 模型
只要遵循 MKAnnotation 協議,任何類別都能當標注使用。這裡最容易被忽略的一點是:忘記宣告 <MKAnnotation>,addAnnotation 完全不會有任何反應。
#import <Foundation/Foundation.h>
#import <MapKit/MapKit.h>

@interface HMTAnnotation : NSObject <MKAnnotation>
@property (nonatomic, readonly) CLLocationCoordinate2D coordinate;  // 座標,唯讀
@property (nonatomic, copy) NSString *title;                        // 主標題
@property (nonatomic, copy) NSString *subtitle;                     // 副標題,可選

- (id)initWithCGLocation:(CLLocationCoordinate2D)coordinate;
@end

@implementation HMTAnnotation

- (id)initWithCGLocation:(CLLocationCoordinate2D)coordinate {
    if (self = [super init]) {
        _coordinate = coordinate;
    }
    return self;
}

@end
最後提醒兩件事:一是 iOS 8 之後定位權限需要動態請求(requestWhenInUseAuthorization),並在 Info.plist 補上用途說明;二是反編碼會實際走網路,記得處理 error 與空 placemarks 的情況,別假設回呼一定有資料。