
UITabBarController 實戰:標籤欄配置、代理方法與模態跳轉
編輯:iOS 相關教學
先看 UITabBarController 的 view 層級結構,理解父子關係之後再動手寫,會清楚很多:
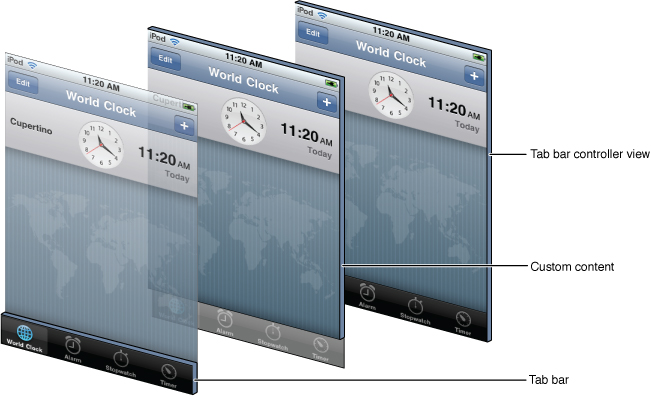
一、建立 TabBarController 與各分頁的 tabBarItem
tabBarItem 有兩種寫法:一是逐項設定 title 與 image;二是直接用系統提供的 UITabBarSystemItem 枚舉,一次帶入圖示與文字,省去自己找圖的麻煩。
- (BOOL)application:(UIApplication *)application didFinishLaunchingWithOptions:(NSDictionary *)launchOptions {
    self.window = [[UIWindow alloc] initWithFrame:[[UIScreen mainScreen] bounds]];
    self.window.backgroundColor = [UIColor whiteColor];

#pragma mark - 第一個分頁:自行設定標題與圖片
    HMT_AViewController *tabBarViewA = [[HMT_AViewController alloc] init];
    tabBarViewA.tabBarItem.title = @"微信";                    // 標籤欄標題
    // tabBarViewA.tabBarItem.image = [UIImage imageNamed:@"1.png"];
    tabBarViewA.tabBarItem.badgeValue = @"3";                  // 右上角數字提醒,類似未讀訊息
    // iOS 7 之後改寫法:
    // tabBarViewA.tabBarItem.selectedImage = actionMenu.selectedIcon;

#pragma mark 第二個分頁:使用系統內建樣式
    HMT_BViewController *tabBarViewB = [[HMT_BViewController alloc] init];
    tabBarViewB.tabBarItem = [[UITabBarItem alloc] initWithTabBarSystemItem:UITabBarSystemItemSearch tag:1];
    tabBarViewB.tabBarItem.badgeValue = @"GO";

#pragma mark 第三個分頁
    HMT_CViewController *tabBarViewC = [[HMT_CViewController alloc] init];
    tabBarViewC.tabBarItem = [[UITabBarItem alloc] initWithTabBarSystemItem:UITabBarSystemItemDownloads tag:2];
    tabBarViewC.tabBarItem.badgeValue = @"new";

#pragma mark 第四個分頁
    HMT_DViewController *tabBarViewD = [[HMT_DViewController alloc] init];
    tabBarViewD.tabBarItem = [[UITabBarItem alloc] initWithTabBarSystemItem:UITabBarSystemItemFavorites tag:3];
    tabBarViewD.tabBarItem.badgeValue = @"99";

#pragma mark 第五個分頁
    HMT_EViewController *tabBarViewE = [[HMT_EViewController alloc] init];
    tabBarViewE.tabBarItem = [[UITabBarItem alloc] initWithTabBarSystemItem:UITabBarSystemItemHistory tag:4];
    tabBarViewE.tabBarItem.badgeValue = @"sky";

#pragma mark 第六個分頁:超過五個會自動產生 More
    /* viewControllers 一旦塞入超過五個 item,tab bar controller 會自動插入一個
       More view controller 來管理多餘的項目,它以表格形式呈現剩餘功能,數量不限 */
    HMT_FViewController *tabBarViewF = [[HMT_FViewController alloc] init];
    tabBarViewF.tabBarItem = [[UITabBarItem alloc] initWithTabBarSystemItem:UITabBarSystemItemContacts tag:5];
    tabBarViewF.tabBarItem.badgeValue = @"AG";

#pragma mark - 組裝 TabBarController
    UITabBarController *tabBarController = [[UITabBarController alloc] init];

    // 預設貼齊底部,若要調整位置可自行改 frame(44 是標準高度)
    // tabBarController.tabBar.frame = CGRectMake(0, 20, 320, 44);

    // viewControllers 決定這個 tabBar 總共有幾個畫面可切換
    tabBarController.viewControllers = [NSArray arrayWithObjects:
                                        tabBarViewA, tabBarViewB, tabBarViewC,
                                        tabBarViewD, tabBarViewE, tabBarViewF, nil];

    tabBarController.tabBar.tintColor = [UIColor greenColor];              // 整體著色
    tabBarController.tabBar.selectedImageTintColor = [UIColor brownColor]; // 選中態著色
    // tabBarController.tabBar.backgroundImage = [UIImage imageNamed:@"@@@@@"];

    // 啟動時預設停在第三個(索引從 0 起算,3 代表第四個分頁)
    tabBarController.selectedIndex = 3;

    self.window.rootViewController = tabBarController;
    [self.window makeKeyAndVisible];
    return YES;
}
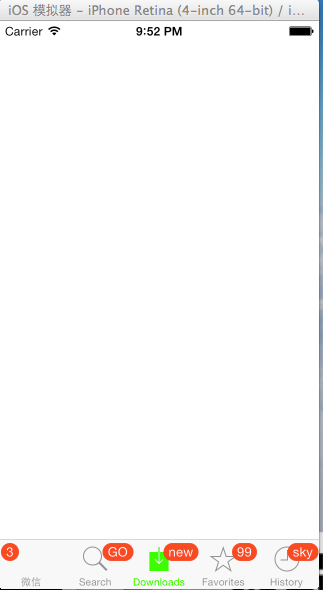
二、UITabBarControllerDelegate 的幾個關鍵方法
想要攔截分頁切換、控制哪些分頁不可點擊,就必須實作 UITabBarControllerDelegate 協議並設定 delegate。
tabBarController.delegate = self;

// 決定哪些分頁允許被點擊
- (BOOL)tabBarController:(UITabBarController *)tabBarController
shouldSelectViewController:(UIViewController *)viewController {
    // 讓 HMT_CViewController 對應的分頁無法被點選
    if ([viewController isKindOfClass:[HMT_CViewController class]]) {
        return NO;
    }
    return YES;
}

// 分頁被選中時的回呼,常用於埋點或同步狀態
- (void)tabBarController:(UITabBarController *)tabBarController
 didSelectViewController:(UIViewController *)viewController {
}

// 以下三個是 More 頁面進入/離開「編輯模式」時的通知
- (void)tabBarController:(UITabBarController *)tabBarController
willBeginCustomizingViewControllers:(NSArray *)viewControllers {
}

- (void)tabBarController:(UITabBarController *)tabBarController
willEndCustomizingViewControllers:(NSArray *)viewControllers
                           changed:(BOOL)changed {
}

- (void)tabBarController:(UITabBarController *)tabBarController
 didEndCustomizingViewControllers:(NSArray *)viewControllers
                           changed:(BOOL)changed {
}
三、從分頁觸發模態畫面
第一個分頁放一顆按鈕,點擊後以 present 方式彈出模態控制器,並示範幾種轉場動畫與呈現樣式。
#import "HMT-AViewController.h"
#import "HMTModalShowViewController.h"

@implementation HMT_AViewController

- (void)viewDidLoad {
    [super viewDidLoad];
    self.view.backgroundColor = [UIColor redColor];

    UIButton *button = [UIButton buttonWithType:UIButtonTypeDetailDisclosure];
    button.frame = CGRectMake(100, 100, 100, 100);
    [button addTarget:self action:@selector(modalShow) forControlEvents:UIControlEventTouchUpInside];
    [self.view addSubview:button];
}

- (void)modalShow {
    HMTModalShowViewController *modalShowVC = [[HMTModalShowViewController alloc] init];

    /* 轉場動畫可選值:
       UIModalTransitionStyleCoverVertical  預設,由下往上
       UIModalTransitionStyleFlipHorizontal 水平翻轉
       UIModalTransitionStyleCrossDissolve  淡入淡出
       UIModalTransitionStylePartialCurl    翻頁 */
    modalShowVC.modalTransitionStyle = UIModalTransitionStyleCrossDissolve;

    /* 呈現樣式可選值:
       UIModalPresentationFullScreen     預設全螢幕
       UIModalPresentationPageSheet
       UIModalPresentationFormSheet
       UIModalPresentationCurrentContext
       UIModalPresentationCustom
       UIModalPresentationNone = -1 */
    modalShowVC.modalPresentationStyle = UIModalPresentationFullScreen;

    // 用導航控制器包裝,模態畫面才有導航欄可用
    UINavigationController *modalShowNC = [[UINavigationController alloc] initWithRootViewController:modalShowVC];

    [self presentViewController:modalShowNC animated:YES completion:^{
        NSLog(@"hello world");
    }];
}

@end
被呈現的那一端,用導航欄左側的 bar button 觸發關閉,完成動畫後印出訊息:
@implementation HMTModalShowViewController

- (void)viewDidLoad {
    [super viewDidLoad];
    self.view.backgroundColor = [UIColor yellowColor];

    UIBarButtonItem *barButton = [[UIBarButtonItem alloc]
                                  initWithBarButtonSystemItem:UIBarButtonSystemItemAdd
                                  target:self action:@selector(modalDismiss)];
    self.navigationItem.leftBarButtonItem = barButton;
    self.navigationItem.title = @"humingtao";
}

- (void)modalDismiss {
    [self dismissViewControllerAnimated:YES completion:^{
        NSLog(@"退出 GoodBye");
    }];
}

@end
幾個容易踩到的重點:模態呈現必須由「當前可見」的控制器發出;present 與 dismiss 一律成對出現;若要自訂轉場,iOS 7 之後應改用 transitioningDelegate 搭配自訂的 animator,而不是舊有的 DEPRECATED API。