
iOS 開發中如何精準控制螢幕旋轉方向
螢幕旋轉的控制看似簡單,實際上從 iOS 5.1 到 iOS 6 經歷了 API 的重大變革,許多開發者都曾在這裡踩過坑。本文整理了各版本的旋轉控制方法,以及橫豎屏切換時視圖錯亂的處理思路。
舊版 API 的退場
在 iOS 5.1 及更早版本中,我們通常透過 shouldAutorotateToInterfaceOrientation: 來單獨控制某個 UIViewController 的旋屏方向:
- (BOOL)shouldAutorotateToInterfaceOrientation:(UIInterfaceOrientation)interfaceOrientation
{
    return (interfaceOrientation == UIInterfaceOrientationPortrait);
}
然而到了 iOS 6,這個方法被正式廢棄,改為使用 supportedInterfaceOrientations 與 preferredInterfaceOrientationForPresentation。實測會發現,單靠 supportedInterfaceOrientations 是無法鎖定螢幕的:
-(NSUInteger)supportedInterfaceOrientations
{
    return UIInterfaceOrientationMaskPortrait;
}
能否鎖定螢幕的關鍵:UINavigationController
多次實驗後歸納出的做法是:子類化 UINavigationController,把方向判斷轉發給當前顯示的頂層控制器:
- (BOOL)shouldAutorotate
{
    return self.topViewController.shouldAutorotate;
}

- (NSUInteger)supportedInterfaceOrientations
{
    return self.topViewController.supportedInterfaceOrientations;
}
接著將這個子類設定為程式入口,或指定為 self.window.rootViewController,之後再往裡頭加入自己的 view controller。
禁止某個 view controller 旋屏(全版本通用)
- (BOOL)shouldAutorotateToInterfaceOrientation:(UIInterfaceOrientation)interfaceOrientation
{
    return (interfaceOrientation == UIInterfaceOrientationPortrait);
}

-(BOOL)shouldAutorotate
{
    return NO;
}

-(NSUInteger)supportedInterfaceOrientations
{
    return UIInterfaceOrientationMaskPortrait;
}
開啟某個 view controller 的全部方向
- (BOOL)shouldAutorotateToInterfaceOrientation:(UIInterfaceOrientation)interfaceOrientation
{
    return (interfaceOrientation != UIInterfaceOrientationPortraitUpsideDown);
}

-(NSUInteger)supportedInterfaceOrientations
{
    return UIInterfaceOrientationMaskAllButUpsideDown;
}

-(BOOL)shouldAutorotate
{
    return YES;
}
如此一來,就能對每個 view controller 進行獨立的方向控制。
整個 App 都不支援旋屏
如果整個應用裡所有 view controller 都不需要旋轉,乾脆直接在 AppDelegate 層面處理:
- (NSUInteger)application:(UIApplication *)application supportedInterfaceOrientationsForWindow:(UIWindow *)window
{
    return UIInterfaceOrientationMaskPortrait;
}
橫豎屏切換後視圖錯亂怎麼辦?
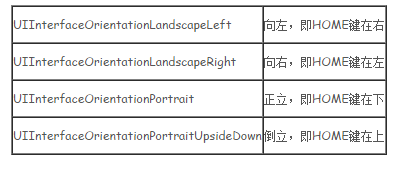
處理旋屏時,先要理解描述設備方向的四種狀態(Portrait、PortraitUpsideDown、LandscapeLeft、LandscapeRight)。針對不同需求,大致有以下幾種處理思路:
情況一:鎖定螢幕,不支援旋轉
-(BOOL)shouldAutorotateToInterfaceOrientation:(UIInterfaceOrientation)interfaceOrientation
{
    return NO;
}
情況二:支援部分方向
-(BOOL)shouldAutorotateToInterfaceOrientation:(UIInterfaceOrientation)interfaceOrientation
{
    return (interfaceOrientation != UIInterfaceOrientationPortraitUpsideDown);
}
情況三:旋屏時手動調整控制項大小與位置
系統可能只幫你拉伸背景圖,卻不管按鈕等元件。此時可在旋轉動畫中依方向重設 frame:
-(void)willAnimateRotationToInterfaceOrientation:(UIInterfaceOrientation)toInterfaceOrientation duration:(NSTimeInterval)duration
{
    if (UIInterfaceOrientationIsPortrait(toInterfaceOrientation)) {
        NSLog(@"現在是豎屏");
        [btn setFrame:CGRectMake(213, 442, 340, 46)];
    }
    if (UIInterfaceOrientationIsLandscape(toInterfaceOrientation)) {
        NSLog(@"現在是橫屏");
        [btn setFrame:CGRectMake(280, 322, 460, 35)];
    }
}
情況四:讓元件透過旋轉自適應,而非硬編碼座標
可以監聽設備方向的通知,再依狀態旋轉元件:
- (void)viewDidLoad
{
    [super viewDidLoad];
    UIDevice *device = [UIDevice currentDevice];
    [device beginGeneratingDeviceOrientationNotifications];
    NSNotificationCenter *ncenter = [NSNotificationCenter defaultCenter];
    [ncenter addObserver:self selector:@selector(orientationChanged)
                    name:UIDeviceOrientationDidChangeNotification object:device];
}

-(void)rotation_btn:(float)n
{
    UIButton *robtn = self.btn;
    robtn.transform = CGAffineTransformMakeRotation(n * M_PI / 180.0);
}

-(void)orientationChanged
{
    UIDeviceOrientation orientation = [[UIDevice currentDevice] orientation];
    switch (orientation) {
        case UIDeviceOrientationPortrait:
            [self rotation_btn:0.0];
            break;
        case UIDeviceOrientationPortraitUpsideDown:
            [self rotation_btn:90.0*2];
            break;
        case UIDeviceOrientationLandscapeLeft:
            [self rotation_btn:90.0*3];
            break;
        case UIDeviceOrientationLandscapeRight:
            [self rotation_btn:90.0];
            break;
        default:
            break;
    }
}
此外,你也可能需要設定 autoresizesSubviews = YES 讓子視圖自動縮放;或者乾脆為橫豎屏各準備一份 Subview,在不同狀態下替換。別忘了調整下圖中標示的相關設定:
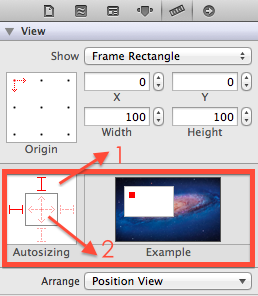
官方 Example 中的動畫把適應效果呈現得非常清晰,照著操作即可輕鬆完成自訂的旋轉適配。
- 上一篇文章: 徹底搞懂 Cocos2d-x 在 iOS 上的記憶體管理機制
- 下一篇文章: 實作教學:在 iOS 開發中打造可拖動的視圖