
動手實作:iOS 開發中 UISwitch 開關控件的兩種用法
UISwitch 是 iOS 裡最常見的開關控制元件,無論是設定頁面的通知開啟,還是功能的啟停切換,都少不了它的身影。本文整理了兩種建立與使用 UISwitch 的完整做法,一種是純程式碼動態建立,另一種則是透過 Storyboard/xib 拖曳完成,並附上事件監聽與自訂樣式的進階範例。
一、用程式碼動態建立 UISwitch
首先開啟 Xcode,新增一個名為 Switch 的專案,範本選擇 Single View Application。接著打開 ViewController.m,在 viewDidLoad 方法中寫入以下程式碼:
- (void)viewDidLoad
{
    [super viewDidLoad];
    UISwitch *switchButton = [[UISwitch alloc] initWithFrame:CGRectMake(50, 100, 20, 10)];
    [switchButton setOn:YES];
    [switchButton addTarget:self action:@selector(switchAction:) forControlEvents:UIControlEventValueChanged];
    [self.view addSubview:switchButton];
}
這裡有兩個關鍵點。第一,addTarget:action:forControlEvents: 中的 switchAction: 是按下開關時要觸發的事件方法,需要我們自行實作。第二,別忘了呼叫 [self.view addSubview:switchButton],把開關真正加到畫面上,否則它不會顯示。
監聽開關狀態變化
事件方法的實作如下,透過 isOn 判斷目前是開啟還是關閉,並即時更新一個用來顯示結果的 Label:
-(void)switchAction:(id)sender
{
    UISwitch *switchButton = (UISwitch*)sender;
    BOOL isButtonOn = [switchButton isOn];
    if (isButtonOn) {
        showSwitchValue.text = @"是";
    } else {
        showSwitchValue.text = @"否";
    }
}
其中 showSwitchValue 是透過拖曳方式放到介面上的 Label,用來直觀呈現切換結果。執行後即可看到開關作用:
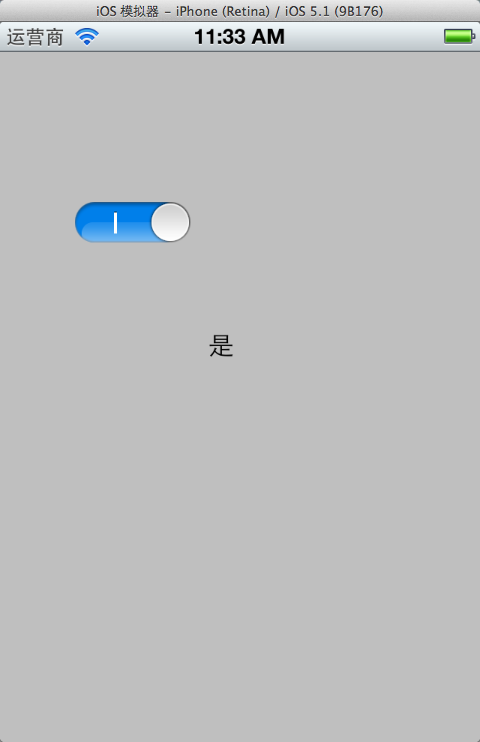
二、透過拖曳方式使用 UISwitch
相較於純程式碼,利用 xib 拖曳的做法更直觀,步驟如下:
1、從元件庫拖一個 UISwitch 到 xib 畫面上。
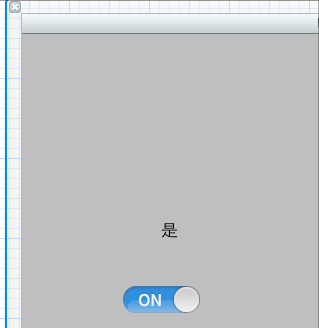
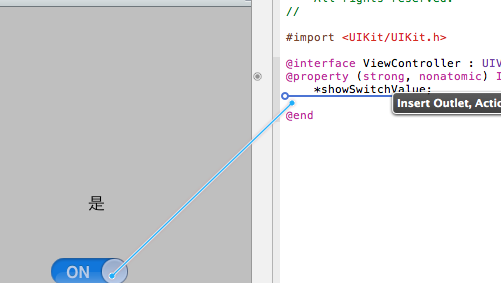
2、按下 alt + command + return 開啟 Assistant Editor 模式,選中 UISwitch,按住 Control 鍵拖曳到 ViewController.h。
3、在跳出視窗中選擇 Action 方式。
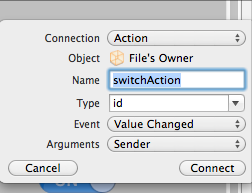
4、在 .m 檔案中實作 switchAction。由於方法名稱與前面動態建立的相同,記得先把先前那段註解掉,避免衝突:
- (IBAction)switchAction:(id)sender {
    UISwitch *switchButton = (UISwitch*)sender;
    BOOL isButtonOn = [switchButton isOn];
    if (isButtonOn) {
        showSwitchValue.text = @"是";
    } else {
        showSwitchValue.text = @"否";
    }
}
進階:自訂 UISwitch(HMCustomSwitch)
系統預設的 UISwitch 樣式比較單調,如果想顯示自訂的 ON/OFF 文字、調整字型與顏色,可以參考 HMCustomSwitch 的實作。它的核心思路其實是繼承 UISlider,左右兩側各放一個 UILabel,開啟時滑塊滑到最右、關閉時滑到最左。以下是 .m 檔的關鍵程式碼:
@implementation HMCustomSwitch

@synthesize on;
@synthesize tintColor, clippingView, leftLabel, rightLabel;

+(HMCustomSwitch *)switchWithLeftText:(NSString *)leftText andRight:(NSString *)rightText
{
    HMCustomSwitch *switchView = [[HMCustomSwitch alloc] initWithFrame:CGRectZero];
    switchView.leftLabel.text = leftText;
    switchView.rightLabel.text = rightText;
    return [switchView autorelease];
}

-(id)initWithFrame:(CGRect)rect
{
    if ((self=[super initWithFrame:CGRectMake(rect.origin.x, rect.origin.y, 95, 27)]))
    {
        [self awakeFromNib];
    }
    return self;
}

-(void)awakeFromNib
{
    [super awakeFromNib];
    self.backgroundColor = [UIColor clearColor];

    [self setThumbImage:[UIImage imageNamed:@"switchThumb.png"] forState:UIControlStateNormal];
    [self setMinimumTrackImage:[UIImage imageNamed:@"switchBlueBg.png"] forState:UIControlStateNormal];
    [self setMaximumTrackImage:[UIImage imageNamed:@"switchOffPlain.png"] forState:UIControlStateNormal];

    self.minimumValue = 0;
    self.maximumValue = 1;
    self.continuous = NO;
    self.on = NO;
    self.value = 0.0;
}
@end
從程式碼可以看出,它透過 UISlider 的滑塊位移來模擬開關效果,並在左右各配置一個文字標籤。使用時可以透過便利的建構方法來自訂左右文字:
HMCustomSwitch *switchView = [HMCustomSwitch switchWithLeftText:@"YES" andRight:@"NO"];
switchView.center = CGPointMake(160.0f, 60.0f);
switchView.on = YES;
[contentView addSubview:switchView];
除了標準的 ON/OFF,你還可以自訂字型、顏色,甚至多行文字與背景色調,讓開關更貼合你的 App 風格:
switchView = [HMCustomSwitch switchWithLeftText:@"Hello\nWorld" andRight:@"Bye\nWorld"];
switchView.center = CGPointMake(160.0f, 140.0f);
switchView.on = YES;
switchView.tintColor = [UIColor orangeColor];
switchView.leftLabel.numberOfLines = 2;
switchView.rightLabel.numberOfLines = 2;
switchView.leftLabel.lineBreakMode = NSLineBreakByWordWrapping;
switchView.rightLabel.lineBreakMode = NSLineBreakByWordWrapping;
[contentView addSubview:switchView];
若要接收切換事件,一樣透過 addTarget:action:forControlEvents: 綁定即可:
[switchView addTarget:self action:@selector(switchFlipped:) forControlEvents:UIControlEventValueChanged];

-(void)switchFlipped:(HMCustomSwitch*)switchView
{
    NSLog(@"switchFlipped=%f  on:%@", switchView.value, (switchView.on ? @"Y" : @"N"));
}
以上就是 UISwitch 的兩種基本用法與自訂技巧,不論哪一種,掌握「建立 → 綁定事件 → 讀取狀態」這個流程,就能輕鬆應付各種開關互動需求。