
iOS 多線程開發:透徹理解線程的狀態與生命週期
編輯:iOS 相關教學
在開發中,我們總希望縮短用戶等待、讓程序跑得更快。但無論用什麼語言寫的程序,最終都會被翻譯成彙編、再解釋成機器碼順序執行,一個複雜的多步操作只能一步步來。想打破這種瓶頸,可以從兩個角度著手:對單核處理器而言,把不同步驟分到不同線程,用戶完成 UI 操作後,後續任務交給其他線程,CPU 空閒時接著跑,用戶則能繼續做別的事;對多核處理器而言,UI 線程之外的操作不僅能讓用戶繼續操作,還能把後續任務分散到多個空閒核心上並行執行,既避免阻塞又提升效率。從 iPad 2 的雙核 A5(iPhone 4S 起)到後來加入協處理器的 A7,如何榨乾這些硬件性能,值得深入思考。今天我們就聚焦 iOS 多線程中的線程狀態。
一、基礎概念
創建線程:
self.thread=[[NSThread alloc]initWithTarget:self selector:@selector(test) object:nil];
創建方式有很多種,這裡從略。
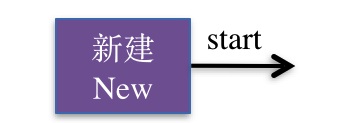
開啟線程:
[self.thread start];

線程的運行與阻塞:
(1)阻塞 2 秒:
[NSThread sleepForTimeInterval:2.0];
(2)以當前時間為基準阻塞 4 秒:
NSDate *date=[NSDate dateWithTimeIntervalSinceNow:4.0];
[NSThread sleepUntilDate:date];
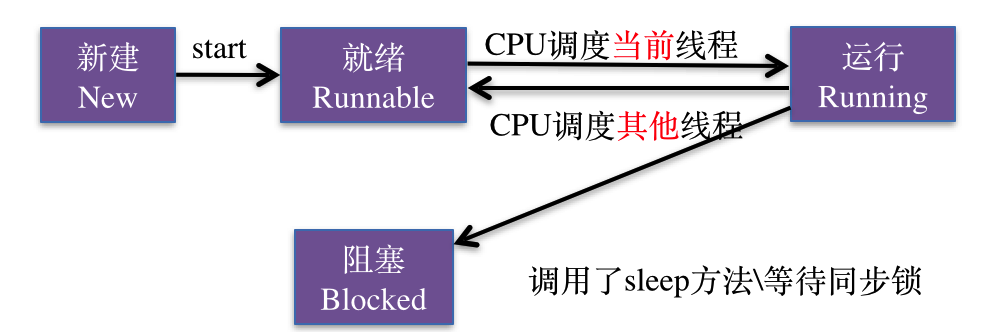
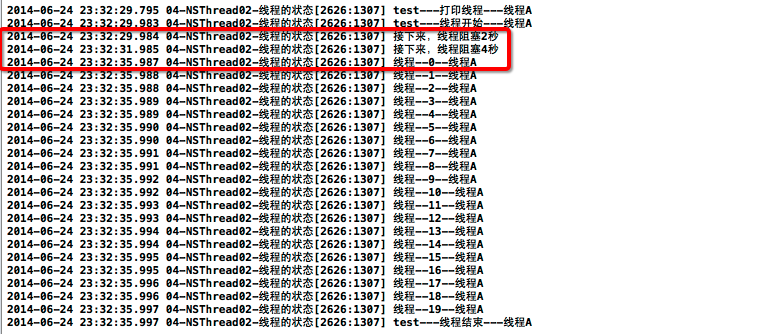
線程阻塞時,在內存中的表現是:它被移出可調度線程池,此時無法被調度。
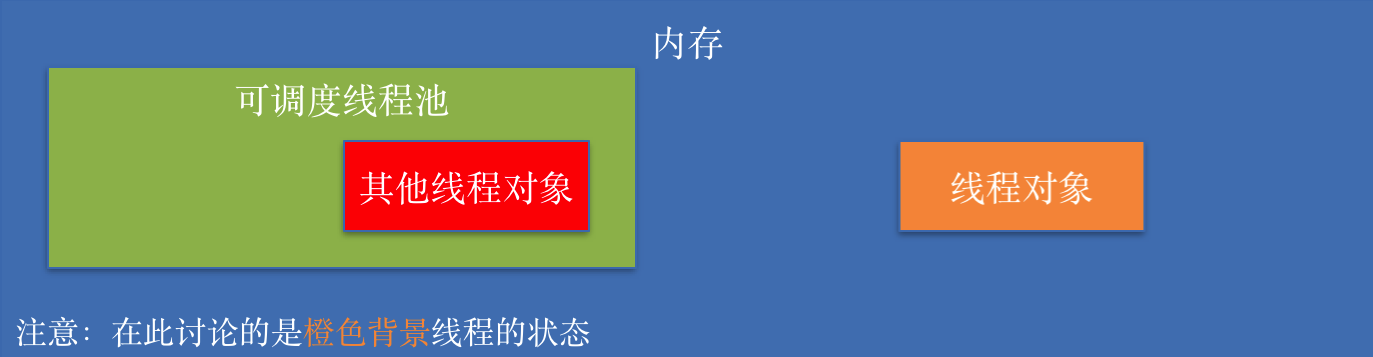
線程的死亡:任務結束、發生異常、被強制退出,這三種情況都會導致線程死亡。
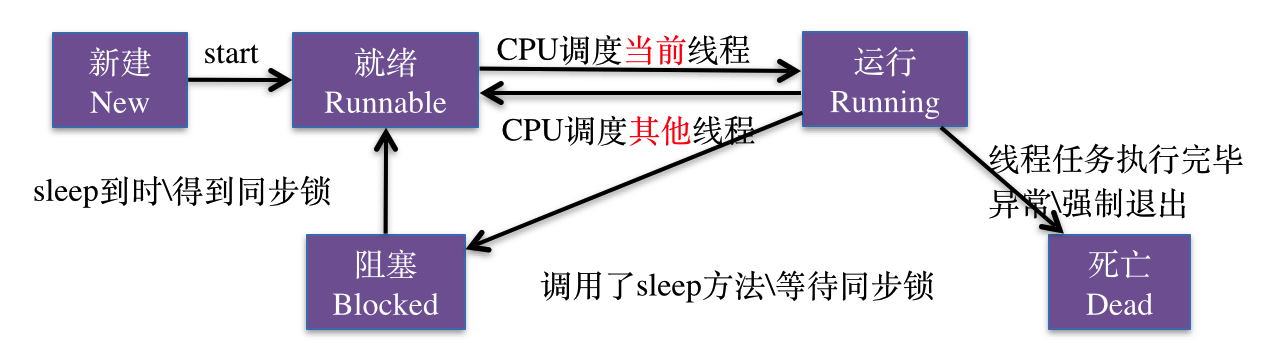
線程死亡後,線程對象會從內存中移除。

二、代碼示例
示例一:創建線程並觀察阻塞:
// YYViewController.m
#import "YYViewController.h"

@interface YYViewController ()
@property(nonatomic,strong)NSThread *thread;
@end

@implementation YYViewController
- (void)viewDidLoad {
    [super viewDidLoad];
    // 創建線程
    self.thread=[[NSThread alloc]initWithTarget:self selector:@selector(test) object:nil];
    [self.thread setName:@"線程A"];
}
// 手指按下時開啟線程
-(void)touchesBegan:(NSSet *)touches withEvent:(UIEvent *)event {
    [self.thread start];
}
-(void)test {
    NSThread *current=[NSThread currentThread];
    NSLog(@"test---打印線程---%@",self.thread.name);
    NSLog(@"test---線程開始---%@",current.name);
    // 阻塞 2 秒
    NSLog(@"接下來,線程阻塞 2 秒");
    [NSThread sleepForTimeInterval:2.0];
    // 以當前時間為基準阻塞 4 秒
    NSLog(@"接下來,線程阻塞 4 秒");
    NSDate *date=[NSDate dateWithTimeIntervalSinceNow:4.0];
    [NSThread sleepUntilDate:date];
    for (int i=0; i<10; i++) {
        NSLog(@"線程--%d--%@",i,current.name);
    }
    NSLog(@"test---線程結束---%@",current.name);
}
@end
打印結果:
示例二:中途退出線程:
// YYViewController.m
#import "YYViewController.h"

@interface YYViewController ()
@property(nonatomic,strong)NSThread *thread;
@end

@implementation YYViewController
- (void)viewDidLoad {
    [super viewDidLoad];
    self.thread=[[NSThread alloc]initWithTarget:self selector:@selector(test) object:nil];
    [self.thread setName:@"線程A"];
}
-(void)touchesBegan:(NSSet *)touches withEvent:(UIEvent *)event {
    [self.thread start];
}
-(void)test {
    NSThread *current=[NSThread currentThread];
    NSLog(@"test---打印線程---%@",self.thread.name);
    NSLog(@"test---線程開始---%@",current.name);
    [NSThread sleepForTimeInterval:2.0];
    NSDate *date=[NSDate dateWithTimeIntervalSinceNow:4.0];
    [NSThread sleepUntilDate:date];
    for (int i=0; i<10; i++) {
        NSLog(@"線程--%d--%@",i,current.name);
        if (5==i) {
            // 強制結束線程
            [NSThread exit];
        }
    }
    NSLog(@"test---線程結束---%@",current.name);
}
@end
打印示例:
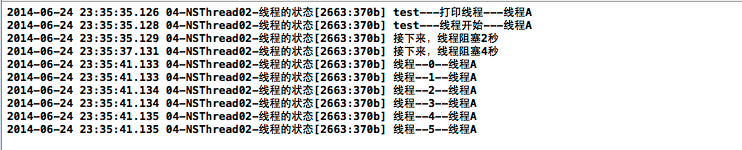
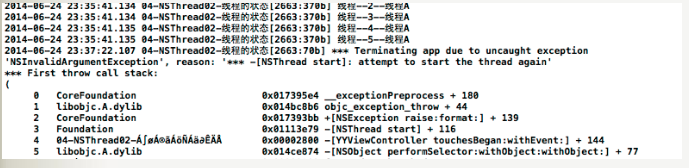
特別注意:人死不能復生,線程一旦死亡同樣無法復活。如果在線程結束後再次點擊屏幕嘗試重新開啟它,程序就會崩潰。
以上就是關於 iOS 多線程開發中線程狀態的介紹,希望能幫你理清線程從創建、運行、阻塞到死亡的完整生命週期。