
iOS 資料持久化:歸檔(NSCoding)與偏好設置 NSUserDefaults 詳解
一、為什麼需要歸檔
iOS 提供的持久化方式各有適用範圍。plist 只能處理系統自帶的常用類型,而且每次都得先取路徑,寫起來繁瑣;偏好設置把所有內容塞在同一個檔案裡,主要服務於應用的設定資訊。
兩者共同的致命限制是:只能存基本類型。而歸檔(Archive)最大的價值就在這裡——它能把我們自己定義的物件整體存進檔案。
二、基礎範例
檔案結構:
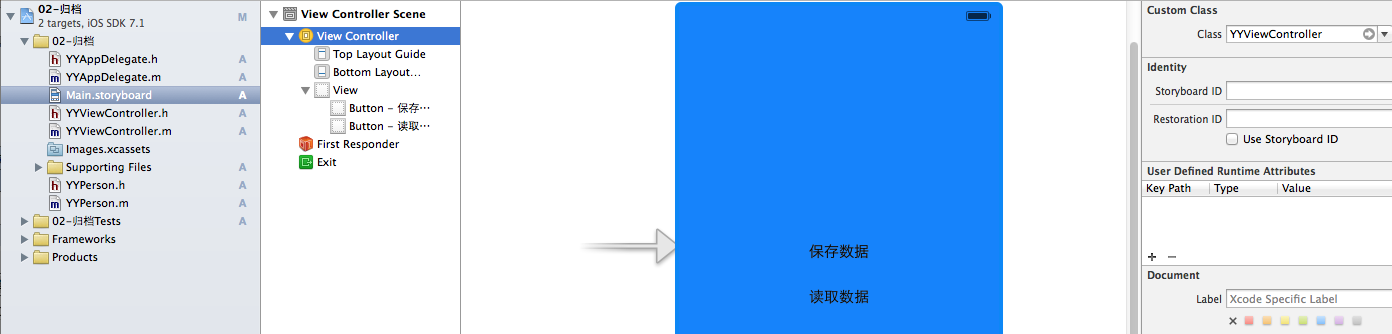
YYViewController.m:
#import "YYViewController.h"
#import "YYPerson.h"
@interface YYViewController ()
- (IBAction)saveBtnOnclick:(id)sender;
- (IBAction)readBtnOnclick:(id)sender;
@end
@implementation YYViewController
- (void)viewDidLoad
{
[super viewDidLoad];
}
- (IBAction)saveBtnOnclick:(id)sender {
//1.創建對象
YYPerson *p=[[YYPerson alloc]init];
p.name=@"文頂頂";
p.age=23;
p.height=1.7;
//2.獲取文件路徑
NSString *docPath=[NSSearchPathForDirectoriesInDomains(NSDocumentDirectory, NSUserDomainMask, YES)lastObject];
NSString *path=[docPath stringByAppendingPathComponent:@"person.yangyang"];
NSLog(@"path=%@",path);
//3.將自定義的對象保存到文件中
[NSKeyedArchiver archiveRootObject:p toFile:path];
}
- (IBAction)readBtnOnclick:(id)sender {
//1.獲取文件路徑
NSString *docPath=[NSSearchPathForDirectoriesInDomains(NSDocumentDirectory, NSUserDomainMask, YES)lastObject];
NSString *path=[docPath stringByAppendingPathComponent:@"person.yangyang"];
NSLog(@"path=%@",path);
//2.從文件中讀取對象
YYPerson *p=[NSKeyedUnarchiver unarchiveObjectWithFile:path];
NSLog(@"%@,%d,%.1f",p.name,p.age,p.height);
}
@end
YYPerson.h:
#import <Foundation/Foundation.h>
// 如果想將一個自定義對象保存到文件中必須實現NSCoding協議
@interface YYPerson : NSObject<NSCoding>
//姓名
@property(nonatomic,copy)NSString *name;
//年齡
@property(nonatomic,assign)int age;
//身高
@property(nonatomic,assign)double height;
@end
YYPerson.m:
#import "YYPerson.h"
@implementation YYPerson
// 當將一個自定義對象保存到文件的時候就會調用該方法
// 在該方法中說明如何存儲自定義對象的屬性
-(void)encodeWithCoder:(NSCoder *)aCoder
{
NSLog(@"調用了encodeWithCoder:方法");
[aCoder encodeObject:self.name forKey:@"name"];
[aCoder encodeInteger:self.age forKey:@"age"];
[aCoder encodeDouble:self.height forKey:@"height"];
}
// 當從文件中讀取一個對象的時候就會調用該方法
// 在該方法中說明如何讀取保存在文件中的對象
-(id)initWithCoder:(NSCoder *)aDecoder
{
NSLog(@"調用了initWithCoder:方法");
//注意:在構造方法中需要先初始化父類的方法
if (self=[super init]) {
self.name=[aDecoder decodeObjectForKey:@"name"];
self.age=[aDecoder decodeIntegerForKey:@"age"];
self.height=[aDecoder decodeDoubleForKey:@"height"];
}
return self;
}
@end
點擊兩個按鈕後,log 正常輸出:

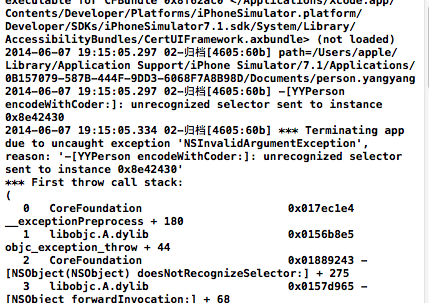
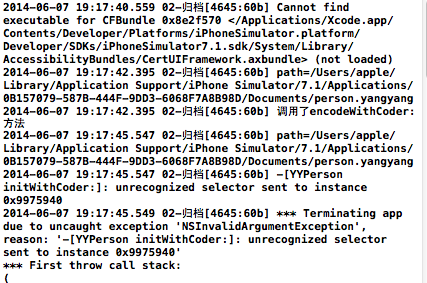
如果忘了實作這兩個方法,編譯器會給出明確警告:
缺少 encodeWithCoder::
缺少 initWithCoder::
兩個方法分工很清楚:encodeWithCoder: 決定「要存哪些屬性、怎麼存」,initWithCoder: 決定「怎麼從檔案裡讀回來」。key 必須兩邊對應一致,否則讀出來會是空的。
三、繼承結構下的歸檔
新建 YYstudent 繼承自 YYPerson,多一個體重屬性。子類要在自己的兩個方法裡先呼叫 super,再處理新增欄位。
YYstudent.h:
#import "YYPerson.h"
@interface YYstudent : YYPerson
//增加一個體重屬性
@property(nonatomic,assign) double weight;
@end
YYstudent.m:
#import "YYstudent.h"
@implementation YYstudent
//在子類中重寫這兩個方法
- (void)encodeWithCoder:(NSCoder *)aCoder
{
[super encodeWithCoder:aCoder];
NSLog(@"調用了YYStudent encodeWithCoder");
[aCoder encodeFloat:self.weight forKey:@"weight"];
}
- (id)initWithCoder:(NSCoder *)aDecoder
{
if (self = [super initWithCoder:aDecoder]) {
NSLog(@"調用了YYstudent initWithCoder");
self.weight = [aDecoder decodeFloatForKey:@"weight"];
}
return self;
}
@end
YYViewController.m:
#import "YYViewController.h"
#import "YYPerson.h"
#import "YYstudent.h"
@interface YYViewController ()
- (IBAction)saveBtnOnclick:(id)sender;
- (IBAction)readBtnOnclick:(id)sender;
@end
@implementation YYViewController
- (void)viewDidLoad
{
[super viewDidLoad];
}
- (IBAction)saveBtnOnclick:(id)sender {
//1.創建對象
YYstudent *s=[[YYstudent alloc]init];
s.name=@"wendingding";
s.age=23;
s.height=1.7;
s.weight=62;
//2.獲取文件路徑
NSString *docPath=[NSSearchPathForDirectoriesInDomains(NSDocumentDirectory, NSUserDomainMask, YES)lastObject];
NSString *path=[docPath stringByAppendingPathComponent:@"person.yangyang"];
NSLog(@"path=%@",path);
//3.將自定義的對象保存到文件中
[NSKeyedArchiver archiveRootObject:s toFile:path];
}
- (IBAction)readBtnOnclick:(id)sender {
//1.獲取文件路徑
NSString *docPath=[NSSearchPathForDirectoriesInDomains(NSDocumentDirectory, NSUserDomainMask, YES)lastObject];
NSString *path=[docPath stringByAppendingPathComponent:@"person.yangyang"];
NSLog(@"path=%@",path);
//2.從文件中讀取對象
YYstudent *s=[NSKeyedUnarchiver unarchiveObjectWithFile:path];
NSLog(@"%@,%d,%.1f,%f",s.name,s.age,s.height,s.weight);
}
@end
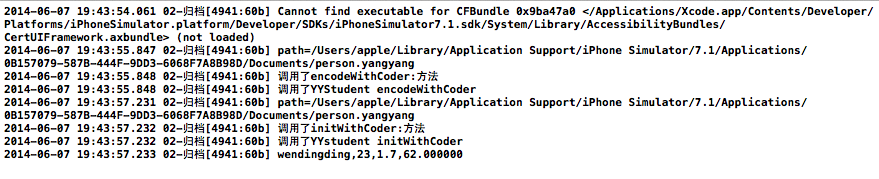
父類與子類的屬性都被完整保留,說明 [super encodeWithCoder:] 這一行確實發揮了作用。實務上更常見的做法是搭配 NSCoding 的替代方案 NSSecureCoding,因為直接解檔存在反序列化風險;另外 archiveRootObject:toFile: 這組 API 在後續系統版本中已被 NSKeyedArchiver 的 archiveRootObject:fileURL: 取代,新專案建議採用後者。
四、偏好設置 NSUserDefaults
幾乎每個 App 都需要記住一些設定:使用者名稱、密碼、字體大小、是否自動登入。iOS 為此提供了標準方案——每個應用都有一個 NSUserDefaults 實例,透過它存取偏好設定。
儲存位置在 App 沙盒的 Library/Preferences 目錄下。
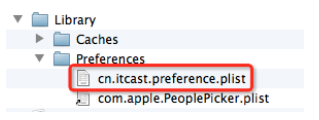
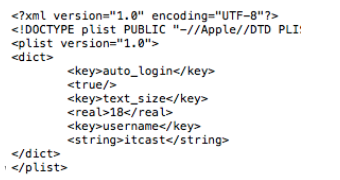
儲存形式是一個 plist:
storyboard 上放兩個按鈕,一個存、一個讀:
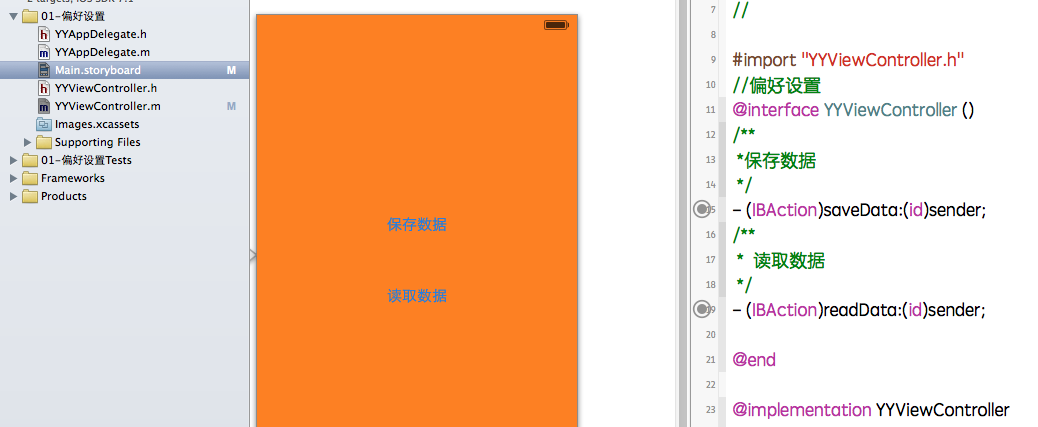
YYViewController.m:
#import "YYViewController.h"
//偏好設置
@interface YYViewController ()
/**
*保存數據
*/
- (IBAction)saveData:(id)sender;
/**
* 讀取數據
*/
- (IBAction)readData:(id)sender;
@end
@implementation YYViewController
- (IBAction)saveData:(id)sender {
//1.獲取NSUserDefaults對象
NSUserDefaults *defaults=[NSUserDefaults standardUserDefaults];
//2.保存數據(如果沒有同步, 會在將來某一時間點自動保存到Preferences文件夾下面)
[defaults setObject:@"yangyong" forKey:@"name"];
[defaults setInteger:23 forKey:@"age"];
[defaults setDouble:1.73f forKey:@"height"];
[defaults setObject:@"man" forKey:@"gender"];
//3.強制讓數據立刻保存
[defaults synchronize];
}
- (IBAction)readData:(id)sender {
//1.獲取NSUserDefaults對象
NSUserDefaults *defaults=[NSUserDefaults standardUserDefaults];
//2.讀取保存的數據
NSString *name=[defaults objectForKey:@"name"];
NSString *gender=[defaults objectForKey:@"gender"];
NSInteger age=[defaults integerForKey:@"age"];
double height=[defaults doubleForKey:@"height"];
//3.打印數據
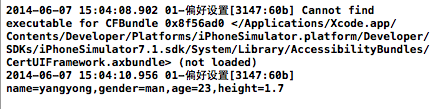
NSLog(@"name=%@,gender=%@,age=%d,height=%.1f",name,gender,age,height);
}
@end
執行結果:
五、幾個必須知道的注意事項
(1)偏好設置是專門用來存應用配置資訊的,不要拿它當通用資料庫。所有鍵值都寫進同一個 plist 檔,資料量一大就會拖慢讀寫。
(2)寫入後實際落盘的時機並不確定,系統會在未來某個時間點自動寫入 Preferences 目錄。如果需要立刻保存,呼叫 [defaults synchronize]。
(3)操作步驟固定為兩步:取得 standardUserDefaults,然後依型別呼叫對應的 set / get 方法。取出時若鍵不存在,整數與浮點會得到 0,物件則是 nil,判斷前最好留意這一點。
(4)敏感資訊(例如密碼、token)不建議放在偏好設置裡,那是 Keychain 的工作。
總結一下三種方式的定位:plist 適合少量結構化資料,偏好設置適合輕量的設定項,歸檔則是保存自訂物件與物件圖譜的首選。