
iOS 實現驗證碼與密碼的按位分割輸入框(自定義 drawRect 方案)
編輯:iOS 相關教學
很多 App 的驗證碼輸入框是那種「一格一格」的樣式,密碼框則每輸一位顯示一個圓點。系統自帶的 UITextField 做不到這種效果,需要自己封裝一個組合控件。本文分享一種通過自定義 drawRect 繪製的實現思路。
一、實現思路
- 自定義一個繼承自 UIView 的容器視圖。
- 在裡面添加三個子控件:textField、backgroundImageView、label。
- 把驗證碼或密碼的內容繪製到 label 的指定區域,位置通過計算得出,因此 label 需要自定義並在
drawRect:中繪製。 - 用一個
secureTextEntry屬性控制顯示模式:YES 顯示圓點(密碼),NO 顯示真實數字(驗證碼)。
各子控件的職責劃分
- textField:只負責彈出鍵盤並接收輸入,本身隱藏,不承擔顯示工作。
- backgroundImageView:顯示帶分割線效果的背景圖。
- label:真正負責把驗證碼或密碼畫出來。
視圖層級關係如下圖,編號 1 是父視圖 vertificationCodeInputView,2 是 textField,3 是 backgroundImageView,4 是 label:
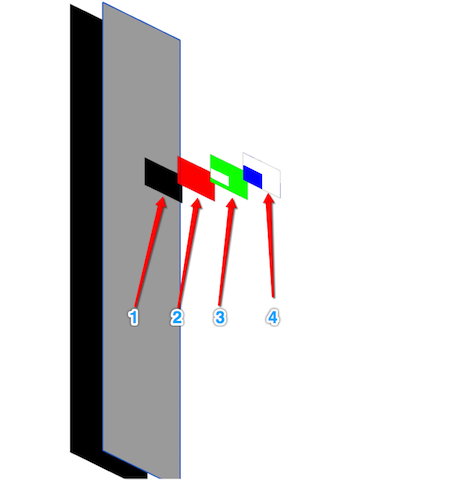
層級順序上,label 必須在最上層才能正常顯示內容;backgroundImageView 要壓在 label 之下,同時自身必須可見。
二、實現效果
密碼輸入:
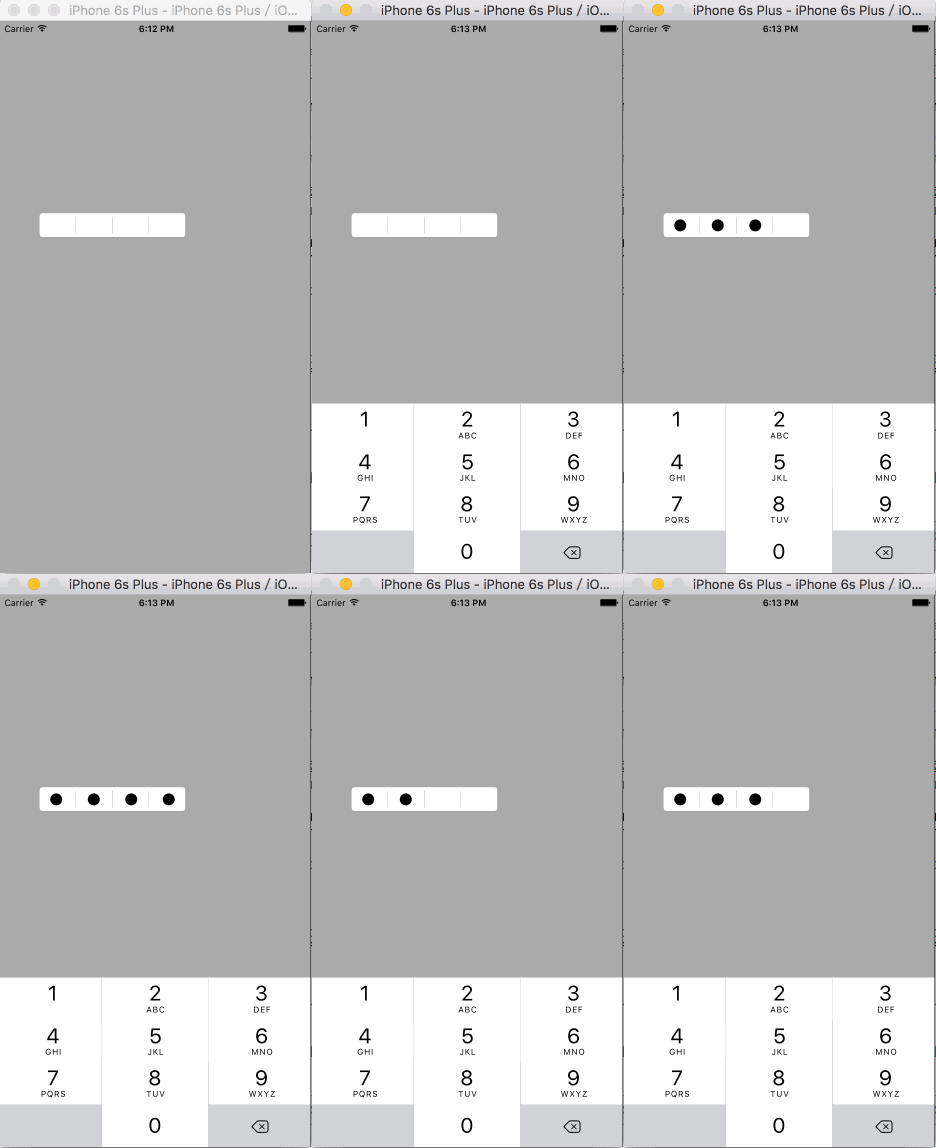
驗證碼輸入:
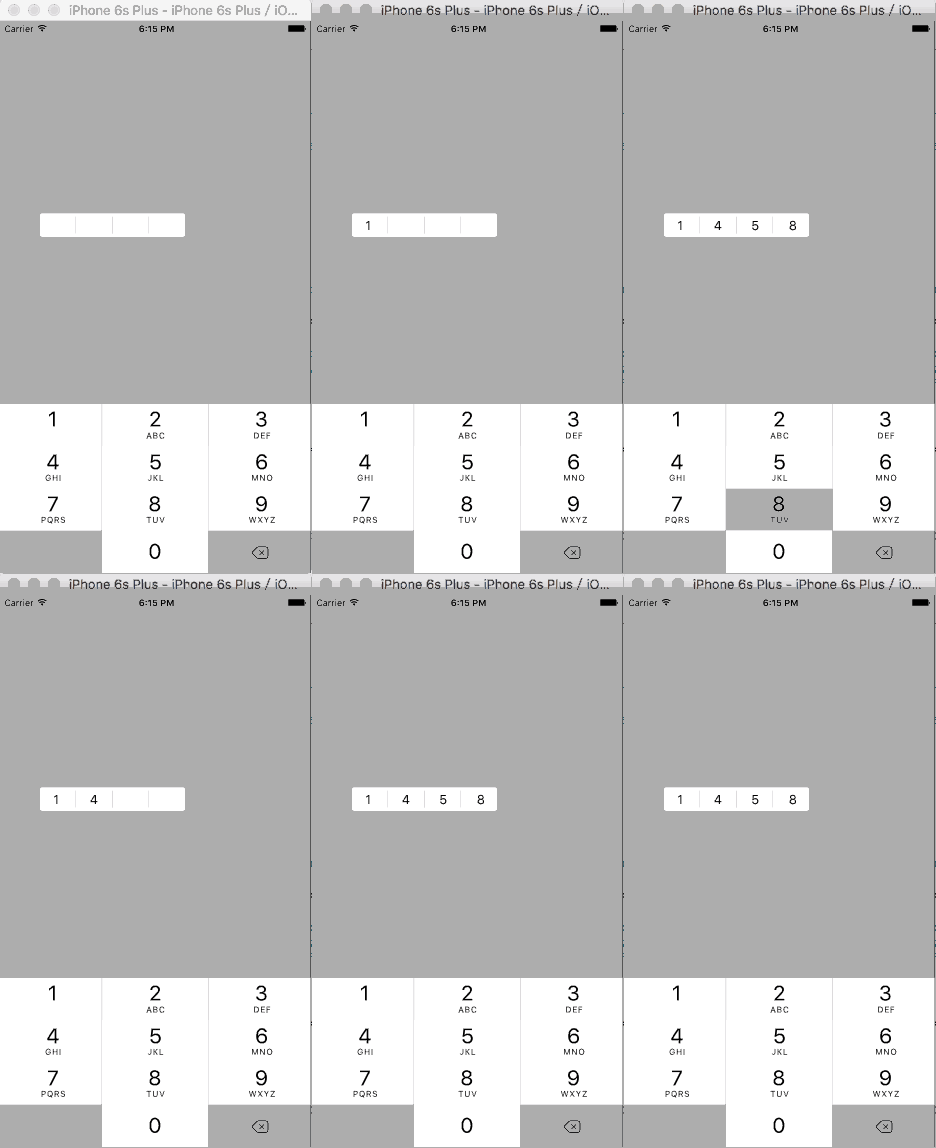
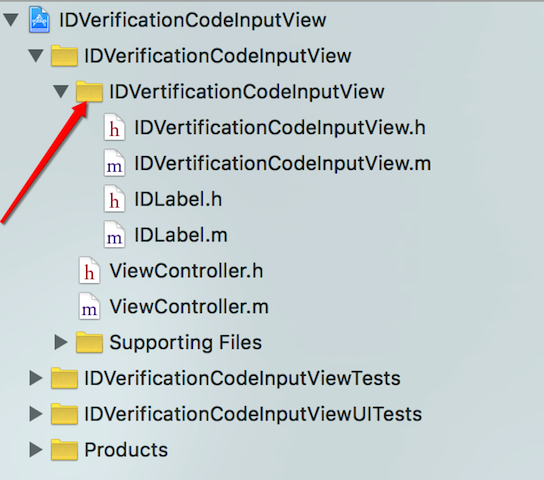
代碼結構:
三、實現步驟
1. 容器視圖 IDVertificationCodeInputView 的公有屬性
@interface IDVertificationCodeInputView : UIView

/** 背景圖片名 */
@property (nonatomic, copy) NSString *backgroudImageName;

/** 驗證碼/密碼的位數 */
@property (nonatomic, assign) NSInteger numberOfVertificationCode;

/** 控制是否密文顯示 */
@property (nonatomic, assign) bool secureTextEntry;

/** 驗證碼/密碼內容,外部通過此屬性讀取輸入結果 */
@property (nonatomic, copy) NSString *vertificationCode;

@end
私有屬性對應三個子控件:
@interface IDVertificationCodeInputView () <UITextFieldDelegate>

/** 用於接收鍵盤輸入,實際不顯示 */
@property (nonatomic, strong) UITextField *textField;

/** 背景圖片 */
@property (nonatomic, strong) UIImageView *backgroundImageView;

/** 實際負責顯示的 label */
@property (nonatomic, strong) IDLabel *label;

@end
2. IDLabel 的公有屬性
@interface IDLabel : UILabel

/** 位數 */
@property (nonatomic, assign) NSInteger numberOfVertificationCode;

/** 是否密文顯示 */
@property (nonatomic, assign) bool secureTextEntry;

@end
3. 初始化邏輯
設置默認位數為 4,並完成子控件的創建與層級安排:
- (instancetype)initWithFrame:(CGRect)frame
{
    if (self = [super initWithFrame:frame])
    {
        // 背景透明,讓容器視圖的可見範圍等於 backgroundImageView
        self.backgroundColor = [UIColor clearColor];

        // 默認四位
        self.numberOfVertificationCode = 4;

        /* 用於調出鍵盤的 textField */
        self.textField = [[UITextField alloc] initWithFrame:self.bounds];
        self.textField.hidden = YES;
        self.textField.keyboardType = UIKeyboardTypeNumberPad;
        self.textField.delegate = self;
        [self insertSubview:self.textField atIndex:0]; // 放最底層

        /* 負責顯示的 label */
        self.label = [[IDLabel alloc] initWithFrame:self.bounds];
        self.label.numberOfVertificationCode = self.numberOfVertificationCode;
        self.label.secureTextEntry = self.secureTextEntry;
        self.label.font = self.textField.font;
        [self addSubview:self.label];
    }
    return self;
}
如果外部設置了背景圖,則把 imageView 插到 label 之下:
- (void)setBackgroudImageName:(NSString *)backgroudImageName
{
    _backgroudImageName = backgroudImageName;

    self.backgroundImageView = [[UIImageView alloc] initWithFrame:self.bounds];
    self.backgroundImageView.image = [UIImage imageNamed:self.backgroudImageName];

    // 插到 label 下方,避免遮擋驗證碼
    [self insertSubview:self.backgroundImageView belowSubview:self.label];
}
位數與密文開關變化時,要同步給 label:
- (void)setNumberOfVertificationCode:(NSInteger)numberOfVertificationCode
{
    _numberOfVertificationCode = numberOfVertificationCode;
    // 此時 label 一定已創建
    self.label.numberOfVertificationCode = _numberOfVertificationCode;
}

- (void)setSecureTextEntry:(bool)secureTextEntry
{
    _secureTextEntry = secureTextEntry;
    self.label.secureTextEntry = _secureTextEntry;
}
4. 彈出鍵盤並接收輸入
點擊容器時讓隱藏的 textField 成為第一響應者:
- (void)touchesBegan:(NSSet<UITouch *> *)touches withEvent:(UIEvent *)event
{
    [self.textField becomeFirstResponder];
}
在代理方法中攔截每一次輸入,控制位數上限並同步內容:
- (BOOL)textField:(UITextField *)textField
  shouldChangeCharactersInRange:(NSRange)range
              replacementString:(NSString *)string
{
    if (string.length != 0)
    {
        // 不是刪除操作:未達到上限時追加
        if (textField.text.length < self.numberOfVertificationCode)
        {
            self.label.text = [textField.text stringByAppendingString:string];
            self.vertificationCode = self.label.text;
            return YES;
        }
        else
        {
            return NO; // 已滿位,拒絕輸入
        }
    }
    else
    {
        // 刪除操作:截掉最後一個字符
        self.label.text = [textField.text substringToIndex:textField.text.length - 1];
        self.vertificationCode = self.label.text;
        return YES;
    }
}
5. 在 IDLabel 中繪製
文本變化時主動觸發重繪:
// 重寫 setText,讓每次文本變化都重新繪製
- (void)setText:(NSString *)text
{
    [super setText:text];
    [self setNeedsDisplay];
}
核心繪製邏輯——把每一位字符或圓點畫在各自獨立的格子中央:
- (void)drawRect:(CGRect)rect
{
    // 每一格分配的寬高
    float width = rect.size.width / (float)self.numberOfVertificationCode;
    float height = rect.size.height;

    for (int i = 0; i < self.text.length; i++)
    {
        CGRect tempRect = CGRectMake(i * width, 0, width, height);

        if (self.secureTextEntry)
        {
            // 密碼模式:畫圓點
            UIImage *dotImage = [UIImage imageNamed:@"dot"];
            CGPoint dotStartPoint = CGPointMake(width * i + (width - dotImage.size.width) / 2.0,
                                               (tempRect.size.height - dotImage.size.height) / 2.0);
            [dotImage drawAtPoint:dotStartPoint];
        }
        else
        {
            // 驗證碼模式:畫字符
            NSString *charecterString =
                [NSString stringWithFormat:@"%c", [self.text characterAtIndex:i]];

            NSMutableDictionary *attributes = [[NSMutableDictionary alloc] init];
            attributes[NSFontAttributeName] = self.font;

            // 先量出尺寸,才能讓字符在格子裡居中
            CGSize characterSize = [charecterString sizeWithAttributes:attributes];
            CGPoint codeStartPoint = CGPointMake(width * i + (width - characterSize.width) / 2.0,
                                                (tempRect.size.height - characterSize.height) / 2.0);
            [charecterString drawAtPoint:codeStartPoint withAttributes:attributes];
        }
    }
}
6. 使用示例
- (void)viewDidLoad
{
    [super viewDidLoad];

    self.view.backgroundColor = [UIColor lightGrayColor];

    self.vertificationCodeInputView =
        [[IDVertificationCodeInputView alloc] initWithFrame:CGRectMake(50, 250, 200, 45)];
    self.vertificationCodeInputView.backgroudImageName = @"1";

    // 驗證碼模式(顯示數字)
    self.vertificationCodeInputView.secureTextEntry = NO;
    // 密碼模式改為 YES 即可

    [self.view addSubview:self.vertificationCodeInputView];
}

// 點擊屏幕讀取當前輸入內容
- (void)touchesBegan:(NSSet<UITouch *> *)touches withEvent:(UIEvent *)event
{
    NSLog(@"%@", self.vertificationCodeInputView.vertificationCode);
}
這個方案的核心思想是「顯示」與「輸入」職責分離:真實的輸入交給隱藏的 textField 和系統鍵盤,顯示則完全通過 drawRect 自己掌控。這樣一來,無論是圓點、星號還是自定義動畫,都能自由發揮。
- 上一篇文章: iOS 快速接入 SMSSDK 實現手機短信驗證碼登入
- 下一篇文章: iOS 技巧:修改 UISearchBar 內部搜索框的高度