
iOS 中創建控制器的幾種方式:storyboard、xib 與純程式碼
編輯:iOS 相關教學
一、用 storyboard 手動創建控制器
平常我們都是靠系統自動載入 storyboard 並建立好控制器,但其實也可以自己動手。關鍵是透過 UIStoryboard 這個物件來載入 storyboard 文件。注意:必須先有 storyboard,建立 UIStoryboard 物件才有意義,用 alloc init 做出來的物件是沒用的。
1.1  instantiateInitialViewController:
     預設載入箭頭指向的那個控制器

1.2  instantiateViewControllerWithIdentifier:
     依 identifier 在 storyboard 中查找並建立控制器
     (identifier 不能亂傳,否則會報錯,storyboard 中必須真的有這個標識)
這裡有個常見的困惑:這樣做出來的控制器為什麼不能處理事件?
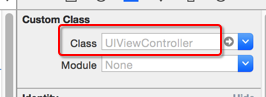
原因是:當系統依 storyboard ID 找到對應的場景時,會依照該場景的 Custom Class 決定要實例化哪個類別。如果沒有指定,就會使用系統自帶的控制器類別,而系統類別自然無法讓我們寫入監聽方法。所以,要處理事件就必須自定義控制器並在 storyboard 中設定 Custom Class。
二、模仿系統的啟動流程載入 storyboard
帶有 storyboard 的專案,預設在啟動時就會自動載入 storyboard 並建立好窗口與根控制器。系統判斷是否要載入 storyboard 的方式,是看專案設定中有沒有設定主界面(Main Interface);若設為 Main,就會去載入 Main.storyboard。

如果想載入自己新增的 storyboard,只要修改主界面設定即可。而若要完全手動模擬這套流程(先清空主界面設定,並清除快取),程式碼如下:
- (BOOL)application:(UIApplication *)application didFinishLaunchingWithOptions:(NSDictionary *)launchOptions {
    // 建立窗口(必須用強引用持有,否則會被釋放而無法顯示)
    self.window = [[UIWindow alloc] initWithFrame:[UIScreen mainScreen].bounds];

    // 載入 storyboard,bundle 傳 nil 代表主 bundle
    UIStoryboard *storyboard = [UIStoryboard storyboardWithName:@"Main" bundle:nil];

    // 取得箭頭指向的控制器
    UIViewController *vc = [storyboard instantiateInitialViewController];

    // 設為窗口的根控制器並顯示
    self.window.rootViewController = vc;
    [self.window makeKeyAndVisible];

    return YES;
}
三、用 xib 創建控制器的 view
使用 xib 時有幾個必需要注意的地方:
- xib 裡必須有一個 view 用來描述控制器的 view,因為控制器的
view屬性必須有值。 - xib 需要指定它描述的是「哪一個」控制器。描述 UIView 時不需要,因為一個 xib 可以包含很多 UIView,無法固定;但控制器不同,一個 xib 只用來描述一個控制器。
- xib 裡可能有很多 view,需要用連線指明哪一個才是控制器的 view。
- (BOOL)application:(UIApplication *)application didFinishLaunchingWithOptions:(NSDictionary *)launchOptions {
    self.window = [[UIWindow alloc] initWithFrame:[UIScreen mainScreen].bounds];

    // 透過 xib 創建控制器
    ViewController *vc = [[ViewController alloc] initWithNibName:@"ViewController" bundle:nil];

    self.window.rootViewController = vc;
    [self.window makeKeyAndVisible];
    return YES;
}
xib 與 storyboard 的差別:storyboard 已經指定了每個控制器的 view,不需要我們操心;而 xib 需要我們手動管理這層關係。此外,storyboard 還能描述控制器之間的跳轉(segue),xib 則不行——這也是為什麼大型專案通常 storyboard 只用於流程骨架,複雜頁面仍拆成獨立 xib 的原因。
- 上一篇文章: iOS 開發中的觸摸事件與手勢處理詳解
- 下一篇文章: 全面解析 iOS 中自定義 UITableViewCell 的做法