
iOS 開發入門:UISwitch 開關控件的建立、事件監聽與自訂外觀
UISwitch 是 iOS 裡最典型的「二態」控制元件:撥到右邊代表開啟,撥到左邊代表關閉,非常適合用來呈現「是否接收通知」「是否開啟藍牙」這類開關型設定。本文從零開始,帶你走過三件事:用程式碼建立開關、用介面檔案拖曳建立開關,以及如何改寫它的預設外觀。
一、用程式碼動態建立 UISwitch
先在 Xcode 建立一個名為 Switch 的專案,模板選擇 Single View Application,接著打開 ViewController.m,在 viewDidLoad 中寫入建立與配置程式碼:
- (void)viewDidLoad {
    [super viewDidLoad];

    UISwitch *switchButton = [[UISwitch alloc] initWithFrame:CGRectMake(50, 100, 20, 10)];
    [switchButton setOn:YES];
    [switchButton addTarget:self
                     action:@selector(switchAction:)
           forControlEvents:UIControlEventValueChanged];
    [self.view addSubview:switchButton];
}
這裡有兩個關鍵細節值得留意。第一,UISwitch 的尺寸由系統決定,你在初始化時傳入的 width 與 height 實際上不會生效,真正有意義的只有原點座標。第二,建立完物件後別忘了呼叫 addSubview: 把它掛到視圖階層上,否則畫面上什麼都不會出現。
addTarget:action:forControlEvents: 中的 switchAction: 是回呼方法,需要我們自行實作,它就是使用者撥動開關時被觸發的事件。
監聽開關的狀態變化
- (void)switchAction:(id)sender {
    UISwitch *switchButton = (UISwitch *)sender;
    BOOL isButtonOn = [switchButton isOn];

    if (isButtonOn) {
        showSwitchValue.text = @"是";
    } else {
        showSwitchValue.text = @"否";
    }
}
回呼方法收到的 sender 就是觸發事件的控件本身,把它轉型回 UISwitch 後,即可透過 isOn 讀取目前狀態。示範中的 showSwitchValue 是一個用拖曳方式放到位面上的 Label,純粹為了讓變化看得清楚。
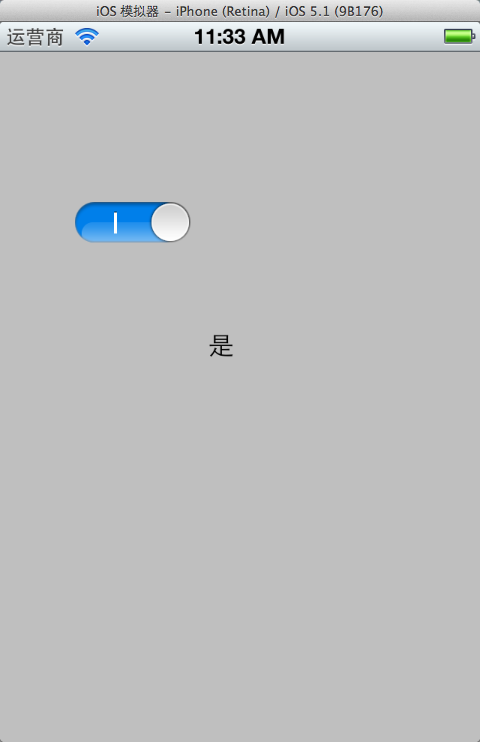
二、用介面檔案拖曳 UISwitch
如果你偏好所見即所得的開發方式,也可以直接在 xib 或 storyboard 上操作,流程如下:
1. 從元件庫拖一個 UISwitch 到 xib 上。
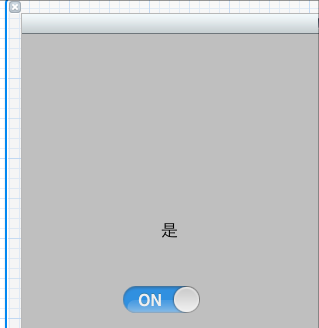
2. 按下 alt + command + return 開啟 Assistant Editor,選取剛才的 UISwitch,按住 Control 鍵拖曳到 ViewController.h。
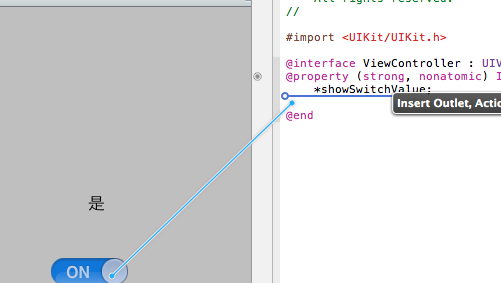
3. 在彈出的面板中把連線類型選為 Action。
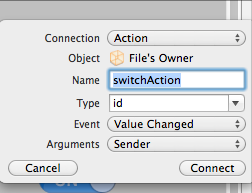
4. 在 .m 檔案中實作 switchAction。由於名稱與前面程式碼版本重複,記得先把舊的那份註解掉,避免編譯衝突。
- (IBAction)switchAction:(id)sender {
    UISwitch *switchButton = (UISwitch *)sender;
    BOOL isButtonOn = [switchButton isOn];

    if (isButtonOn) {
        showSwitchValue.text = @"是";
    } else {
        showSwitchValue.text = @"否";
    }
}
三、自訂 UISwitch 的文字標籤
系統預設的 UISwitch 只有 ON / OFF 兩種語言預設值,若想顯示自家人看得懂的雙語標示,可以透過類別(Category)擴充。做法是在 UISwitch 內部遞尋它的子視圖,把找到的兩個 UILabel 標上 tag,再透過 tag 取回來改文字。
UISwitch-Extended.h:
#import <UIKit/UIKit.h>

@interface UISwitch (tagged)
+ (UISwitch *)switchWithLeftText:(NSString *)tag1 andRight:(NSString *)tag2;

@property (nonatomic, readonly) UILabel *label1;
@property (nonatomic, readonly) UILabel *label2;
@end
UISwitch-Extended.m:
#import "UISwitch-Extended.h"

#define TAG_OFFSET 900

@implementation UISwitch (tagged)

- (void)spelunkAndTag:(UIView *)aView withCount:(int *)count {
    for (UIView *subview in [aView subviews]) {
        if ([subview isKindOfClass:[UILabel class]]) {
            *count += 1;
            [subview setTag:(TAG_OFFSET + *count)];
        } else {
            [self spelunkAndTag:subview withCount:count];
        }
    }
}

- (UILabel *)label1 {
    return (UILabel *)[self viewWithTag:TAG_OFFSET + 1];
}

- (UILabel *)label2 {
    return (UILabel *)[self viewWithTag:TAG_OFFSET + 2];
}

+ (UISwitch *)switchWithLeftText:(NSString *)tag1 andRight:(NSString *)tag2 {
    UISwitch *switchView = [[UISwitch alloc] initWithFrame:CGRectZero];

    int labelCount = 0;
    [switchView spelunkAndTag:switchView withCount:&labelCount];

    if (labelCount == 2) {
        [switchView.label1 setText:tag1];
        [switchView.label2 setText:tag2];
    }

    return [switchView autorelease];
}

@end
還有一種更「取巧」的寫法,程式碼短得多,但可读性也差得多,直接沿著 subviews 的巢狀結構硬取值:
UISwitch *isFooOrBar = [[UISwitch alloc] init];

((UILabel *)[[[[[[isFooOrBar subviews] lastObject] subviews] objectAtIndex:2] subviews] objectAtIndex:0]).text = @"Foo";
((UILabel *)[[[[[[isFooOrBar subviews] lastObject] subviews] objectAtIndex:2] subviews] objectAtIndex:1]).text = @"Bar";
這種寫法完全依賴 UISwitch 內部的視圖層級結構,一旦系統版本更新調整了實作,就會無預警失效。正式專案中不建議採用,知道有這回事即可。
四、常用屬性與方法速查
讀取目前狀態
BOOL setting = switchView.isOn;
NSLog(@"%d", setting);
設定狀態(可選擇是否播放動畫)
[switchView setOn:setting animated:YES];
開啟狀態的底色
switchView.onTintColor = [UIColor orangeColor];
滑塊(thumb)的顏色
switchView.thumbTintColor = [UIColor redColor];
邊框顏色
switchView.tintColor = [UIColor purpleColor];
註冊事件監聽
[switchView addTarget:self
                 action:@selector(switchAction:)
       forControlEvents:UIControlEventValueChanged];
掌握以上內容,你就能在專案裡自如地建立、監聽並美化 UISwitch 了。