
iOS 實作:左右兩個 TableView 連動效果
編輯:iOS 相關教學
一、先看成品
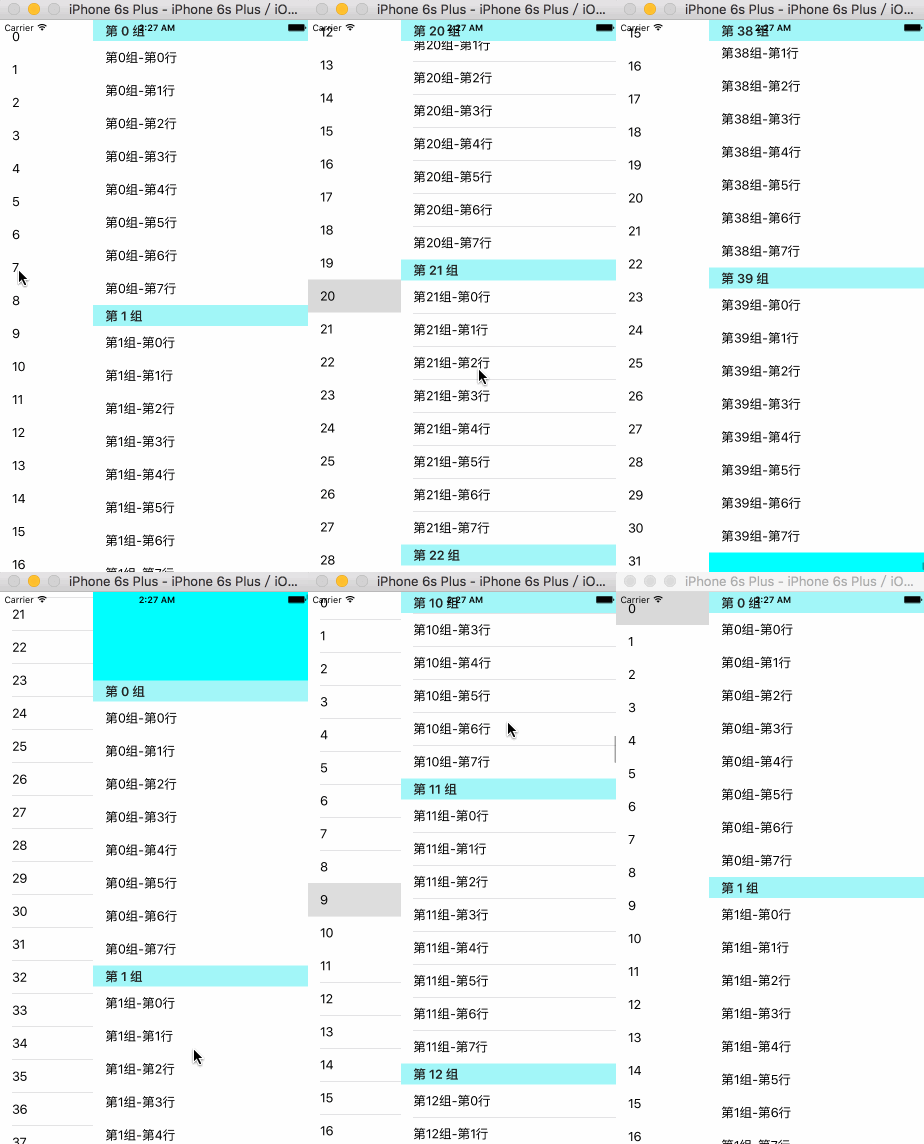
二、簡單解析
三、連動其實只有兩種情況
1、點擊左側 cell,讓右側 tableView 滾到對應位置。
2、滑動右側 tableView,讓左側 tableView 滾到對應位置。
1. 先處理簡單的:點左側讓右側跟著跑
 // MARK: - 點擊 cell 的代理方法

- (void)tableView:(UITableView *)tableView didSelectRowAtIndexPath:(NSIndexPath *)indexPath {
    // 只處理左側的 tableView
    if (tableView == self.leftTableView) {
        // 算出右側要滾到的位置:對應 section 的第一列
        NSIndexPath *moveToIndexPath = [NSIndexPath indexPathForRow:0 inSection:indexPath.row];

        // 讓右側滾動並選中
        [self.rightTableView selectRowAtIndexPath:moveToIndexPath animated:YES scrollPosition:UITableViewScrollPositionTop];

        // 取消選中的視覺效果
        [self.rightTableView deselectRowAtIndexPath:moveToIndexPath animated:YES];
    }
}
左側點擊的連動到這裡就完成了。
2. 滑動右側讓左側跟著跑
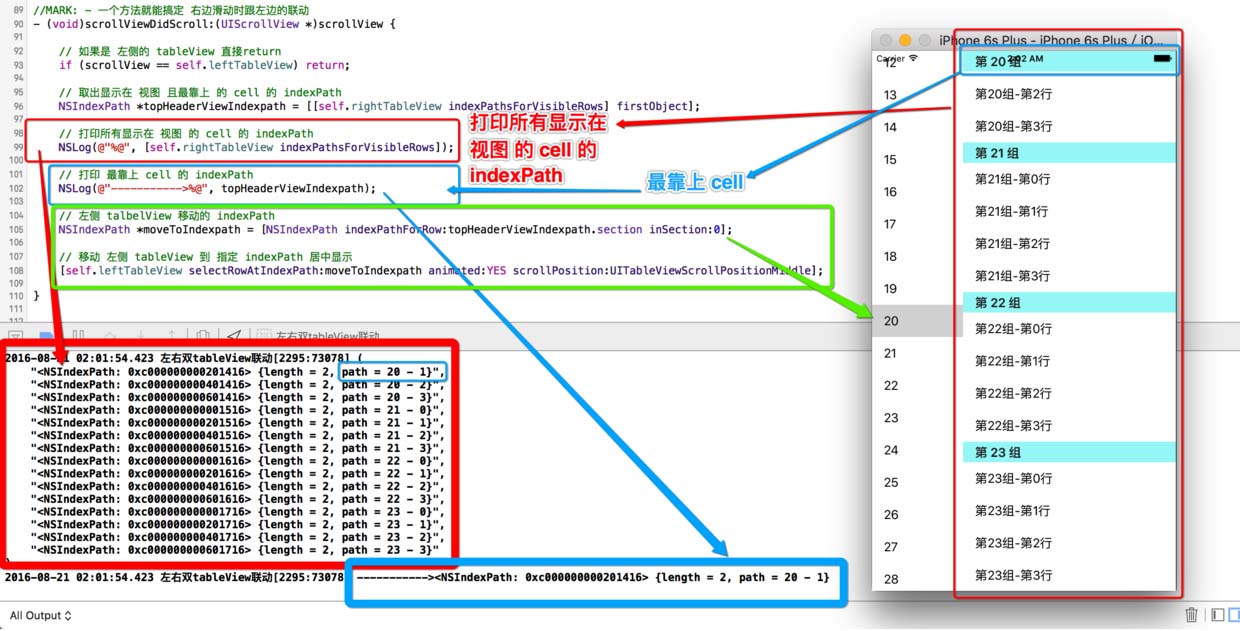
[self.rightTableView indexPathsForVisibleRows] 會回傳目前畫面上所有可見 cell 的 indexPath 陣列,取第一個就是最上面那一列。
 // MARK: - 一個方法解決右滑時與左邊的連動

- (void)scrollViewDidScroll:(UIScrollView *)scrollView {
    // 左側滾動時直接返回,避免無限循環
    if (scrollView == self.leftTableView) return;

    // 取出畫面上最靠上的 cell
    NSIndexPath *topHeaderViewIndexpath = [[self.rightTableView indexPathsForVisibleRows] firstObject];

    // 左側要移動到的位置
    NSIndexPath *moveToIndexpath = [NSIndexPath indexPathForRow:topHeaderViewIndexpath.section inSection:0];

    // 讓左側對應列居中顯示
    [self.leftTableView selectRowAtIndexPath:moveToIndexpath animated:YES scrollPosition:UITableViewScrollPositionMiddle];
}
就這樣,右滑時左側也會跟著移動。真的只有這麼簡單。
四、一個常見的錯誤寫法
網路上有人用下面這兩個方法來判斷,請勿採用——它會導致連動不準確:
 #pragma mark - UITableViewDelegate 代理方法

- (void)tableView:(UITableView *)tableView willDisplayHeaderView:(UIView *)view forSection:(NSInteger)section {
    // headerView 將要顯示,這個時機不準確
}

- (void)tableView:(UITableView *)tableView didEndDisplayingHeaderView:(UIView *)view forSection:(NSInteger)section {
    // headerView 已顯示,這個時機也不準確
}
五、完整範例程式碼
 //
// ViewController.m
// 左右雙 tableView 連動
//
// Created by 阿酷 on 16/8/20.
// Copyright © 2016年 AkuApp. All rights reserved.
//

#import "ViewController.h"

#define leftTableWidth [UIScreen mainScreen].bounds.size.width * 0.3
#define rightTableWidth [UIScreen mainScreen].bounds.size.width * 0.7
#define ScreenWidth [UIScreen mainScreen].bounds.size.width
#define ScreenHeight [UIScreen mainScreen].bounds.size.height
#define leftCellIdentifier @"leftCellIdentifier"
#define rightCellIdentifier @"rightCellIdentifier"

@interface ViewController () <UITableViewDataSource, UITableViewDelegate>

@property (nonatomic, weak) UITableView *leftTableView;
@property (nonatomic, weak) UITableView *rightTableView;

@end

@implementation ViewController

- (void)viewDidLoad {
    [super viewDidLoad];
    [self.view addSubview:self.leftTableView];
    [self.view addSubview:self.rightTableView];
}

#pragma mark - tableView 資料來源代理方法

- (NSInteger)tableView:(UITableView *)tableView numberOfRowsInSection:(NSInteger)section {
    if (tableView == self.leftTableView) return 40;
    return 8;
}

- (NSInteger)numberOfSectionsInTableView:(UITableView *)tableView {
    if (tableView == self.leftTableView) return 1;
    return 40;
}

- (UITableViewCell *)tableView:(UITableView *)tableView cellForRowAtIndexPath:(NSIndexPath *)indexPath {
    UITableViewCell *cell;

    // 左邊的 view
    if (tableView == self.leftTableView) {
        cell = [tableView dequeueReusableCellWithIdentifier:leftCellIdentifier forIndexPath:indexPath];
        cell.textLabel.text = [NSString stringWithFormat:@"%ld", (long)indexPath.row];

    // 右邊的 view
    } else {
        cell = [tableView dequeueReusableCellWithIdentifier:rightCellIdentifier forIndexPath:indexPath];
        cell.textLabel.text = [NSString stringWithFormat:@"第%ld組-第%ld行", (long)indexPath.section, (long)indexPath.row];
    }
    return cell;
}

- (NSString *)tableView:(UITableView *)tableView titleForHeaderInSection:(NSInteger)section {
    if (tableView == self.rightTableView) {
        return [NSString stringWithFormat:@"第 %ld 組", (long)section];
    }
    return nil;
}

#pragma mark - UITableViewDelegate 代理方法

//- (void)tableView:(UITableView *)tableView didEndDisplayingHeaderView:(UIView *)view forSection:(NSInteger)section {
//     // 這兩個方法都不準確
//}

//- (void)tableView:(UITableView *)tableView willDisplayHeaderView:(UIView *)view forSection:(NSInteger)section {
//     // 這兩個方法都不準確
//}

// MARK: - 一個方法搞定右邊滑動時跟左邊的連動

- (void)scrollViewDidScroll:(UIScrollView *)scrollView {
    if (scrollView == self.leftTableView) return;

    NSIndexPath *topHeaderViewIndexpath = [[self.rightTableView indexPathsForVisibleRows] firstObject];
    NSIndexPath *moveToIndexpath = [NSIndexPath indexPathForRow:topHeaderViewIndexpath.section inSection:0];

    [self.leftTableView selectRowAtIndexPath:moveToIndexpath animated:YES scrollPosition:UITableViewScrollPositionMiddle];
}

// MARK: - 點擊 cell 的代理方法

- (void)tableView:(UITableView *)tableView didSelectRowAtIndexPath:(NSIndexPath *)indexPath {
    if (tableView == self.leftTableView) {
        NSIndexPath *moveToIndexPath = [NSIndexPath indexPathForRow:0 inSection:indexPath.row];
        [self.rightTableView selectRowAtIndexPath:moveToIndexPath animated:YES scrollPosition:UITableViewScrollPositionTop];
        [self.rightTableView deselectRowAtIndexPath:moveToIndexPath animated:YES];
    }
}

#pragma mark - 懶載入 tableView

// MARK: - 左邊的 tableView

- (UITableView *)leftTableView {
    if (!_leftTableView) {
        UITableView *tableView = [[UITableView alloc] initWithFrame:CGRectMake(0, 0, leftTableWidth, ScreenHeight)];
        [self.view addSubview:tableView];
        _leftTableView = tableView;
        tableView.dataSource = self;
        tableView.delegate = self;
        [tableView registerClass:[UITableViewCell class] forCellReuseIdentifier:leftCellIdentifier];
        tableView.backgroundColor = [UIColor redColor];
        tableView.tableFooterView = [[UIView alloc] init];
    }
    return _leftTableView;
}

// MARK: - 右邊的 tableView

- (UITableView *)rightTableView {
    if (!_rightTableView) {
        UITableView *tableView = [[UITableView alloc] initWithFrame:CGRectMake(leftTableWidth, 0, rightTableWidth, ScreenHeight)];
        [self.view addSubview:tableView];
        _rightTableView = tableView;
        tableView.dataSource = self;
        tableView.delegate = self;
        [tableView registerClass:[UITableViewCell class] forCellReuseIdentifier:rightCellIdentifier];
        tableView.backgroundColor = [UIColor cyanColor];
        tableView.tableFooterView = [[UIView alloc] init];
    }
    return _rightTableView;
}

@end
六、總結
這個左側分類、右側內容的雙列表布局,在電商分類頁、新聞頻道頁都很常見。核心其實就是「把一個 tableView 的滾動位置映射成另一個的 row」,剩下的都是資料源配置。有興趣的朋友可以自己動手改改看,例如把 selectRow 換成 scrollToRow,就能做出更平滑的滾動效果。