
實作 iOS SearchBar 搜尋欄與關鍵字高亮
搜尋框效果演示
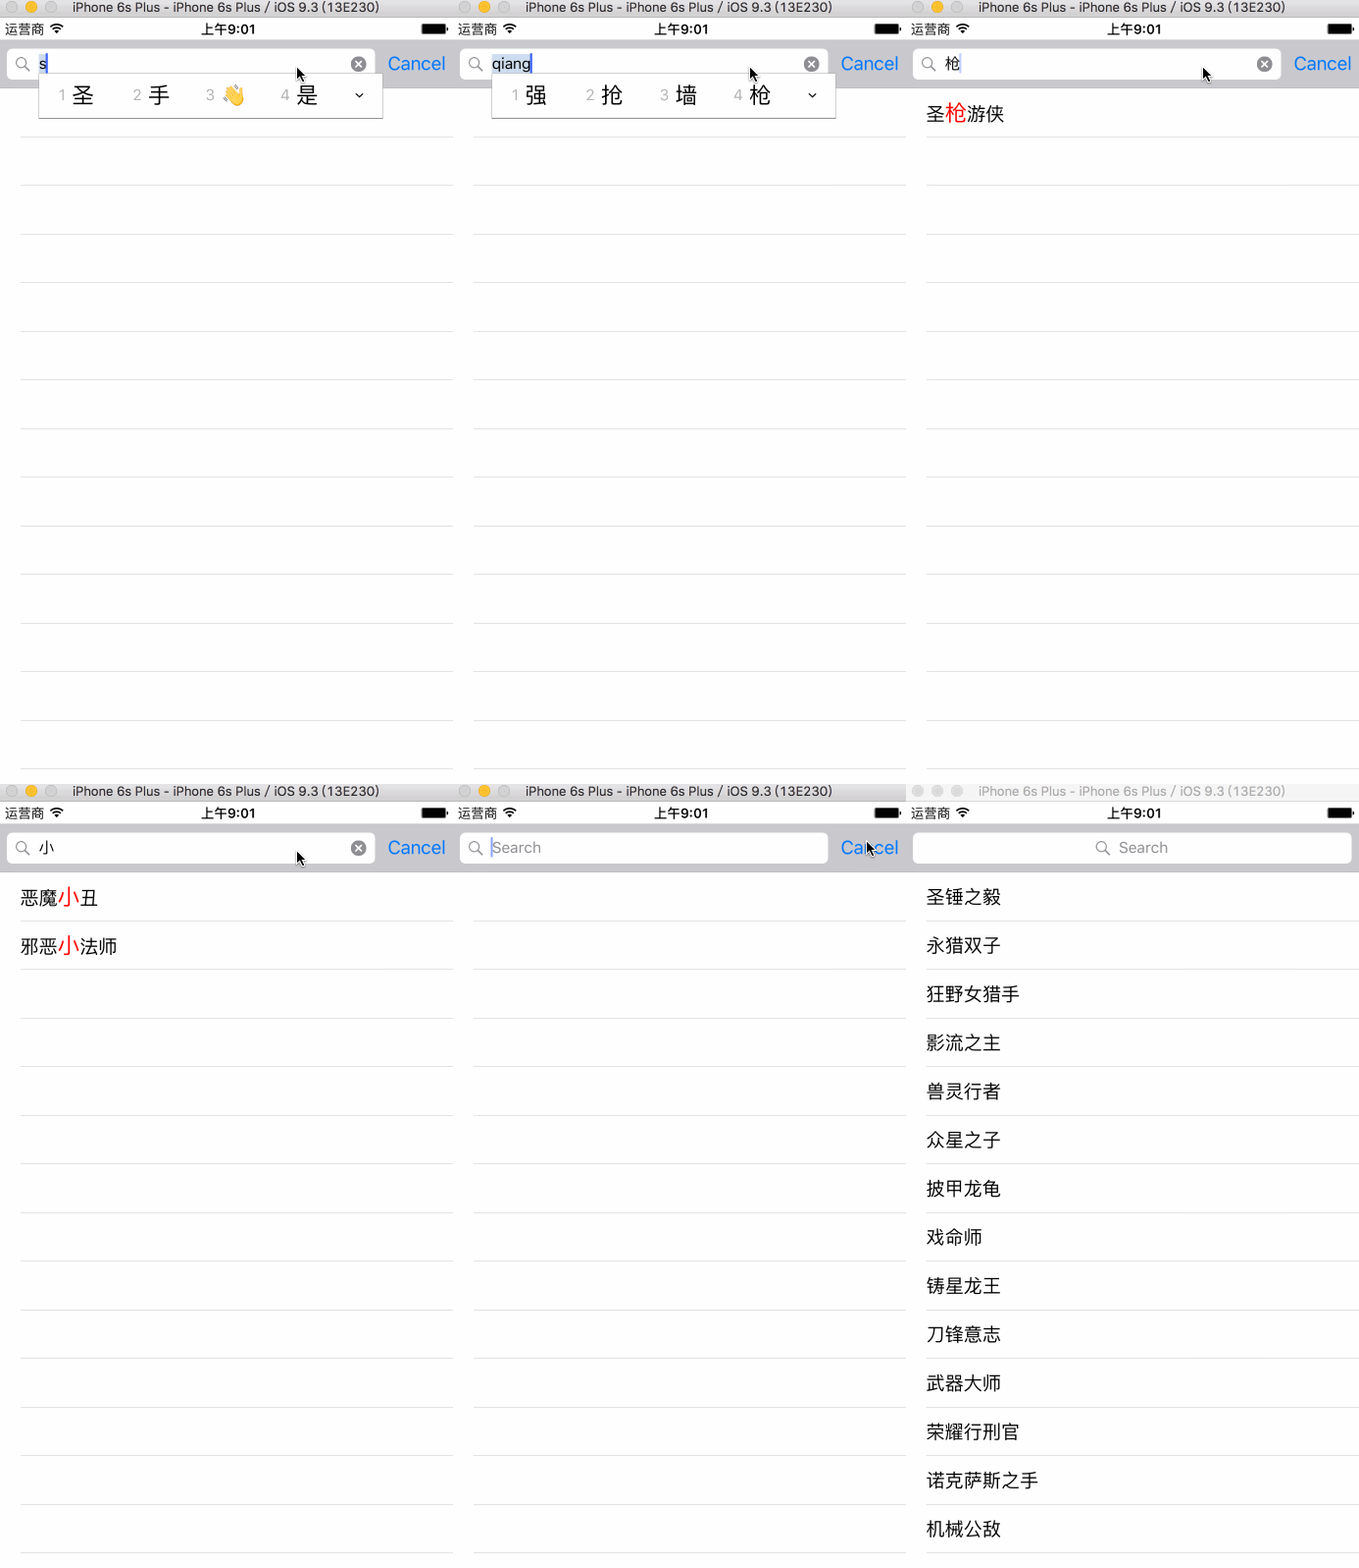
接下來看如何用程式碼實作這個功能。
示範資料是英雄聯盟的英雄名單,一個 JSON 格式的 txt 檔,解析如下:
// 取得檔案路徑
NSString *path = [[NSBundle mainBundle] pathForResource:@"heros" ofType:@"txt"];
// 讀成 NSData
NSData *data = [NSData dataWithContentsOfFile:path];
// JSON 解析
id result = [NSJSONSerialization JSONObjectWithData:data
                                           options:NSJSONReadingMutableContainers
                                             error:nil];
資料的層級關係如下:
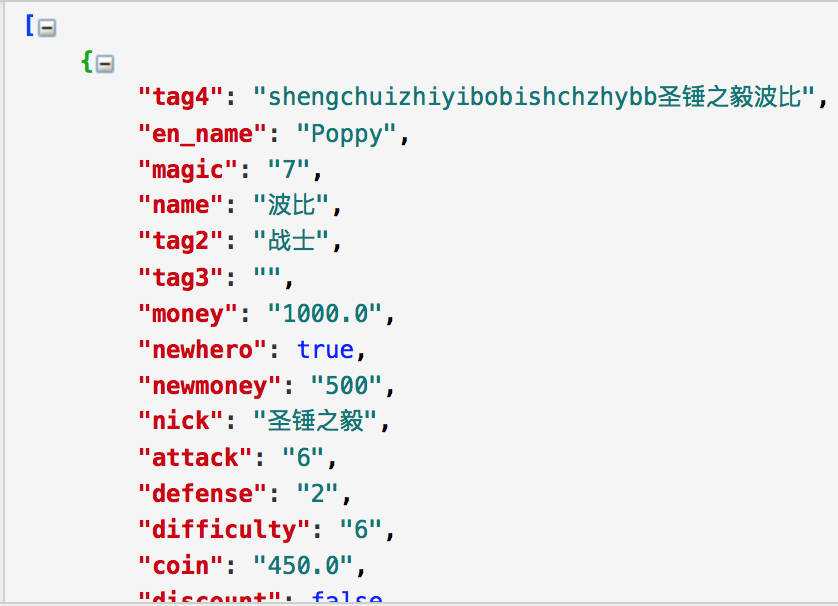
這個層級關係是透過線上 JSON 格式化工具看到的。上一步的 result 結構與格式化後一致,因此可以直接照著它取值;當然也可以直接印出 result 觀察結構,看個人習慣。
我們要的是每筆字典中 nick 對應的值,遍歷後放進一個陣列(這裡宣告成屬性,後面會用到):
// 把搜尋範圍的內容放進陣列
for (NSDictionary *diction in result) {
    [self.arrOfSeachBoxes addObject:diction[@"nick"]];
}
接著建立 UITableView 顯示資料。搜尋相關的類別是 UISearchController,先看看初始化:

系統註解寫得很清楚:若要在目前頁面顯示結果,參數填 nil。方便起見先宣告屬性:
@property (nonatomic, retain) UISearchController *searchController;
建立
// nil 表示在目前頁面顯示搜尋結果
self.searchController = [[UISearchController alloc] initWithSearchResultsController:nil];
UISearchController 標頭檔中相當靠前的是這個屬性:

從命名不難猜出它與「搜尋結果更新」有關,作用等同 tableView 的 reloadData。因此我們必須採用 UISearchResultsUpdating 協定,這個協定只有一個必須實作的方法:
- (void)updateSearchResultsForSearchController:(UISearchController *)searchController;
協定定義如下:

---------- 以下是整理 ----------
所有屬性
NS_ASSUME_NONNULL_BEGIN

@interface ViewController () <UITableViewDelegate, UITableViewDataSource, UISearchResultsUpdating>
@property (nonatomic, retain) NSMutableArray *arrOfSeachBoxes;   /**< 搜尋範圍 */
@property (nonatomic, retain) NSMutableArray *arrOfSeachResults; /**< 搜尋結果 */
@property (nonatomic, retain) UISearchController *searchController;
@property (nonatomic, retain) UITableView *tableView;
@end

NS_ASSUME_NONNULL_END
資料處理
// 解析資料
NSString *path = [[NSBundle mainBundle] pathForResource:@"heros" ofType:@"txt"];
NSData *data = [NSData dataWithContentsOfFile:path];
id result = [NSJSONSerialization JSONObjectWithData:data
                                           options:NSJSONReadingMutableContainers
                                             error:nil];
self.arrOfSeachBoxes = [NSMutableArray array];

for (NSDictionary *dic in result) {
    [self.arrOfSeachBoxes addObject:dic[@"nick"]];
}
UISearchController 相關
// 建立
self.searchController = [[UISearchController alloc] initWithSearchResultsController:nil];
// searchBar 的 frame
self.searchController.searchBar.frame = CGRectMake(0, 44, 0, 44);
// 輸入時是否變暗背景
self.searchController.dimsBackgroundDuringPresentation = false;
self.searchController.searchBar.showsCancelButton = YES;  /**< 取消按鈕 */
self.searchController.searchResultsUpdater = self;        /**< 結果更新者 */
self.searchController.active = YES;                       /**< 顯示搜尋結果 */
tableView 相關
self.tableView = [[UITableView alloc] initWithFrame:CGRectMake(0, 20,
    self.view.bounds.size.width, self.view.bounds.size.height - 20)
                                          style:UITableViewStylePlain];
[self.view addSubview:self.tableView];
self.tableView.delegate = self;
self.tableView.dataSource = self;
[self.tableView registerClass:[UITableViewCell class] forCellReuseIdentifier:@"pool"];
// 把 SearchBar 放到 tableView 的表頭
self.tableView.tableHeaderView = self.searchController.searchBar;
UISearchResultsUpdating 協定方法
- (void)updateSearchResultsForSearchController:(UISearchController *)searchController {
    // 初始化存放結果的陣列
    self.arrOfSeachResults = [NSMutableArray array];

    // 取得關鍵字
    NSPredicate *predicate = [NSPredicate predicateWithFormat:@"SELF CONTAINS[c] %@",
                              searchController.searchBar.text];

    // 過濾並存入結果陣列
    self.arrOfSeachResults = [[self.arrOfSeachBoxes filteredArrayUsingPredicate:predicate]
                               mutableCopy];

    [self.tableView reloadData];
}
這裡的 CONTAINS[c] 中,[c] 代表 case-insensitive,也就是不分大小寫;若還想忽略聲調可寫成 [cd]。
tableView 的 dataSource
- (NSInteger)tableView:(UITableView *)tableView numberOfRowsInSection:(NSInteger)section {
    // 正在搜尋時顯示結果筆數
    if (self.searchController.active) {
        return self.arrOfSeachResults.count;
    }
    return self.arrOfSeachBoxes.count;
}

- (UITableViewCell *)tableView:(UITableView *)tableView
         cellForRowAtIndexPath:(NSIndexPath *)indexPath {
    UITableViewCell *cell = [tableView dequeueReusableCellWithIdentifier:@"pool"];

    if (self.searchController.active) {
        // 原始結果字串
        NSString *originResult = self.arrOfSeachResults[indexPath.row];
        // 找出關鍵字位置
        NSRange range = [originResult rangeOfString:self.searchController.searchBar.text];
        // 轉成可操作的富文本
        NSMutableAttributedString *attribute =
            [[NSMutableAttributedString alloc] initWithString:originResult];
        // 加粗
        [attribute addAttribute:NSFontAttributeName
                         value:[UIFont systemFontOfSize:20]
                         range:range];
        // 關鍵字高亮
        [attribute addAttribute:NSForegroundColorAttributeName
                         value:[UIColor redColor]
                         range:range];
        [cell.textLabel setAttributedText:attribute];
    } else {
        cell.textLabel.text = self.arrOfSeachBoxes[indexPath.row];
    }
    return cell;
}
兩個實務上的提醒
1. 上面最後把 cell.textLabel.text 與 setAttributedText: 混用時,記得移除多餘那行——原範例在設定 attributedText 之後又指派了 text,這會把高亮效果整個覆蓋掉。
2. 若關鍵字沒有出現在某筆結果中(例如以 [c] 不分大小寫比對成功,但 rangeOfString 未指定 options 而找不到),range 會是 {NSNotFound, 0},此時對它套用 attribute 會崩潰。建議加上保護:
if (range.location != NSNotFound) {
    // 套用高亮
}
以上就是實作 iOS 搜尋欄與關鍵字高亮的完整流程,有興趣的朋友可以自己動手做一遍,希望對大家有幫助。
- 上一篇文章: IOS 開發:級聯(推薦關注)界面的搭建原理
- 下一篇文章: 淺析 iOS 多視圖滑動點擊切換的封裝