
談談 iOS 中的黏性動畫與果凍效果的實作
在做自訂 PageControl(KYAnimatedPageControl)時,我實作了一組 CALayer 的形變動畫與彈性動畫,效果先過目:
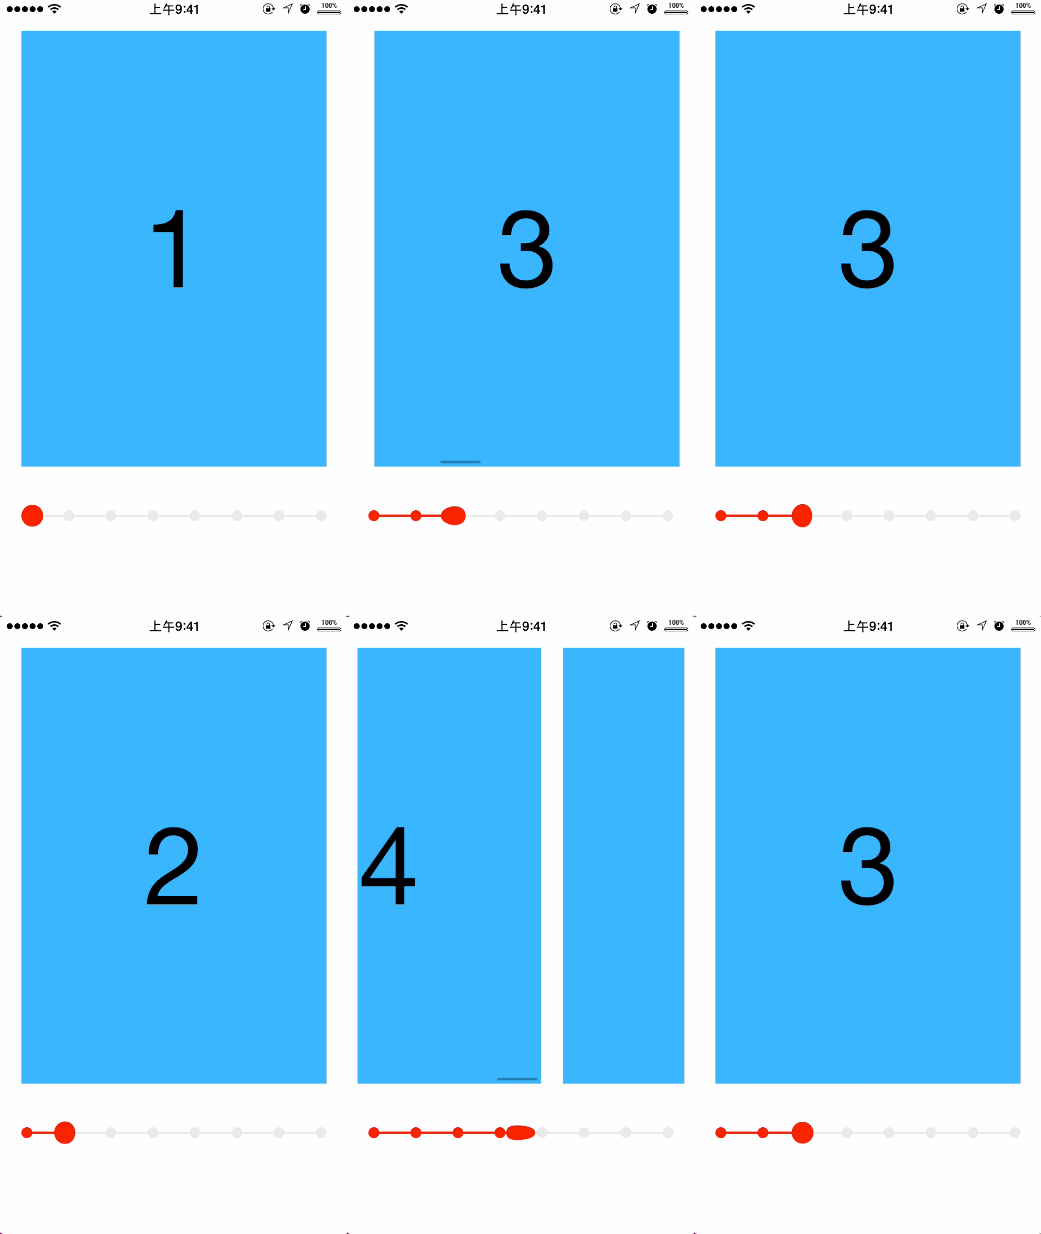
本文分成兩個主題:
- 如何讓 CALayer 發生形變。這個技術在之前的專案 KYCuteView 中就用過,當時寫過一篇簡短的原理說明,今天換個例子再講一次。
- 如何用阻尼振動函數產生 60 個關鍵幀。我也做過類似果凍效果的 KYGooeyMenu,核心技術是 CAKeyframeAnimation 加上幾個手動計算的關鍵幀。但關鍵幀只有幾個,不精確也不夠細膩——你不可能手動設計 60 個關鍵幀。所以今天要談的是:用數學函數把這 60 幀算出來,達到近似
[UIView animateWithDuration:delay:usingSpringWithDamping:initialSpringVelocity:options:animations:completion:]的彈性效果。
一、如何讓 CALayer 發生形變?
關鍵技術其實很單純:用多段貝茲曲線「拼」出這個 Layer。原因不言而喻——只有形狀是由曲線段組成的,我們才有辦法控制它變形。
以 KYAnimatedPageControl 裡那顆小球為例,它實際上是這樣畫出來的:
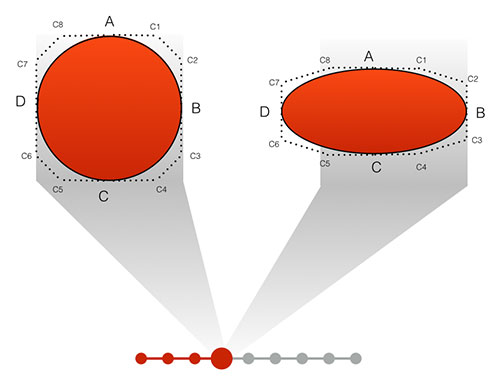
小球由弧 AB、弧 BC、弧 CD、弧 DA 四段組成,每段弧各自綁定兩個控制點:弧 AB 綁定 C1、C2;弧 BC 綁定 C3、C4,依此類推。
如何表達各個點?
A、B、C、D 是四個動點,驅動它們的變量是 ScrollView 的 contentOffset.x。在 scrollViewDidScroll: 中即時取得這個值,並換算成一個 0~1 的係數,取名為 factor:
_factor = MIN(1, MAX(0,
    (ABS(scrollView.contentOffset.x - self.lastContentOffset) /
     scrollView.frame.size.width)));
假設 A、B、C、D 的最大位移距離為小球直徑的 2/5,那麼結合這個係數,真實位移量 extra 就是:
extra = (self.width * 2 / 5) * factor;
當 factor 等於 1 時達到最大形變狀態,此時四點的位移量均為直徑的 2/5。
注意:還要依滑動方向判斷是 B 點移動還是 D 點移動。
CGPoint pointA = CGPointMake(rectCenter.x,
                             self.currentRect.origin.y + extra);

CGPoint pointB = CGPointMake(
    self.scrollDirection == ScrollDirectionLeft
        ? rectCenter.x + self.currentRect.size.width / 2
        : rectCenter.x + self.currentRect.size.width / 2 + extra * 2,
    rectCenter.y);

CGPoint pointC = CGPointMake(rectCenter.x,
                             rectCenter.y + self.currentRect.size.height / 2 - extra);

CGPoint pointD = CGPointMake(
    self.scrollDirection == ScrollDirectionLeft
        ? self.currentRect.origin.x - extra * 2
        : self.currentRect.origin.x,
    rectCenter.y);
控制點怎麼算?
關鍵是求出圖中 A–C1、B–C2、B–C3、C–C4 這些水平與垂直虛線的長度,命名為 offset。經過多次嘗試,我得到的結論是:當 offset 設為直徑除以 3.6 時,弧線能完美貼合成圓弧。我隱約覺得這個 3.6 別有來由,或許與 360 度有關,理論上應該能推導出它的必然性,但我沒有再往下鑽研。
CGPoint c1 = CGPointMake(pointA.x + offset, pointA.y);
CGPoint c2 = CGPointMake(pointB.x, pointB.y - offset);
CGPoint c3 = CGPointMake(pointB.x, pointB.y + offset);
CGPoint c4 = CGPointMake(pointC.x + offset, pointC.y);
CGPoint c5 = CGPointMake(pointC.x - offset, pointC.y);
CGPoint c6 = CGPointMake(pointD.x, pointD.y + offset);
CGPoint c7 = CGPointMake(pointD.x, pointD.y - offset);
CGPoint c8 = CGPointMake(pointA.x - offset, pointA.y);
有了端點與控制點,就能用 UIBezierPath 畫出封閉圖形,並在 CALayer 的 drawInContext: 中填色:
- (void)drawInContext:(CGContextRef)ctx {
    /* 在這裡計算每個點的座標 */

    UIBezierPath *ovalPath = [UIBezierPath bezierPath];
    [ovalPath moveToPoint:pointA];
    [ovalPath addCurveToPoint:pointB controlPoint1:c1 controlPoint2:c2];
    [ovalPath addCurveToPoint:pointC controlPoint1:c3 controlPoint2:c4];
    [ovalPath addCurveToPoint:pointD controlPoint1:c5 controlPoint2:c6];
    [ovalPath addCurveToPoint:pointA controlPoint1:c7 controlPoint2:c8];
    [ovalPath closePath];

    CGContextAddPath(ctx, ovalPath.CGPath);
    CGContextSetFillColorWithColor(ctx, self.indicatorColor.CGColor);
    CGContextFillPath(ctx);
}
完成後,滑動 ScrollView 時小球就會隨之形變。
二、用阻尼振動函數產生 60 個關鍵幀
上面那套做法有一個前提:ScrollView 的 contentOffset.x。沒有這個輸入,什麼都不會發生。但這個值來自使用者的觸摸與滑動——在某些動畫場景中使用者並沒有直接輸入,例如手指離開後要讓小球以果凍效果彈回初始狀態,此時手指已經離開螢幕,也就沒有 offset 可用。這時就必須換成 CAAnimation。
iOS 7 在 UIView 中加入了一個製作彈性動畫的工廠方法:
+ (void)animateWithDuration:(NSTimeInterval)duration
                      delay:(NSTimeInterval)delay
    usingSpringWithDamping:(CGFloat)dampingRatio
     initialSpringVelocity:(CGFloat)velocity
                    options:(UIViewAnimationOptions)options
                 animations:(void (^)(void))animations
                 completion:(void (^)(BOOL finished))completion;
但 CALayer 這邊長期沒有對應的 CAAnimation 子類——不像 CABasicAnimation 或 CAKeyframeAnimation 那樣能直接套用。好消息是 iOS 9 補上了公開的 CASpringAnimation;但基於相容舊版本的考量,以及把原理弄清楚的價值,我們還是來看看如何手動做一個。
這裡需要一點高中物理——阻尼振動:
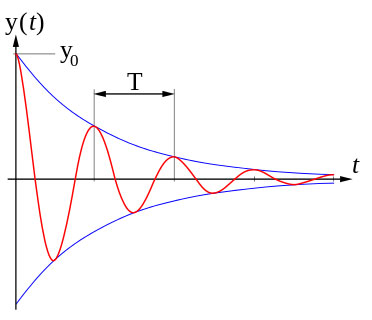
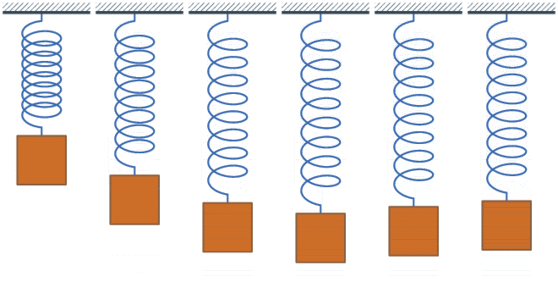
根據維基百科,振動函數的通式如下:

但這只是通式。我們需要圖像過原點 (0, 0),並且最終衰減收斂到 1。做法是把原圖像先繞 X 軸翻轉 180 度(加一個負號),再沿 Y 軸向上平移一個單位,稍加變形後得到:

想看圖形?推薦 Desmos 這個線上函數作圖網站,把 1-(e^(-5x) * cos(30x)) 貼進去就能看到:
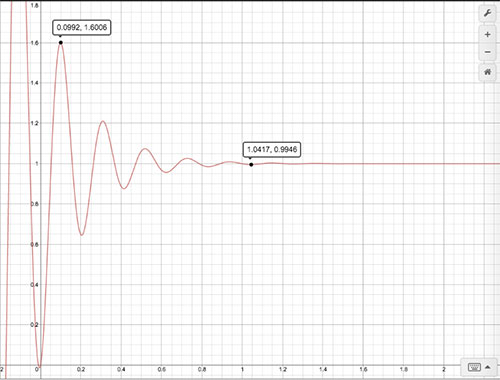
完美滿足「過原點、震盪衰減到 1」兩個條件。式中 5 相當於阻尼係數,數值越小幅度越大;30 相當於震盪頻率,數值越大震盪次數越多。這兩個參數正好對應日後要暴露給呼叫方的 damping 與 velocity。
轉成程式碼
整體思路是產生 60 幀關鍵幀(螢幕最高刷新率就是 60 FPS),再交給 CAKeyframeAnimation 的 values 屬性:
+ (NSMutableArray *)animationValues:(id)fromValue
                            toValue:(id)toValue
             usingSpringWithDamping:(CGFloat)damping
              initialSpringVelocity:(CGFloat)velocity
                           duration:(CGFloat)duration {

    // 60 個關鍵幀
    NSInteger numOfPoints = duration * 60;
    NSMutableArray *values = [NSMutableArray arrayWithCapacity:numOfPoints];
    for (NSInteger i = 0; i < numOfPoints; i++) {
        [values addObject:@(0.0)];
    }

    // 差值
    CGFloat d_value = [toValue floatValue] - [fromValue floatValue];

    for (NSInteger point = 0; point < numOfPoints; point++) {
        CGFloat x = (CGFloat)point / (CGFloat)numOfPoints;
        // y = 1 - e^(-5x) * cos(30x)
        CGFloat value = [toValue floatValue]
                      - d_value * (pow(M_E, -damping * x) * cos(velocity * x));
        values[point] = @(value);
    }
    return values;
}
接著對外提供一個類方法,直接回傳現成的 CAKeyframeAnimation:
+ (CAKeyframeAnimation *)createSpring:(NSString *)keypath
                             duration:(CFTimeInterval)duration
               usingSpringWithDamping:(CGFloat)damping
                initialSpringVelocity:(CGFloat)velocity
                            fromValue:(id)fromValue
                              toValue:(id)toValue {
    CAKeyframeAnimation *anim = [CAKeyframeAnimation animationWithKeyPath:keypath];
    NSMutableArray *values =
        [KYSpringLayerAnimation animationValues:fromValue
                                        toValue:toValue
                         usingSpringWithDamping:damping * dampingFactor
                          initialSpringVelocity:velocity * velocityFactor
                                       duration:duration];
    anim.values = values;
    anim.duration = duration;
    return anim;
}
另一個關鍵:values 對誰生效?
這些 values 究竟是作用在什麼對象上?如果你熟悉 Core Animation,答案很明確:作用在傳入的 keyPath 上。而這些 keyPath 其實就是 CALayer 的屬性。之所以傳入 transform.rotation.x 時 layer 會旋轉,就是因為 CAKeyframeAnimation 發現 CALayer 有個叫 transform 的屬性。
那麼很自然地可以想到:既然我們想改變的是主題一裡的那個 factor 變量,只要給 CALayer 補一個名為 factor 的屬性就好了。動畫掛上去之後,CAKeyframeAnimation 會把 60 幀不同的值逐一套用給 factor:
CAKeyframeAnimation *anim =
    [KYSpringLayerAnimation createSpring:@"factor"
                                duration:0.8
                  usingSpringWithDamping:0.5
                   initialSpringVelocity:3
                               fromValue:@(1)
                                 toValue:@(0)];
self.factor = 0;
[self addAnimation:anim forKey:@"restoreAnimation"];
最後一步:雖然 factor 已經被即時改變,但螢幕不會自動重繪,必須明確告訴系統何時該刷新:
+ (BOOL)needsDisplayForKey:(NSString *)key {
    if ([key isEqual:@"factor"]) {
        return YES;
    }
    return [super needsDisplayForKey:key];
}
最後的最後,別忘了改寫 initWithLayer:,把前一個狀態的所有屬性複製過來,動畫才能無縫銜接:
- (id)initWithLayer:(GooeyCircle *)layer {
    self = [super initWithLayer:layer];
    if (self) {
        self.indicatorSize = layer.indicatorSize;
        self.indicatorColor = layer.indicatorColor;
        self.currentRect = layer.currentRect;
        self.lastContentOffset = layer.lastContentOffset;
        self.scrollDirection = layer.scrollDirection;
        self.factor = layer.factor;
    }
    return self;
}
總結
做自訂動畫最關鍵的一件事,就是要有變量、要有輸入。
滑動 ScrollView 時,滑動距離就是動畫的輸入,可以當作變量;而當沒有使用者互動時,就改用 CAAnimation。其實 CAAnimation 底層就是個計時器,計時器的作用正是持續產生變量——時間本身就是變量,於是有了持續變化的輸入,也就有了連續變化的狀態,把它們串起來,就是動畫。
理解這一點之後,你會發現 Core Animation 並不神秘:動畫 = 一個會變的數字 + 一個把它畫出來的機會。形變與彈性只是同一個原理的兩種輸入來源而已。